Secret Management (Vault)
HashiCorp Vault is used as Secret Management solution for Raspberry PI cluster. All cluster secrets (users, passwords, api tokens, etc) will be securely encrypted and stored in Vault.
Vault will be deployed as an external service, not running as a Kubernetes service, so it can be used by GitOps solution, ArgoCD/FluxCD, to deploy automatically all cluster services.
Vault could be installed as Kubernetes service, deploying it using an official Helm Chart or a community operator like Bank-Vaults - Vault Operator.
Installing Vault as Kubernetes service will drive us to a chicken/egg situation if we want to use Vault as only source of secrets/credentials for all Kubernetes services deployed. Vault requires to have Block storage solution (Longhorn) deployed first since its POD needs Persistent Volumes, and to install Longhorn, a few secrets need to be provided to configure its backup (Minio credentials).
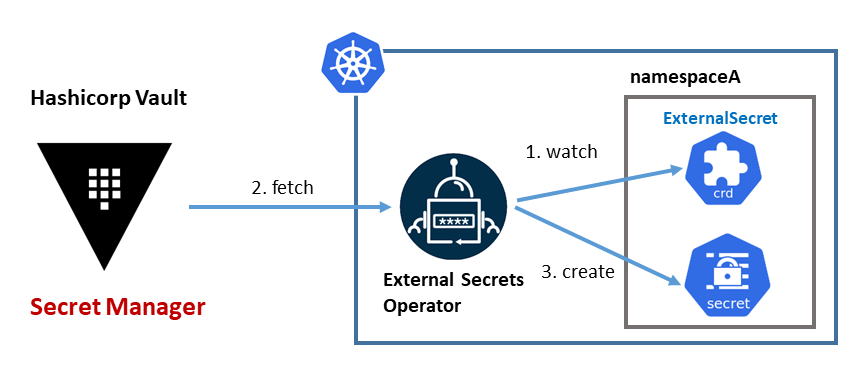
External Secrets Operator will be used to automatically generate the Kubernetes Secrets from Vault data that is needed to deploy the different services using FluxCD/ArgoCD.
Vault installation
Vault installation and configuration tasks have been automated with Ansible developing a role: ricsanfre.vault. This role, installs Vault Server, initialize it and install a systemd service to automatically unseal it whenever vault server is restarted.
Vault installation from binaries
Instead of installing Vault using official Ubuntu packages, installation will be done manually from binaries, so the version to be installed can be decided.
-
Step 1. Create vault’s UNIX user/group
vault user is a system user, not login allowed
sudo groupadd vault sudo useradd vault -g vault -r -s /sbin/nologin -
Step 2. Create vault’s storage directory
sudo mkdir /var/lib/vault chown -R vault:vault /var/lib/vault chmod -R 750 /var/lib/vault -
Step 3. Create vault’s config directories
sudo mkdir -p /etc/vault sudo mkdir -p /etc/vault/tls sudo mkdir -p /etc/vault/policy sudo mkidr -p /etc/vault/plugin chown -R vault:vault /etc/vault chmod -R 750 /etc/vault -
Step 4: Create vault’s log directory
sudo mkdir /var/log/vault chown -R vault:vault /var/log/vault chmod -R 750 /var/log/vault -
Step 5. Download server binary (
vault) and copy them to/usr/local/binwget https://releases.hashicorp.com/vault/<version>/vault_<version>_linux_<arch>.zip unzip vault_<version>_linux_<arch>.zip chmod +x vault sudo mv vault /usr/local/bin/.where
<arch>is amd64 or arm64, and<version>is vault version (for example: 1.12.2). -
Step 6. Create Vault TLS certificate
In case you have your own domain, a trusted TLS certificate signed by Letsencrypt can be obtained for Vault server, using Certbot.
See certbot installation instructions in TLS Certiciates (CertBot). Those instructions indicate how to install certbot using DNS challenge with IONOS DNS provider (my DNS provider). Similar procedures can be followed for other DNS providers.
Letsencrypt using HTTP challenge is avoided for security reasons (cluster services are not exposed to public internet).
If generating trusted TLS certificate is not possible, selfsigned certificates with a custom CA can be used instead.
Follow this procedure for creating a self-signed certificate for Vault Server
-
Create a self-signed CA key and self-signed certificate
openssl req -x509 \
        -sha256 \
        -nodes \
        -newkey rsa:4096 \
        -subj "/CN=My CA" \
        -keyout rootCA.key -out rootCA.crt
Note:
The one created during Minio installation can be re-used.
-
Create a TLS certificate for Vault server signed using the custom CA
-
Create key
openssl genrsa -out vault.key 4096 -
Create a file named
openssl.confwith the content below. SetIP.1and/orDNS.1to point to the correct IP/DNS addresses:[req] distinguished_name = req_distinguished_name x509_extensions = v3_req prompt = no [req_distinguished_name] C = ES ST = Madrid L = Somewhere O = MyOrg OU = MyOU CN = MyServerName [v3_req] subjectAltName = @alt_names [alt_names] IP.1 = 127.0.0.1 DNS.1 = vault.mydomain.comRun
opensslby specifying the configuration file and enter a passphrase if prompted:openssl req -new -nodes -key vault.key -out vault.csr -config openssl.conf -
Verify the csr’s content
openssl req -in vault.csr -noout -text -
Generate the certificate using the vault csr and key along with the CA Root key
openssl x509 -req -in vault.csr \ -extfile openssl.conf -extensions v3_req \ -CA rootCA.crt -CAkey rootCA.key -CAcreateserial \ -out vault.crt -days 500 -sha256 -
Verify the certificate
openssl x509 -in vault.crt -text -noout
-
Once the certificate is created, public certificate and private key need to be installed in Vault server following this procedure:
-
Copy public certificate
vault.crtas/etc/vault/tls/vault.crtsudo cp vault.crt /etc/vault/tls/vault.crt sudo chown vault:vault /etc/vault/tls/vault.crt -
Copy private key
vault.keyas/etc/vault/tls/vault.keycp vault.key /etc/vault/tls/vault.key sudo chown vault:vault /etc/vault/tls/vault.key -
Copy CA certificate
rootCA.crtas/etc/vault/tls/vault-ca.crtNote:
This step is only needed if using selfsigned certificate.
cp rootCA.crt /etc/vault/tls/vault-ca.crt
sudo chown vault:vault /etc/vault/tls/vault-ca.crt
-
-
Step 7: Create vault config file
/etc/vault/vault_main.hclcluster_addr = "https://<node_ip>:8201" api_addr = "https://<node_ip>:8200" plugin_directory = "/etc/vault/plugin" disable_mlock = true listener "tcp" { address = "0.0.0.0:8200" tls_cert_file = "/etc/vault/tl/vault.crt" tls_key_file = "/etc/vault/tls/vault.key" tls_disable_client_certs = true } storage "raft" { path = /var/lib/vault }Vault is configured, as a single node of HA cluster, with the following parameters:
- Node’s URL address to be used in internal communications between nodes of the cluster. (
cluster_addrandapi_addr) - Vault server API listening in all node’s addresses at port 8200: (
listener "tcp" address=0.0.0.0:8200) - TLS certifificates are stored in
/etc/vault/tls - Client TLS certificates validation is disabled (
tls_disable_client_certs) - Vault is configured to use integrated storage Raft data dir
/var/lib/vault - Disables the server from executing the mlock syscall (
disable_mlock) recommended when using Raft storage
- Node’s URL address to be used in internal communications between nodes of the cluster. (
-
Step 8. Create systemd vault service file
/etc/systemd/system/vault.service[Unit] Description="HashiCorp Vault - A tool for managing secrets" Documentation=https://www.vaultproject.io/docs/ Requires=network-online.target After=network-online.target ConditionPathExists=/etc/vault/vault_main.hcl [Service] User=vault Group=vault ProtectSystem=full ProtectHome=read-only PrivateTmp=yes PrivateDevices=yes SecureBits=keep-caps Capabilities=CAP_IPC_LOCK+ep AmbientCapabilities=CAP_SYSLOG CAP_IPC_LOCK CapabilityBoundingSet=CAP_SYSLOG CAP_IPC_LOCK NoNewPrivileges=yes ExecStart=/bin/sh -c 'exec /vault server -config=/etc/vault/vault_main.hcl -log-level=info' ExecReload=/bin/kill --signal HUP $MAINPID KillMode=process KillSignal=SIGINT Restart=on-failure RestartSec=5 TimeoutStopSec=30 StartLimitInterval=60 StartLimitBurst=3 LimitNOFILE=524288 LimitNPROC=524288 LimitMEMLOCK=infinity LimitCORE=0 [Install] WantedBy=multi-user.targetNote:
This systemd configuration is the one that official vault ubuntu’s package installs.
This service start vault server using vault UNIX group and executing the following startup command:
/usr/local/vault server -config=/etc/vault/vault_main.hcl -log-level=info -
Step 9. Enable vault systemd service and start it
sudo systemctl enable vault.service sudo systemctl start vault.service -
Step 10. Check vault server status
export VAULT_ADDR=https://<vault_ip>:8200
export VAULT_CACERT=/etc/vault/tls/vault-ca.crt

vault status
The output should be like the following
Key                Value
---                -----
Seal Type          shamir
Initialized        false
Sealed             true
Total Shares       0
Threshold          0
Unseal Progress    0/0
Unseal Nonce       n/a
Version            1.12.2
Build Date         2022-11-23T12:53:46Z
Storage Type       raft
HA Enabled         true
It shows Vault server status as not initialized (Initialized = false) and sealed (Sealed = true).
Note:
VAULT_CACERT variable is only needed if Vault’s TLS certificate is signed using custom CA. This will be used by vault client to validate Vault’s certificate.
Vault initialization and useal
During initialization, Vault generates a root key, which is stored in the storage backend alongside all other Vault data. The root key itself is encrypted and requires an unseal key to decrypt it.
Unseal process, where uneal keys are provided to rebuid the root key, need to be completed every time vault server is started.
The default Vault configuration uses Shamir’s Secret Sharing to split the root key into a configured number of shards (referred as key shares, or unseal keys). A certain threshold of shards is required to reconstruct the root key, which is then used to decrypt the Vault’s encryption key.
To initialize vault vault operator init command must be used.
vault operator init -key-shares=1 -key-threshold=1 -format=json > /etc/vault/unseal.json
where number of key shares (-key-shares) and threshold (-key-threshold) is set to 1. Only one key is needed to unseal vault.
The vault init command output is redirected to a file (/etc/vault/unseal.json) containing unseal keys values and root token needed to connect to vault.
{
  "unseal_keys_b64": [
    "UEDYFGa/oVUehw5eflXt2mdoE8zJD3QVub8b++rNCm8="
  ],
  "unseal_keys_hex": [
    "5040d81466bfa1551e870e5e7e55edda676813ccc90f7415b9bf1bfbeacd0a6f"
  ],
  "unseal_shares": 1,
  "unseal_threshold": 1,
  "recovery_keys_b64": [],
  "recovery_keys_hex": [],
  "recovery_keys_shares": 0,
  "recovery_keys_threshold": 0,
  "root_token": "hvs.AJxt0CgXT9BcVe5dMNeI0Unm"
}
vault status shows Vault server initialized but sealed
vault status
Key                Value
---                -----
Seal Type          shamir
Initialized        true
Sealed             true
Total Shares       1
Threshold          1
Unseal Progress    0/1
Unseal Nonce       n/a
Version            1.12.2
Build Date         2022-11-23T12:53:46Z
Storage Type       raft
HA Enabled         true
To unseal vault, the vault operator unseal command needs to be executed, providing unseal keys generated during initialization process.
Using the key stored in unseal.json file the following command can be executed:
vault operator unseal $(jq -r '.unseal_keys_b64[0]' /etc/vault/unseal.json)
vault status shows Vault server initialized and unsealed
vault status
Key                Value
---                -----
Seal Type          shamir
Initialized        true
Sealed             true
Total Shares       1
Threshold          1
Unseal Progress    0/1
Unseal Nonce       n/a
Version            1.12.2
Build Date         2022-11-23T12:53:46Z
Storage Type       raft
HA Enabled         true
Vault automatic unseal
A systemd service can be created to automatically unseal vault every time it is started.
-
Step 1: Create a script (
/etc/vault/vault-unseal.sh) for automating the unseal process using the keys stored in/etc/vault/unseal.json#!/usr/bin/env sh #Define a timestamp function timestamp() { date "+%b %d %Y %T %Z" } URL=https://<vault_dns>:8200 KEYS_FILE=/etc/vault/unseal.json LOG=info SKIP_TLS_VERIFY=true if [ true = "$SKIP_TLS_VERIFY" ] then CURL_PARAMS="-sk" else CURL_PARAMS="-s" fi # Add timestamp echo "$(timestamp): Vault-useal started" | tee -a $LOG echo "-------------------------------------------------------------------------------" | tee -a $LOG initialized=$(curl $CURL_PARAMS $URL/v1/sys/health | jq '.initialized') if [ true = "$initialized" ] then echo "$(timestamp): Vault already initialized" | tee -a $LOG while true do status=$(curl $CURL_PARAMS $URL/v1/sys/health | jq '.sealed') if [ true = "$status" ] then echo "$(timestamp): Vault Sealed. Trying to unseal" | tee -a $LOG # Get keys from json file for i in `jq -r '.keys[]' $KEYS_FILE` do curl $CURL_PARAMS --request PUT --data "{\"key\": \"$i\"}" $URL/v1/sys/unseal done sleep 10 else echo "$(timestamp): Vault unsealed" | tee -a $LOG break fi done else echo "$(timestamp): Vault not initialized yet" fi -
Step 2: Create systemd vault service file
/etc/systemd/system/vault-unseal.service[Unit] Description=Vault Unseal After=vault.service Requires=vault.service PartOf=vault.service [Service] Type=oneshot User=vault Group=vault ExecStartPre=/bin/sleep 10 ExecStart=/bin/sh -c '/etc/vault/vault-unseal.sh' RemainAfterExit=false [Install] WantedBy=multi-user.target vault.serviceThis service is defined as part of vault.service (
PartOf), so stopping/starting vault.service is propagated to this service. -
Step 3. Enable vault systemd service and start it
sudo systemctl enable vault-unseal.service
sudo systemctl start vault-unseal.service
Vault configuration
Once vault is unsealed following configuration requires to provide vault’s root token generated during initialization procces. See root_token in unseal.json output.
export VAULT_TOKEN=$(jq -r '.root_token' /etc/vault/unseal.json)
Note:
As an alternative to vault commands, API can be used. See Vault API documentation
curl command can be used. Vault token need to be provider as a HTTP header X-Vault-Token
Get request
curl -k -H "X-Vault-Token: $VAULT_TOKEN" $VAULT_ADDR/<api_endpoint>
Post request
curl -k -x POST -H "X-Vault-Token: $VAULT_TOKEN" -d '{"key1":"value1", "key2":"value2"}' $VAULT_ADDR/<api_endpoint>
Enabling KV secrets
Enable KV (KeyValue) secrets engine to manage static secrets.
vault secrets enable -version=2 -path=secret kv
This command enables KV version 2 at path /secret
Vault policies
Create vault policies to read and read/write KV secrets
-
Read-write policy
Create file
/etc/vault/policy/secrets-write.hclpath "secret/*" { capabilities = [ "create", "read", "update", "delete", "list", "patch" ] }Add policy to vault
vault policy write readwrite /etc/vault/policy/secrets-readwrite.hcl -
Read-only policy
Create file
/etc/vault/policy/secrets-read.hclpath "secret/*" { capabilities = [ "read" ] }Add policy to vault
vault policy write readonly /etc/vault/policy/secrets-read.hcl
Testing policies:
-
Generate tokens for read and write policies
READ_TOKEN=$(vault token create -policy="readonly" -field=token) WRITE_TOKEN=$(vault token create -policy="readwrite" -field=token) -
Try write a secret using read token
VAULT_TOKEN=$READ_TOKEN
vault kv put secret/secret1 user="user1" password="s1cret0"
Permission denied error:
Code: 403. Errors: * 1 error occurred: * permission denied -
Try write a secret using write token
VAULT_TOKEN=$WRITE_TOKEN
vault kv put secret/secret1 user="user1" password="s1cret0"
The secret is stored with success:
=== Secret Path === secret/data/secret1 ======= Metadata ======= Key Value --- ----- created_time 2023-01-02T11:04:21.01853116Z custom_metadata <nil> deletion_time n/a destroyed false version 1 -
Secret can be read using both tokens
vault kv get secret/secret1=== Secret Path === secret/data/secret1 ======= Metadata ======= Key Value --- ----- created_time 2023-01-02T11:04:21.01853116Z custom_metadata <nil> deletion_time n/a destroyed false version 1 ====== Data ====== Key Value --- ----- password s1cret0 user user1
External Vault - Kubernetes Integration
Using Vault Agent Injector and Vault CSI Provider are two different ways to make secrets available to Pods running in a Kubernetes Cluster. See details in https://developer.hashicorp.com/vault/docs/deploy/kubernetes/injector-csi. This two components can be installed using Vault Helm chart. Using Vault helm chart, a Vault server running as a Kubernetes service can be deployed or only Vault Agent Injector and CSI Provider can be deployed using a external Vault Server.
As an alternative External Secrets Operator can be used to automatically synchronize Vault secrets and Kubernetes Secrets.
In both cases, Vault kubernetes auth method need to be configured so Kubernetes Service Accounts can be used to authenticate against Vault.
For details about configuring External Vault see the guide Integrate Kubernetes with an external Vault cluster
Configure Kubernetes Auth Method (Not using Vault Helm Chart)
Enabling Vault kubernetes auth method to authenticate with Vault using a Kubernetes Service Account Token. This method of authentication makes it easy to introduce a Vault token into a Kubernetes Pod.
-
Step 1. Create
vaultnamespacekubectl create namespace vault -
Step 2. Create service account
vault-authto be used by Vault kubernetes authentication--- apiVersion: v1 kind: ServiceAccount metadata: name: vault-auth namespace: vault -
Step 3. Add proper permissions to service account
Vault kubernetes authentication method accesses the Kubernetes TokenReview API to validate the provided JWT is still valid. Service Accounts used in this auth method will need to have access to the TokenReview API. If Kubernetes is configured to use RBAC roles, the Service Account should be granted permissions to access this API. Check more details in Vault - Kubernetes Auth Method
--- apiVersion: rbac.authorization.k8s.io/v1 kind: ClusterRoleBinding metadata: name: role-tokenreview-binding namespace: vault roleRef: apiGroup: rbac.authorization.k8s.io kind: ClusterRole name: system:auth-delegator subjects: - kind: ServiceAccount name: vault-auth namespace: vault -
Step 4. Create long-lived token for vault-auth service account. From Kubernetes v1.24, secrets contained long-lived tokens associated to service accounts are not longer created. See how to create it in Kubernetes documentation
apiVersion: v1 kind: Secret type: kubernetes.io/service-account-token metadata: name: vault-auth-secret namespace: vault annotations: kubernetes.io/service-account.name: vault-auth -
Step 5. Get Service Account token
KUBERNETES_SA_SECRET_NAME=$(kubectl get secrets --output=json -n vault | jq -r '.items[].metadata | select(.name|startswith("vault-auth")).name') TOKEN_REVIEW_JWT=$(kubectl get secret $KUBERNETES_SA_SECRET_NAME -n vault -o jsonpath='{.data.token}' | base64 --decode) -
Step 6. Get Kubernetes CA cert and API URL
# Get Kubernetes CA kubectl config view --raw --minify --flatten --output='jsonpath={.clusters[].cluster.certificate-authority-data}' | base64 --decode > k3s_ca.crt # Get Kubernetes Url KUBERNETES_HOST=$(kubectl config view -o jsonpath='{.clusters[].cluster.server}') -
Step 7. Enable Kubernetes auth method
vault auth enable kubernetesOr using Vault API
curl -k --header "X-Vault-Token:$VAULT_TOKEN" --request POST\ --data '{"type":"kubernetes","description":"kubernetes auth"}' \ https://${VAULT_SERVER}:8200/v1/sys/auth/kubernetes -
Step 8. Configure Vault kubernetes auth method
vault write auth/kubernetes/config  \
  token_reviewer_jwt="${TOKEN_REVIEW_JWT}" \
  kubernetes_host="${KUBERNETES_HOST}" \
  kubernetes_ca_cert=@k3s_ca.crt
  disable_iss_validation=true
Or using Vault API:
KUBERNETES_CA_CERT=$(kubectl config view --raw --minify --flatten --output='jsonpath={.clusters[].cluster.certificate-authority-data}' | base64 --decode | awk 'NF {sub(/\r/, ""); printf "%s\\n",$0;}')

curl --cacert /etc/vault/tls/vault_ca.pem --header "X-Vault-Token:$VAULT_TOKEN" --request POST --data '{"kubernetes_host": "'"$KUBERNETES_HOST"'", "kubernetes_ca_cert":"'"$KUBERNETES_CA_CERT"'", "token_reviewer_jwt":"'"$TOKEN_REVIEW_JWT"'"}' https://${VAULT_SERVER}:8200/v1/auth/kubernetes/config
Configure Kubernetes Auth Method (Using Vault Helm Chart)
The Vault Helm chart is able to install only the Vault Agent Injector service.
-
Step 1: Add the HashiCorp Helm repository.
$ helm repo add hashicorp https://helm.releases.hashicorp.com "hashicorp" has been added to your repositories -
Step 2: Update all the repositories to ensure
helmis aware of the latest versions.$ helm repo update Hang tight while we grab the latest from your chart repositories... ...Successfully got an update from the "hashicorp" chart repository Update Complete. ⎈Happy Helming!⎈ - Step 3: Create vault namespace
kubectl create namespace vault - Step 4: Create helm chart values file:
vault-values.yamlglobal: # External vault server address for the injector and CSI provider to use. # Setting this will disable deployment of a vault server. externalVaultAddr: "${VAULT_ADDR}" # Create Service Account an long-lived token for enabling Kubernetes Auth Method server: # authDelegator enables a cluster role binding to be attached to the service # account. This cluster role binding can be used to setup Kubernetes auth # method. See https://developer.hashicorp.com/vault/docs/auth/kubernetes authDelegator: enabled: true serviceAccount: # Specifies whether a service account should be created create: true # The name of the service account to use. # If not set and create is true, a name is generated using the fullname template name: vault-auth # Create a Secret API object to store a non-expiring token for the service account. # Prior to v1.24.0, Kubernetes used to generate this secret for each service account by default. # Kubernetes now recommends using short-lived tokens from the TokenRequest API or projected volumes instead if possible. # For more details, see https://kubernetes.io/docs/concepts/configuration/secret/#service-account-token-secrets # serviceAccount.create must be equal to 'true' in order to use this feature. createSecret: trueNote: Substitute variables in the above yaml (
${var}) file before deploying helm chart.- Replace
${VAULT_ADDR}by the URL of the external Vault (i.e: https://vault.mydomain.com:8200)
</div>
With this configuration service account (
vault-auth) and its long-lived token is created. Also ClusterRoleBinding is created. Resources created in Steps 2 to 4 in the previous procedure ([[#Configure Kubernetes Auth Method (Not using Vault Helm Chart)]]) are automatically created by Helm Chart. - Replace
-
Step 5: Install the latest version of the Vault server running in external mode.
$ helm upgrade --install --namespace=vault vault hashicorp/vault -f vault-values.yam -
Step 6: Check Vault Agent injector has started The Vault Agent Injector pod is deployed in
vaultnamespace.kubectl get pods -n vault NAME READY STATUS RESTARTS AGE vault-agent-injector-64b5d5dc99-ppz9k 1/1 Running 0 13m - Step 7: Configure Kubernetes Auth method in external Vault, following steps 5 to 8 of [[#Configure Kubernetes Auth Method (Not using Vault Helm Chart)]]
Observability
Metrics
Vault provides rich operational telemetry metrics that you can consume with popular solutions for monitoring and alerting on key operational conditions.
Prometheus Integration
Vault can be configured to expose Metrics in Prometheus-compliant format:
Following lines need to be added to Vault config file
telemetry {
  disable_hostname = true
  prometheus_retention_time = "12h"
}
Querying /v1/sys/metrics with one of the following headers:
will return Prometheus formatted results.
A Vault token is required with capabilities = ["read", "list"] to /v1/sys/metrics. The Prometheus bearer_token or bearer_token_file options must be added to the scrape job.
Vault does not use the default Prometheus path, so Prometheus must be configured to scrape v1/sys/metrics instead of the default scrape path.
Following curl command can be used for testing Prometheus endpoint.
curl -k -H "X-Vault-Token: $VAULT_TOKEN" -H "Accept: prometheus/telemetry" https://vault.homelab.ricsanfre.com:8200/v1/sys/metrics
Before using it, valid token need to be extracted
export VAULT_TOKEN=$(jq -r '.root_token' /etc/vault/unseal.json)
-
Step 1: Deploy Vault Agent Injestor using Vault Helm chart and configure Kubernetes Vault auth. See above section Configure Kubernetes Auth Method using Vault Helm Chart
This will deploy Vault Agent Injector in
vaultnamespace, which will inject Vault Agent into Prometheus pod. -
Step 2: Creating Vault policy for Prometheus, granting access to metrics endpoint
vault policy write prometheus-monitoring - << EOF path "/sys/metrics" { capabilities = ["read", "list"] } EOF -
Step 3: Attach the policy to the existing
kube-prometheus-stack-prometheusServiceAccount used by the Prometheus podvault write auth/kubernetes/role/prometheus \ bound_service_account_names=kube-prometheus-stack-prometheus \ bound_service_account_namespaces=kube-prom-stack \ policies="default,prometheus-monitoring" \ ttl="15m" -
Step 4: Annotate Prometheus Pod, add following values to Kube-prom-stack, so Prometheus POD is automatically injected with Vault Agent
prometheus:
  prometheusSpec:
    podMetadata:
      annotations:
        vault.hashicorp.com/agent-inject: "true"
        vault.hashicorp.com/agent-init-first: "true"
        vault.hashicorp.com/agent-inject-token: "true"
        vault.hashicorp.com/role: "prometheus"
        # Using self-signed certificates, so we need to skip TLS verification
        vault.hashicorp.com/tls-skip-verify: "true"
        # Run agent as group 2000, same group used by Prometheus process. Grant read access to token file.
        vault.hashicorp.com/agent-run-as-group: "2000"
Prometheus POD have access to Vault Token at path
/vault/secrets/tokenfile. -
Step 5: Configure Prometheus monitoring to Scrape Vault using token. Add following to Kube-prom-stack helm chart values file:
prometheus:
  prometheusSpec:
    additionalScrapeConfigs:
    - job_name: vault
      metrics_path: /v1/sys/metrics
      params:
        format: ['prometheus']
      scheme: https
      authorization:
        credentials_file: /vault/secrets/token
      static_configs:
      - targets: [vault.domain.com:8200]
Prometheus Operator’s ScrapeConfig CRD does not support to provide the credentials using a file (
credentials_fileoption is not supported), so vault scrape configuration is hardcoded into Prometheus CRD asadditionalScrapeConfigs
Grafana Dashboards
See Grafana Operator - Provisioning Dashboards for the general GrafanaDashboard onboarding patterns.
Vault dashboard sample can be downloaded from Grafana jsonnet libraries repo: vault-mixin.
The dashboard can be onboarded with a GrafanaDashboard resource:
apiVersion: grafana.integreatly.org/v1beta1
kind: GrafanaDashboard
metadata:
  name: vault
spec:
  allowCrossNamespaceImport: true
  folder: Infrastructure
  instanceSelector:
    matchLabels:
      dashboards: grafana
  url: https://raw.githubusercontent.com/grafana/jsonnet-libs/refs/heads/master/vault-mixin/dashboards/vault.json
External Secrets Operator installation
External Secrets Operator is installed through its helm chart.
- Step 1: Add External sercrets repository:
helm repo add external-secrets https://charts.external-secrets.io - Step 2: Fetch the latest charts from the repository:
helm repo update - Step 3: Create namespace
kubectl create namespace external-secrets - Step 4: Install helm chart
helm install external-secrets \ external-secrets/external-secrets \ -n external-secrets \ --set installCRDs=true -
Step 5: Create external secrets vault role. Applying read policy
vault write auth/kubernetes/role/external-secrets \
  bound_service_account_names=external-secrets \
  bound_service_account_namespaces=external-secrets \
  audience=https://kubernetes.default.svc.cluster.local \
  policies=readonly \
  ttl=24h
Or using the Vault API
curl -k --header "X-Vault-Token:$VAULT_TOKEN" --request POST \
  --data '{ "bound_service_account_names": "external-secrets", "bound_service_account_namespaces": "external-secrets", "audience": "https://kubernetes.default.svc.cluster.local", "policies": ["readonly"], "ttl" : "24h"}' \
  https://${VAULT_SERVER}:8200/v1/auth/kubernetes/role/external-secrets
Note:
Vault 1.21+ requires roles to define an
audience. The audience configured in the Vault role must match the audience requested by External Secrets Operator inClusterSecretStore. -
Step 6: Create Cluster Secret Store
apiVersion: external-secrets.io/v1
kind: ClusterSecretStore
metadata:
  name: vault-backend
  namespace: external-secrets
spec:
  provider:
    vault:
      server: "https://${VAULT_SERVER}:8200"
      # caBundle needed if vault TLS is signed using a custom CA.
      # If Vault TLS is valid signed by Letsencrypt this is not needed?
      # ca cert base64 encoded and remobed '\n' characteres"
      # <vault-ca> =`cat vault-ca.pem | base64 | tr -d "\n"`
      # caBundle: <vault-ca>
      path: "secret"
      version: "v2"
      auth:
        kubernetes:
          mountPath: "kubernetes"
          role: "external-secrets"
          serviceAccountRef:
            name: "external-secrets"
            namespace: "external-secrets"
            audiences:
              - "https://kubernetes.default.svc.cluster.local"
Note:
Substitute variables (
${var}) in the above yaml file before deploying mangifest file.- Replace
${VAULT_SERVER}by FQDN of the vault server (i.e.vault.homelab.com)
Check ClusterSecretStore status
kubectl get clustersecretstore -n external-secrets NAME AGE STATUS CAPABILITIES READY vault-backend 10m Valid ReadWrite True - Replace
-
Step 7: Create External secret
apiVersion: external-secrets.io/v1
kind: ExternalSecret
metadata:
  name: vault-example
spec:
  secretStoreRef:
    name: vault-backend
    kind: ClusterSecretStore
  target:
    name: mysecret
  data:
  - secretKey: password
    remoteRef:
      key: secret1
      property: password
  - secretKey: user
    remoteRef:
      key: secret1
      property: user
Check ExternalSecret status
kubectl get externalsecret
NAME            STORE           REFRESH INTERVAL   STATUS         READY
vault-example   vault-backend   1h                 SecretSynced   True
Check Secret created
kubectl get secret mysecret -o yaml