Service Mesh (Linkerd)
Important: Deprecated Technology in PiCluster project
ServiceMesh solution for the cluster has been migrated to Istio in release 1.9. Linkerd technology has been deprecated and this documentation is not updated anymore.
Reasons behind this decission in PiCluster 1.9 release announcement.
See alternative Service Mesh solution documentation: “Service Mesh (Istio)”.
Why a Service Mesh
Introduce Service Mesh architecture to add observability, traffic management, and security capabilities to internal communications within the cluster.
Linkerd Architecture
Linkerd service mesh archictecture is composed of three planes: control Plane, data plane and observability plane as shows the following diagram:
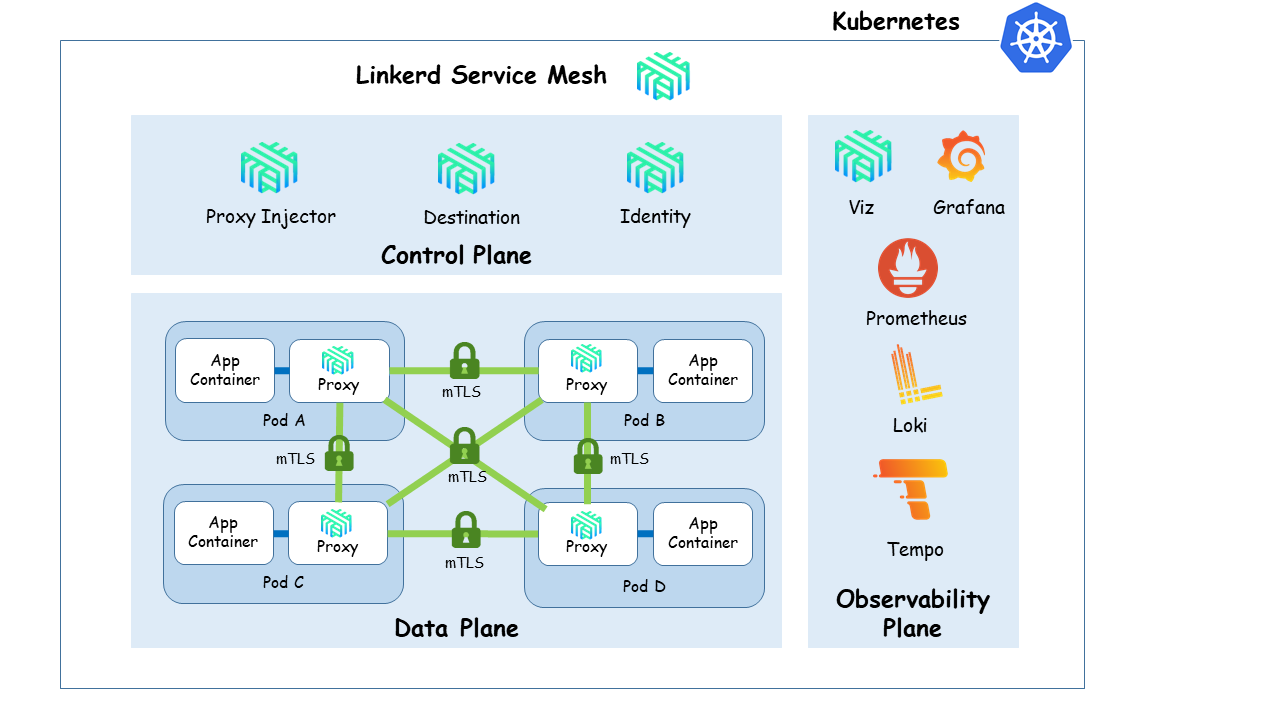
-
Control plane: providing the services for automatically injecting data plane components into pods(
poxy-injector), generate certificates used in mTLS communications in the data plane and authorized data plane componentes (identity), and traffic flow control services (destination) -
Data Plane, transparent proxy running as sidecar container within the pods. Proxies automatically intercept Pod’s inbound/outbound TCP traffic and add transparantly encryption (mTLS), Later-7 load balancing, routing, retries, telemetry, etc.
-
Observability Plane: Linkerd service mesh is integrated into cluster Obserbability platform.
- Linkerd control plane and data-plane components expose metrics that can be scraped by Prometheus and their logs can be captured and integrated into Loki (Logging aggregator)
- User-plane component (linkerd-proxy) can be also configured to emit traces to cluster tracing backend, Grafana Tempo. Linkerd-jaeger extension need to be installed.
- Linkerd-viz component add a service mesh web dashboard and pre-configured Grafana dashboards.
Automatic mTLS configuration and Certmanager
By default, Linkerd automatically enables mutually-authenticated Transport Layer Security (mTLS) for all TCP traffic between meshed pods. This means that Linkerd adds authenticated, encrypted communication to all application by default.
The Linkerd control plane contains a certificate authority (CA) called identity. This CA issues TLS certificates to each Linkerd data plane proxy. These TLS certificates expire after 24 hours and are automatically rotated. The proxies use these certificates to encrypt and authenticate TCP traffic to other proxies.
On the control plane side, Linkerd maintains a set of credentials in the cluster: a trust anchor, and an issuer certificate and private key. While Linkerd automatically rotates the TLS certificates for data plane proxies every 24 hours, it does not rotate the TLS credentials and private key associated with the issuer. cert-manager can be used to initially generate this issuer certificate and private key and automatically rotate them.
In our cluster we will use certmanager to generate the trust anchor (root CA) needed to sign identity TLS certificate and being able to validate the rest of TLS certificates issued by identity to linkerd-proxy processes.
Linkerd Installation
Installation procedure using cert-manager to automatically rotate control-plane tls credentials is described in linkerd documentation.
The following instalation procedure is a slightly different from the one proposed in that documentation since we will use, as linkerd trust-anchor, the root CA and CA ClusterIssuer already created during Cert-manager installation and configuration for the cluster.
Installation pre-requisite: Cert-Manager
Install Cert-manager
Installation using Helm (Release 3):
-
Step 1: Add the JetStack Helm repository:
helm repo add jetstack https://charts.jetstack.io -
Step 2: Fetch the latest charts from the repository:
helm repo update -
Step 3: Create namespace
kubectl create namespace cert-manager -
Step 4: Create
cert-manager-values.yamlfilecrds: enabled: true -
Step 5: Install Cert-Manager
helm install cert-manager jetstack/cert-manager --namespace cert-manager -f cert-manager-values.yaml -
Step 6: Confirm that the deployment succeeded, run:
kubectl -n cert-manager get podConfigure Cert-manager
Cert-manager need to be configured to act as an on-cluster CA and to re-issue Linkerd’s issuer certificate and private key on a periodic basis.
Cert-manager CA root certificate (trust-anchor) and CA Cluster issuer need to be created.
That trust-anchor and ClusterIssuer will be used to generate linkerd certificate used as intermediate CA for signing linkerd’s mTLS certificates.
-
Step 1: Create selfsigned
ClusterIssuerFirst step is to create the self-signed issuer for being able to selfsign a custom root certificate of the PKI (CA certificate).
In order to obtain certificates from cert-manager, we need to create an issuer to act as a certificate authority. We have the option of creating an
Issuerwhich is a namespaced resource, or aClusterIssuerwhich is a global resource. We’ll create a self-signedClusterIssuerusing the following definition:apiVersion: cert-manager.io/v1 kind: ClusterIssuer metadata: name: self-signed-issuer spec: selfSigned: {} -
Step 2: Bootstrapping CA Issuers
Bootstrap a custom root certificate for a private PKI (custom CA) and create the corresponding cert-manager CA issuer
---
apiVersion: cert-manager.io/v1
kind: Certificate
metadata:
  name: my-selfsigned-ca
  namespace: cert-manager
spec:
  isCA: true
  commonName: my-selfsigned-ca
  secretName: root-secret
  privateKey:
    algorithm: ECDSA
    size: 256
  issuerRef:
    name: self-signed-issuer
    kind: ClusterIssuer
    group: cert-manager.io
---
apiVersion: cert-manager.io/v1
kind: ClusterIssuer
metadata:
  name: ca-issuer
  namespace: cert-manager
spec:
  ca:
    secretName: root-secret
Important: Algorithm used for creating private keys is ECDSA P-256. This is a requirement for Linkerd to work . RootCa and Linkerd identity issuer certificate must use ECDSA P-256 algorithm.
Linkerd Installation using Helm
Installation using Helm (Release 3):
-
Step 1: Add the Linkerd Helm stable repository:
helm repo add linkerd https://helm.linkerd.io/stable -
Step2: Fetch the latest charts from the repository:
helm repo update -
Step 3: Create namespace
By default, the helm chart creates the control plane namespace with the
config.linkerd.io/admission-webhooks: disabledlabel. It is required for the control plane to work correctly.Since we are creating the namespace we need to provide the same labels and annotations.
Create namespace manifest file
linkerd_namespace.ymlkind: Namespace apiVersion: v1 metadata: name: linkerd annotations: linkerd.io/inject: disabled labels: linkerd.io/is-control-plane: "true" config.linkerd.io/admission-webhooks: disabled linkerd.io/control-plane-ns: linkerdAnd apply the manifest with the following command:
kubectl apply -f linkerd_namespace.yml -
Step 4: Create
linkerd-identity-issuercertificate resourceCreate file
linkerd-identity-issuer.ymlapiVersion: cert-manager.io/v1 kind: Certificate metadata: name: linkerd-identity-issuer namespace: linkerd spec: secretName: linkerd-identity-issuer duration: 48h renewBefore: 25h issuerRef: name: ca-issuer kind: ClusterIssuer group: cert-manager.io commonName: identity.linkerd.cluster.local dnsNames: - identity.linkerd.cluster.local isCA: true privateKey: algorithm: ECDSA usages: - cert sign - crl sign - server auth - client authClusterIssuer
ca-issuer, created as part of cert-manager configuration, is used to sign this certificate.durationinstructs cert-manager to consider certificates as valid for 48 hours andrenewBeforeindicates that cert-manager will attempt to issue a new certificate 25 hours before expiration of the current one.Certificate is creates as CA (isCA:true) because it will be use by linkerd to issue mTLS certificates.
-
Step 5: Command cert-manager to create the
Certificateand the associatedSecret.kubectl apply -f linkerd-identity-issuer.yml -
Step 6: Get CA certificate used to sign the linkerd-identy-issuer certificate
Linkerd installation procedure (using Helm chart of
linkerdCLI), requires to pass as parameter the trust-anchor (root certiticate) used to sign the linkerd-identy-issuer. It can be obtained from the associated Secret with the following commad.kubectl get secret linkerd-identity-issuer -o jsonpath="{.data.ca\.crt}" -n linkerd | base64 -d > ca.crt -
Step 7: Install Linkerd CRDs Helm
helm install linkerd-crds linkerd/linkerd-crds -n linkerd -
Step 8: Install Linkerd control Plane Helm
helm install linkerd-control-plane \ --set-file identityTrustAnchorsPEM=ca.crt \ --set identity.issuer.scheme=kubernetes.io/tls \ --set installNamespace=false \ linkerd/linkerd-control-plane \ -n linkerd -
Step 9: Confirm that the deployment succeeded, run:
kubectl -n linkerd get pod -
Step 10: Check linkerd control plane configmap
Check that the ca.crt is properly included in linkerd configmap
kubectl get configmap linkerd-config -o yaml -n linkerdThe
identiyTrustAnchorPEMkey included in the Configmap should show the ca.crt extracted in Step 3identityTrustAnchorsPEM: |- -----BEGIN CERTIFICATE----- MIIBbzCCARWgAwIBAgIRAKTg35A0zYXdNKIfOfzmvBswCgYIKoZIzj0EAwIwFzEV MBMGA1UEAxMMcGljbHVzdGVyLWNhMB4XDTIyMDMwODEyMTYxM1oXDTIyMDYwNjEy MTYxM1owFzEVMBMGA1UEAxMMcGljbHVzdGVyLWNhMFkwEwYHKoZIzj0CAQYIKoZI zj0DAQcDQgAEYcZquh74RiIWje8/PHC8haksDdjvQroRrZQnsKP9j/LL+C0qLx9n 7Fs3nLMQ6ipRZ1KV9k/sP0nFHzI4G4W3wKNCMEAwDgYDVR0PAQH/BAQDAgKkMA8G A1UdEwEB/wQFMAMBAf8wHQYDVR0OBBYEFM+IzMMYOlVcCe0BEBvmVKGO7RF9MAoG CCqGSM49BAMCA0gAMEUCIBRop9dU9iDuZRVlxFLjwwxnQxL601atw/298/wQWdzn AiEAwlZ6RTYjoN4XHxQnz2yZhu7ACsjX5p3oSNnL2nOs+7k= -----END CERTIFICATE-----
GitOps installation
As an alternative, for GitOps deployments, instead of hardcoding CA certificate within Helm chart values, a external configMap can be created,linkerd-identity-trust-roots, containing the ca certificate (ca-bundle.crt key). If external configMap is provided, helm value identity.externalCA=true need to be provided during installation.
Trust Manager, installed jointly with Cert-Manager, can be used to automate the generation of that configMap containing the information about the ca secret. See detailed procedure described in linkerd issue #7345.
See Trust-Manager installation procedure in TLS certification management documentation.
Trust Manager Installation
Trust-manager is an operator for distributing trust bundles across a Kubernetes cluster. trust-manager is designed to complement cert-manager by enabling services to trust X.509 certificates signed by Issuers, distributing data from trust namespace (cert-manager).
trust ships with a single cluster scoped Bundle resource. A Bundle represents a set of data (configMap, secret) from the trust namespace that should be distributed and made available across the cluster.
To install Trust-Manager, from Helm chart execute the following command:
helm install trust-manager jetstack/cert-manager --namespace cert-manager
Linkerd Installation
In the previous installation procedure, step 6 and step 8 can be replaced by the following:
-
Step 6: Create a Trust-Manager
Bundleresource to distribute CA certificate in linkerd namespace as a configmap (source is taken from the namespace trust was installed in, i.e cert-manager)Create Trust Manager bundle resource to share
ca.crtstored inroot-secretwithin a configMap (linkerd-identity-trust-roots) in linkerd namespace.apiVersion: trust.cert-manager.io/v1alpha1 kind: Bundle metadata: name: linkerd-identity-trust-roots spec: sources: - secret: name: "root-secret" key: "ca.crt" target: configMap: key: "ca-bundle.crt" namespaceSelector: matchLabels: kubernetes.io/metadata.name: linkerdApply this resource using
kubectl apply -fcommandCheck that config map is created and the content is the expected one
kubectl get cm linkerd-identity-trust-roots -o jsonpath="{.data.ca-bundle\.crt}" -n linkerd -
Step 8: Install Linkerd control Plane Helm (
identity.externalCAneed to be set to true)helm install linkerd-control-plane \ --set identity.externalCA=true \ --set identity.issuer.scheme=kubernetes.io/tls \ --set installNamespace=false \ linkerd/linkerd-control-plane \ -n linkerd
Linkerd Viz extension installation
Linkerd provides a full on-cluster metrics stack, a web dashboard, and pre-configured Grafana dashboards. This is the linkerd viz extension.
This extension installs the following components into a new namespace linkerd-viz:
- A Prometheus instance
- metrics-api, tap, tap-injector, and web components
Since we have already our monitoring deployment, we will configure Viz extension to use the existing Prometheus and Grafana instance. See linkerd documentation “Bringing your own Prometheus”.
Linkerd-viz dashboard (web component) will be exposed configuring a Ingress resource.
Since Linkerd-viz release 2.12, Grafana component installation is not included. External Grafana need to be configured to enable drill-down from linkerd-viz’s dashboards metrics to Grafana’s dashboards.
By default linkerd-viz dashboard has a DNS rebinding protection. The dashboard rejects any request whose Host header is not localhost, 127.0.0.1 or the service name web.linkerd-viz.svc. So different configuration need to be applied to Ingress resources depending on the Ingress Controller:
-
Traefik does not support a mechanism for ovewritting Host header, Host validation regexp, used by dashboard server, need to be tweaked using Helm chart parameter
enforcedHostRegexp. -
Ingress NGINX does not need to have
nginx.ingress.kubernetes.io/upstream-vhostannotation to properly set the upstream Host header.
See document “Exposing dashboard - DNS Rebinding Protection” for more details.
Installation procedure:
-
Step 1: Create namespace
By default, the helm chart creates a namespace
linkerd-vizwith annotationslinkerd.io/inject: enabledandconfig.linkerd.io/proxy-await: "enabled"Since we are creating the namespace we need to provide the same labels and annotations.
Create namespace manifest file
linkerd_viz_namespace.ymlkind: Namespace apiVersion: v1 metadata: name: linkerd-viz annotations: linkerd.io/inject: enabled config.linkerd.io/proxy-await: "enabled" labels: linkerd.io/extension: vizAnd apply the manifest with the following command:
kubectl apply -f linkerd_viz_namespace.yml -
Step 2: Prepare values.yml for Viz helm chart installation
# Skip namespace creation installNamespace: false # Disable prometheus installation prometheus: enabled: false # Configure external Prometheus URL prometheusUrl: http://kube-prometheus-stack-prometheus.monitoring.svc.cluster.local:9090 # External Grafana grafana: url: kube-prometheus-stack-grafana.monitoring.svc.cluster.local # Disabling DNS rebinding protection (only Traefik) # dahsboard: # enforcedHostRegexp: ".*" -
Step 3: Install linkerd viz extension helm
helm install linkerd-viz -n linkerd-viz -f values.ymlBy default, helm chart creates
linkerd-viznamespace where all components are deployed. -
Step 4: Exposing Linkerd Viz dashboard
Ingress controller rule can be defined to grant access to Viz dashboard.
Linkerd documentation contains information about how to configure NGINX as Ingress Controller.
The following Ingress resource, exposes linkerd-viz at
linkerd.picluster.ricsanfre.com, enabling HTTP basic auth:--- apiVersion: networking.k8s.io/v1 kind: Ingress metadata: name: linkerd-viz-ingress namespace: linkerd-viz annotations: # Enable basic auth nginx.ingress.kubernetes.io/auth-type: basic # Secret defined in nginx namespace nginx.ingress.kubernetes.io/auth-secret: nginx/basic-auth-secret # Linkerd configuration. Configure Service as Upstream nginx.ingress.kubernetes.io/service-upstream: "true" # Configuring Ingress for linkerd-viz DNS rebind protection # https://linkerd.io/2.13/tasks/exposing-dashboard/#nginx nginx.ingress.kubernetes.io/upstream-vhost: $service_name.$namespace.svc.cluster.local:8084 nginx.ingress.kubernetes.io/configuration-snippet: | proxy_set_header Origin ""; proxy_hide_header l5d-remote-ip; proxy_hide_header l5d-server-id; # Enable cert-manager to create automatically the SSL certificate and store in Secret cert-manager.io/cluster-issuer: ca-issuer cert-manager.io/common-name: linkerd.picluster.ricsanfre.com spec: ingressClassName: nginx tls: - hosts: - linkerd.picluster.ricsanfre.com secretName: linkerd-viz-tls rules: - host: linkerd.picluster.ricsanfre.com http: paths: - path: / pathType: Prefix backend: service: name: web port: number: 8084 -
Step 5: Configure Prometheus to scrape metrics from linkerd
Create
linkerd-prometheus.yml--- apiVersion: monitoring.coreos.com/v1 kind: PodMonitor metadata: labels: app: linkerd release: kube-prometheus-stack name: linkerd-controller namespace: monitoring spec: namespaceSelector: matchNames: - linkerd-viz - linkerd selector: matchLabels: {} podMetricsEndpoints: - relabelings: - sourceLabels: - __meta_kubernetes_pod_container_port_name action: keep regex: admin-http - sourceLabels: - __meta_kubernetes_pod_container_name action: replace targetLabel: component # Replace job value - sourceLabels: - __address__ action: replace targetLabel: job replacement: linkerd-controller --- apiVersion: monitoring.coreos.com/v1 kind: PodMonitor metadata: labels: app: linkerd release: kube-prometheus-stack name: linkerd-service-mirror namespace: monitoring spec: namespaceSelector: any: true selector: matchLabels: {} podMetricsEndpoints: - relabelings: - sourceLabels: - __meta_kubernetes_pod_label_linkerd_io_control_plane_component - __meta_kubernetes_pod_container_port_name action: keep regex: linkerd-service-mirror;admin-http$ - sourceLabels: - __meta_kubernetes_pod_container_name action: replace targetLabel: component # Replace job value - source_labels: - __address__ action: replace targetLabel: job replacement: linkerd-service-mirror --- apiVersion: monitoring.coreos.com/v1 kind: PodMonitor metadata: labels: app: linkerd release: kube-prometheus-stack name: linkerd-proxy namespace: monitoring spec: namespaceSelector: any: true selector: matchLabels: {} podMetricsEndpoints: relabelings: - sourceLabels: - __meta_kubernetes_pod_container_name - __meta_kubernetes_pod_container_port_name - __meta_kubernetes_pod_label_linkerd_io_control_plane_ns action: keep regex: ^linkerd-proxy;linkerd-admin;linkerd$ - sourceLabels: [__meta_kubernetes_namespace] action: replace targetLabel: namespace - sourceLabels: [__meta_kubernetes_pod_name] action: replace targetLabel: pod - sourceLabels: [__meta_kubernetes_pod_label_linkerd_io_proxy_job] action: replace targetLabel: k8s_job - action: labeldrop regex: __meta_kubernetes_pod_label_linkerd_io_proxy_job - action: labelmap regex: __meta_kubernetes_pod_label_linkerd_io_proxy_(.+) - action: labeldrop regex: __meta_kubernetes_pod_label_linkerd_io_proxy_(.+) - action: labelmap regex: __meta_kubernetes_pod_label_linkerd_io_(.+) - action: labelmap regex: __meta_kubernetes_pod_label_(.+) replacement: __tmp_pod_label_$1 - action: labelmap regex: __tmp_pod_label_linkerd_io_(.+) replacement: __tmp_pod_label_$1 - action: labeldrop regex: __tmp_pod_label_linkerd_io_(.+) - action: labelmap regex: __tmp_pod_label_(.+) # Replace job value - sourceLabels: - __address__ action: replace targetLabel: job replacement: linkerd-proxyApply manifest file
kubectl apply -f linkerd-prometheus.ymlNote:
This is a direct translation of the Prometheus’ scrape configuration defined in linkerd documentation to Prometheus Operator based configuration (ServiceMonitor and PodMonitor CRDs).
Only two additional changes have been made:
-
Changing
joblabel: Prometheus operator by default creates job names and job labels with<namespace>/<podMonitor/serviceMonitor_name>. Additional relabel rule has been added to remove namespace from job label matching Grafana dashboard’s filters. -
Removing scraping
intervalandtimeoutconfiguration set to 10 seconds, so Prometheus defaults are used (30 seconds), reducing the impact on memory and cpu consumption.
-
-
Step 6: Load linkerd dashboards into Grafana
Linkerd available Grafana dashboards are located in linkerd2 repository: linkerd grafana dashboards
Follow “Provision dashboards automatically” procedure to load Grafana dashboards automatically.
Linkerd jaeger extension installation
Linkerd-jaeger extension is needed to configure linkerd to emit span traces from linkerd-proxies.
Linkerd jaegger extension, by default, installs Jaeger, as traces backend, OpenTelemetry collector, to collect and distribute traces to Jaeger backend and Jaegger-injector, responsible for configuring the Linkerd proxies to emit spans.
Note: Linkerd and Tracing context propagation
Linkerd included support to W3C tracing propagation since release v2.13. See linkerd issue #5416. When multiple headers are present: proxy will use w3c by default, if that’s not present, it will fallback to b3.
As part of the Pi Cluster - Observability platform, Tempo is used as tracing backend, instead of Jaeger. See Tempo installation documentation.
Tempo’s distributor component has embedded an OpenTelemetry collector. So neither Jaeger nor the collector are needed, only jaeger-injector is going to be installed.
Note:
Tempo service need to be meshed with linkerd before installing Linkerd jaeger extension with the procedure defined below.
-
Step 1. Prepare linked-jaeger-values.yml
collector:
  enabled: false
jaeger:
  enabled: false
webhook:
  collectorSvcAddr: tempo-distributor.tracing:55678
  collectorSvcAccount: tempo
This configuration disables Jaeger and OTel Collector installation and configures jaeger-injector to send traces span to tempo-distributor component using OpenCensus receiver (port 55678)
webhook.collectorSvcAddris OpenCensus endpoint distributor receiverwebhook.collectorSvcAccountis service account name used by Tempo. -
Step 2. Install jaeger-extensiong helm chart
helm install linkerd-jaeger -n linkerd-jaeger --create-namespace linkerd/linkerd-jaeger -f linkerd-jaeger-values.yml
Meshing a service with linkerd
There are two common ways to define a resource as meshed with Linkerd:
-
Explicit: add
linkerd.io/inject: enabledannotation per resource. Annotated pod deployment is injected with linkerd-proxy.Annotation can be added automatically using
linkerdcommand to inject the annotationkubectl get -n NAMESPACE deploy/daemonset/statefulset -o yaml | linkerd inject - | kubectl apply -f -This command takes all deployments resoureces from NAMESPACE and inject the annotation, so linkerd can inject linkerd-proxy automatically
Alternative the deployment/daemonset/statefulset can be manually annotated through the
kubectl patchcommand:kubectl patch deployment/daemonset/stateful <name> "{\"spec\":{\"template\":{\"metadata\":{\"annotations\":{\"linkerd.io/inject\":\"enabled\"}}}}}"In both cases deployemnt/daemonset/stateful are redeploy after applying the command.
-
Implicit: add
linkerd.io/inject: enabledannotation for a namespace. Any new pod created within the namespace is automatically injected with linkerd-proxy.Using kubectl:
kubectl annotate ns <namespace_name> linkerd.io/inject=enabledThrough manifest file during namespace creation or patching the resource.
kind: Namespace
apiVersion: v1
metadata:
  name: test
  annotations:
    linkerd.io/inject: enabled
Problems with Kubernetes Jobs and implicit annotation
With linkerd.io/inject: enabled annotation at namespace level, Kubernetes Jobs do not terminate after completion since the Pods created are injected with linkerd-proxy and it continues to run after the job container completes its work.
That behaviour might cause errors during helm chart installation that deploy Jobs or during executions of scheduled CronJobs.
As stated in this ITNEXT blog post there are different ways to handle this issue, both of them requires to modify Job template definition:
1) Do not mesh the Jobs resources
Adding linkerd.io/inject: disabled annotation to job template definition.
jobTemplate:
  spec:
    template:
      metadata:
        annotations:
          linkerd.io/inject: disabled
2) Shuting down linkerd-proxy as part of the Job execution.
This can be done using linkerd-await as wrapper of the main job command.
linkerd-await waits till linkerd-proxy is ready then executes the main job command and, when it finishes, it calls the linkerd-proxy /shutdown endpoint.
linked-await --shutdown option <job_commad>
See details of implementation of this second workarround previously mentioned ITNEXT blog post
Meshing cluster services
Longhorn
Implicit annotation at namespace cannot be used since Longhorn create several kubernetes workloads (daemonsets, deployments and jobs) that cannot be annotated through customization of the helm chart.
Only the DaemonSet longhorn-manager is customizable via the Helm chart, but the workloads managed by longhorn-manager (e.g. instance managers and jobs) are not. There is an longhorn’s open feature request asking for this kind of functionality.
In order to not impact on the performance of Longhorn data plane, implicit annotation at namespace level should be avoided. lonhorn-enine and longhorn-replica, data plane components shoud not be meshed with linkerd so mTLS connection does not implact on read/write operations.
So we will try to limit the meshing to Longhorn control-plane components (longhorn-manager including its csi plugin ) and UI component (longhorn-ui)
Note:
One longhorn-engine process and a set of longhorn-replica processes is created per Volume created by Longhorn. These processes run inside instance-manager-e and instance-manager-r pods (one per node) whose controls their lifecycle.
Trying to apply the explicit annotation at namespace level or only explicit annotation for longhorn-manager daemon set (only available at Helm Chart configuration) causes Longhorn deployment to fail. See picluster-issue #47.
One of the main problems is that longhorn-manager, is not accepting connections coming from localhost, only connections coming to the assigned IP address. When deploying linkerd-proxy as its sidecar, all connections received to its API endpoint are rejected because linkerd-proxy is using 127.0.0.1 as destination IP-address when routing all the incoming traffic to the container.
Note:
Linkerd iptables forwarding rules makes that all received traffic by the meshed containers appears to come from localhost.
So containers meshed with linkerd need to be listening on localhost. They should be listening on “0.0.0.0” address (any IP address including localhost: 127.0.0.1)
There is a linkerd open issue for changing linkerd’s default behavior and keep IP addresses when forwarding the traffic using TPROXY.
There is a longhorn open issue with a similar problem when trying to mesh with Istio. As a workarround it is proposed to change longhorn-manager POD_IP environment variable.
longhorn-manager container open the listening port on the IP get form POD_IP environment variable which points to the assigned ip to the POD. See daemonset definition:
env:
- name: POD_IP
  valueFrom:
    fieldRef:
      fieldPath: status.podIP
This environment variable can be changed using on an already deployed daemon set using the command kubectl set env or can be patched during installation of Helm Chart using its post-rendering feature with kustomize:
kubectl set envprocedure described in this comment of issue #47helm+kustomizeprocedure described in this other comment of issue #47
Note:
Applying patching procedure on installation time (helm+kustomize procedure), before Longhorn 1.6, produced an error that Longhorn is not completely deployed (CSI driver is not deployed).
See the analysis and the root cause identified in issue #47 and the correponding bug submitted to longhorn project, Longorhn issue #3809.
Longhorn Issue #3809 was fixed in release Longhorn 1.6, so early described procedure can be used to automatically apply service mesh to longhorn manager and steps below are not needed anymore.
So the only way to meshing longhorn-manager component is to wait till Longhorn is completely deployed and inject linkerd-proxy using explicit annotation afterwards:
-
Deploy Lonhgorn using Helm. -
Wait till it is completely deployed. -
Meshinglonghorn-managerdaemonset-
Change environment variable (POD_IP) to make the container listen to localhost connetionskubectl set env daemonset/longhorn-manager -n longhorn-system POD_IP=0.0.0.0 -
Annotate daemonset to deploy linkerd sidecarkubectl patch daemonset longhorn-manager "{\"spec\":{\"template\":{\"metadata\":{\"annotations\":{\"linkerd.io/inject\":\"enabled\"}}}}}" -n longhorn-system
-
-
Meshing
longhorn-uideploymentAnnotate daemonset to deploy linkerd sidecar
kubectl patch deployment longhorn-ui "{\"spec\":{\"template\":{\"metadata\":{\"annotations\":{\"linkerd.io/inject\":\"enabled\"}}}}}" -n longhorn-system
Prometheus Stack
For applying linkerd service mesh to Prometheus-stack services, implicit annotation at namespace level can be used before deploying kube-prometheys-stack chart.
When deploying kube-prometheus-stack helm using an annotated namespace (linkerd.io/inject: enabled), causes the Prometheus Operator to hung.
Job pod pod/kube-prometheus-stack-admission-create-<randomAlphanumericString> is created and its status is always NotReady since the linkerd-proxy continues to run after the job container ends so the Job Pod never ends.
See linkerd Prometheus Operator issue.
To solve this issue linkerd injection must be disabled in the associated jobs created by Prometheus Operator. This can be achieved adding the following parameters to values.yml file of kube-prometheus-stack helm chart.
prometheusOperator:
  admissionWebhooks:
    patch:
      podAnnotations:
        linkerd.io/inject: disabled
Modify Prometheus installation procedure to annotate the corresponding namespace before deploying the helm chart and use the modified values.yml file.
kubectl annotate ns monitoring linkerd.io/inject=enabled
Note:
node-exporter daemonset, which are part of kube-prometheus-stack, are not injected with linkerd-proxy becasue its PODs use hosts network namespace spec.hostNework=true. Linkerd injection is disabled for pods with hostNetwork=true.
If you try to inject manually:
kubectl get daemonset -n monitoring -o yaml | linkerd inject -

Error transforming resources:
failed to inject daemonset/kube-prometheus-stack-prometheus-node-exporter: hostNetwork is enabled
EFK
For applying linkerd service mesh to EFK services, it is enough to use the implicit annotation at namespace level before deploying ECK Operator and create Kibana and Elasticsearch service and before deploying fluentbit chart.
Modify EFK installation procedure to annotate the corresponding namespace before deploying the helm charts.
kubectl annotate ns logging linkerd.io/inject=enabled
When deploying Elasticsearch and Kibana using the ECK operator, it is needed to specify the parameter automountServiceAccountToken: true, otherwise the linkerd-proxy is not injected.
The following configuration need to be added to Elastic and Kibana resources
podTemplate:
  spec:
    automountServiceAccountToken: true
For details about how to integrate with linkerd Elastic stack components using ECK operator, see ECK-linkerd document.
Important:
Elasticsearch default TLS configuration has been disabled, so Linkerd can gather more metrics about the connections. See issue #45
Velero
For applying linkerd service mesh to Velero services, implicit annotation is used for velero deployment and restic daemonset.
This annotation can be automatic applied when installing Velero’s helm chart using the parameter podAnnnotations. This can be achieved adding the following parameters to values.yml file of velero helm chart.
podAnnotations:
  linkerd.io/inject: enabled
Configure Ingress Controller
Linkerd does not come with a Ingress Controller. Existing ingress controller can be integrated with Linkerd doing the following:
- Configuring Ingress Controller to support Linkerd.
- Meshing Ingress Controller pods so that they have the Linkerd proxy installed.
Linkerd can be used with any ingress controller. In order for Linkerd to properly apply features such as route-based metrics and traffic splitting, Linkerd needs the IP/port of the Kubernetes Service as the traffic destination. However, by default, many ingresses, like Traefik or NGINX, do their own load balance and endpoint selection when forwarding HTTP traffic pass the IP/port of the destination Pod, rather than the Service as a whole.
In order to enable linkerd implementation of load balancing at HTTP request level, Ingress Contoroller load balancing mechanism must be skipped.
More details in linkerd documentation “Ingress Traffic”.
Meshing Traefik
In order to integrate Traefik with Linkerd the following must be done:
-
Traefik must be meshed with
ingress modeenabled, i.e. with thelinkerd.io/inject: ingressannotation rather than the default enabled.Executing the following command Traefik deployment is injected with linkerd-proxy in ingress mode:
kubectl get deployment traefik -o yaml -n kube-system | linkerd inject --ingress - | kubectl apply -f -Important:
In ingress mode only HTTP traffic is routed by linkerd-proxy. Traefik will stop routing any HTTPS traffic. In this mode we must be sure that Traefik will end all TLS communications coming from outside the cluster and that it communicates with the internal services only using HTTP.
This is how we have configured all services within the cluster. Disabling TLS configurations of all internal HTTP services.
Linkerd at platform level provides that TLS secure layer.
HTTP communications from clients outside the cluster are secured by Traefik (closing external TLS sessions). From Traefik traffic routing to the cluster will be secured by Linkerd-proxy.
Since Traefik needs to talk to Kubernetes API using HTTPS standard port, to implements its own routing and load balancing mechanism, this mode of execution breaks Traefik unless outbound communications using port 443 skips the linkerd-proxy.
For making Traefik work with its own loadbalancing/routing mechanism, the following command needs to be executed.
kubectl get deployment traefik -o yaml -n kube-system | linkerd inject --ingress --skip-outbound-ports 443 - | kubectl apply -f -
See Linkerd discussion #7387 for further details about this issue.
Alternative, Traefik helm chart can be configured so the deployed pod contains the required linkerd annotations to enable the ingress mode and skip port 443. The following additional values must be provided
   deployment:
      podAnnotations:
        linkerd.io/inject: ingress
        config.linkerd.io/skip-outbound-ports: "443"
Traefik is a K3S embedded components that is auto-deployed using Helm. In order to configure Helm chart configuration parameters the official document must be followed. See how to do it in Traefik configuration documentation
-
Replace Traefik routing and load-balancing mechanism by linkerd-proxy routing and load balancing mechanism.
Configure Ingress resources to use a Traefik’s Middleware inserting a specific header,
l5d-dst-overridepointing to the Service IP/Port (using internal DNS name:<service-name>.<namespace-name>.svc.cluster.localLinkerd-proxy configured in ingress mode will take
ld5-dst-overrideHTTP header for routing the traffic to the service.When an HTTP (not HTTPS) request is received by a Linkerd proxy, the destination service of that request is identified.
The destination service for a request is computed by selecting the value of the first HTTP header to exist of,
l5d-dst-override,:authority, andHost. The port component, if included and including the colon, is stripped. That value is mapped to the fully qualified DNS name.Per ingress resource do the following:
-
Step 1: Create Middleware routing for providing l5d-dst-override HTTP header
apiVersion: traefik.containo.us/v1alpha1 kind: Middleware metadata: name: l5d-header-middleware namespace: my-namespace spec: headers: customRequestHeaders: l5d-dst-override: "my-service.my-namespace.svc.cluster.local:80" -
Step 2: Add traefik Middleware in Ingress configuration
Through annotation in Ingress resource.
apiVersion: networking.k8s.io/v1
kind: Ingress
metadata:
  name: my-ingress
  namespace: my-namespace
  annotations:
    traefik.ingress.kubernetes.io/router.middlewares:
      my-namespace-l5d-header-middleware@kubernetescrd
Or within
middlewareskey in IngressRoute definitionapiVersion: traefik.containo.us/v1alpha1 kind: IngressRoute metadata: name: my-ingress-route namespace: my-namespace spec: routes: - kind: Rule match: Host(`mydomain`) services: - name: my-service port: 8080 namespace: my-namespace middlewares: - name: l5d-header-middleware namespace: my-namespace
-
Note:
Since Traefik terminates TLS connections, TLS encrypted traffic (e.g. HTTPS calls from outside the cluster) will pass through Linkerd as an opaque TCP stream and Linkerd will only be able to provide byte-level metrics for this side of the connection. The resulting HTTP or gRPC traffic to internal services, of course, will have the full set of metrics and mTLS support.
Meshing Ingress NGINX
Meshing Ingress NGINX is simpler. It can be meshed normally, it does not require the ingress mode annotation.
In order to integrate NGIN with Linkerd the following must be done:
- Ingress NGINX must be meshed. Meshing Ingress NGINX is simpler than Traefik. It can be meshed normally using
linkerd.io/inject: enabledannotation, it does not require the ingress mode annotation (linkerd.io/inject: ingress) like Traefik
If using the ingress-nginx Helm chart, note that the namespace containing the ingress controller should NOT be annotated with linkerd.io/inject: enabled. Instead, only Deployment resource need to be annotated. The reason is because this Helm chart defines (among other things) other Kubernetes resources (short-lived pod) that cannot be meshed.
The following values.yml file need to be provided to ingress-nginx helm chart, so ingress-nginx is meshed.
controller:
  podAnnotations:
    linkerd.io/inject: enabled
- Replace NGINX routing and load-balancing mechanism by linkerd-proxy routing and load balancing mechanism.
Ingress resources need to be annotated with nginx.ingress.kubernetes.io/service-upstream: "true". By default the Ingress-Nginx Controller uses a list of all endpoints (Pod IP/port) in the NGINX upstream configuration. The nginx.ingress.kubernetes.io/service-upstream annotation disables that behavior and instead uses a single upstream in NGINX, the service’s Cluster IP and port.
apiVersion: networking.k8s.io/v1
kind: Ingress
metadata:
  name: my-ingress
  namespace: my-namespace
  annotations:
    nginx.ingress.kubernetes.io/service-upstream: "true"
References
- Linkerd vs Istio Benchmarks
- Why Linkerd does not use Envoy proxy
- Linkerd architecture
- How Linkerd uses iptables to transparently route Kubernetes traffic
- Protocol Detection and Opaque Ports in Linkerd
- Linkerd gRPC load balancing vs default Kubernetes kube-proxy
- How to configure linkerd service-mesh with Elastic Cloud Operator