Distributed Block Storage (Longhorn)
K3s comes with a default Local Path Provisioner that allows creating a PersistentVolumeClaim backed by host-based storage. This means the volume is using storage on the host where the pod is located. If the POD need to be started on a different node it won’t be able to access the data.
A distributed block storage is needed to handle this issue. With distributed block storage, the storage is decouple from the pods, and the PersistentVolumeClaim can be mounted to the pod regardless of where the pod is running.
Longhorn is a distributed block storage system for Kubernetes. Lightweight, reliable and easy-to-use can be used as an alternative to Rook/Cephs. It is opensource software initially developed by Rancher Labs supporting AMD64 and ARM64 architectures that can be easily integrated with K3S.
LongHorn Installation
Installation requirements
Kubernetes version requirements
- A container runtime compatible with Kubernetes (Docker v1.13+, containerd v1.3.7+, etc.)
- Kubernetes >= v1.21
- Mount propagation must be supported1
Installing open-iscsi
LongHorn requires that open-iscsi package has been installed on all the nodes of the Kubernetes cluster, and iscsid daemon is running on all the nodes.2
Longhorn uses internally iSCSI to expose the block device presented by the Longhorn volume to the kubernetes pods. So the iSCSI initiator need to be setup on each node. Longhorn, acting as iSCSI Target, exposes Longhorn Volumes that are discovered by the iSCSI Initiator running on the node as /dev/longhorn/ block devices. For implementation details see Longhorn engine document.

Check than open-iscsi is installed, and the iscsid daemon is running on all the nodes. This is necessary, since Longhorn relies on iscsiadm on the host to provide persistent volumes to Kubernetes.
-
Install open-iscsi package
sudo apt get install open-iscsi -
Ensure
iscsiddaemon is up and running and is started on bootsudo systemclt start iscsid sudo systemctl enable iscsid
Installing NFSv4 Client
In Longhorn system, backup feature requires NFSv4, v4.1 or v4.2, and ReadWriteMany (RWX) volume feature requires NFSv4.1.3
Make sure the client kernel support is enabled on each Longhorn node.
-
Check
NFSv4.1support is enabled in kernelcat /boot/config-`uname -r`| grep CONFIG_NFS_V4_1 -
Check
NFSv4.2support is enabled in kernelcat /boot/config-`uname -r`| grep CONFIG_NFS_V4_2 -
Installl NFSv4 client in all nodes
sudo apt install nfs-common
Installing Cryptsetup and LUKS
Longhorn supports Volume encryption.
Cryptsetup is an open-source utility used to conveniently set up dm-crypt based device-mapper targets and Longhorn uses LUKS2 (Linux Unified Key Setup) format that is the standard for Linux disk encryption to support volume encryption.
To use encrypted volumes, dm_crypt kernel module has to be loaded and that cryptsetup is installed on all worker nodes.4
- Install
cryptsetuppackagesudo apt install cryptsetup -
Load
dm_cryptkernel modulesudo modprobe -v dm_cryptMake that change persisent across reboots
echo "dm_crypt" | sudo tee /etc/modules-load.d/dm_crypt.conf
Installing Device Mapper Userspace Tool
The device mapper is a framework provided by the Linux kernel for mapping physical block devices onto higher-level virtual block devices. It forms the foundation of the dm-crypt disk encryption and provides the linear dm device on the top of v2 volume.5
Ubuntu 24.04 sever includes this package by default.
To install the package:
sudo apt install dmsetup
Longhorn issues with Multipath
Multipath running on the storage nodes might cause problems when starting Pods using Longhorn volumes (“Error messages of type: volume already mounted”).
To prevent the multipath daemon from adding additional block devices created by Longhorn, Longhorn devices must be blacklisted in multipath configuration. See Longhorn documentation related to this issue.
Include in /etc/multipath.conf the following configuration:
blacklist {
  devnode "^sd[a-z0-9]+"
}
Restart multipathd service
systemctl restart multipathd
Installation procedure using Helm
Installation using Helm (Release 3):
-
Step 1: Add the Longhorn Helm repository:
helm repo add longhorn https://charts.longhorn.io -
Step2: Fetch the latest charts from the repository:
helm repo update -
Step 3: Create namespace
kubectl create namespace longhorn-system -
Step 4: Prepare longhorn-values.yml file
defaultSettings:
  defaultDataPath: "/storage"

# HTTPRoute resource for Longhorn dashboard.
httproute:
  ## Enable creation of HTTPRoute resource
  enabled: true
  hostnames:
    - longhorn.${CLUSTER_DOMAIN}
  parentRefs:
    - name: public-gateway
      namespace: envoy-gateway-system
Note:
Substitute variables (
${var}) in the above yaml file before deploying helm chart.- Replace
${CLUSTER_DOMAIN}by the domain name used in the cluster. For example:homelab.ricsanfre.comlonghorn.${CLUSTER_DOMAIN}must resolve to Envoy Gateway’s Load Balancer service external IP. External-DNS can be configured to publish that record automatically from theHTTPRoutehostname.
With this configuration:
-
Longhorn is configured to use
/storageas default path for storing data (defaultSettings.defaultDataPath) -
An
HTTPRouteresource is created to make the Longhorn front-end available through the URLhttps://longhorn.${CLUSTER_DOMAIN}.
- Replace
-
Step 5: Install Longhorn in the longhorn-system namespace, using Helm:
helm install longhorn longhorn/longhorn --namespace longhorn-system -f longhorn-values.ymlNote:
To enable backup to S3 storage server, a backup target need to be configured and other parameters need to be passed to helm chart. See Backup documentation to know how to configure Longhorn backup.
-
Step 6: Confirm that the deployment succeeded, run:
kubectl -n longhorn-system get pod
Longhorn CLI
longhornctl is a Command line interface (CLI) for Longhorn operations and troubleshooting.
-
Step 1: Download binary
curl -LO "https://github.com/longhorn/cli/releases/download/${VERSION}/longhornctl-linux-${ARCH}" -
Step 2: Install binary
sudo install longhornctl-linux-${ARCH} /usr/local/bin/longhornctl -
Step 3: Verify Installation
longhornctl version
See available commands in longhorn reporistory:https://github.com/longhorn/cli/blob/master/docs/longhornctl.md
Testing Longhorn
For testing longorn storage, create a specification for a PersistentVolumeClaim and use the storageClassName of longhorn and a POD making use of that volume claim.
Note:
Ansible playbook has been developed for automatically create this testing POD roles\longhorn\test_longhorn.yml
-
Step 1. Create testing namespace
kubectl create namespace testing-longhorn -
Step 2. Create manifest file
longhorn_test.yml--- apiVersion: v1 kind: PersistentVolumeClaim metadata: name: longhorn-pvc namespace: testing-longhorn spec: accessModes: - ReadWriteOnce storageClassName: longhorn resources: requests: storage: 1Gi --- apiVersion: v1 kind: Pod metadata: name: longhorn-test namespace: testing-longhorn spec: containers: - name: longhorn-test image: nginx:stable-alpine imagePullPolicy: IfNotPresent volumeMounts: - name: longhorn-pvc mountPath: /data ports: - containerPort: 80 volumes: - name: longhorn-pvc persistentVolumeClaim: claimName: longhorn-pvc -
Step 2. Apply the manifest file
kubectl apply -f longhorn_test.yml -
Step 3. Check created POD has been started
kubectl get pods -o wide -n testing-longhorn -
Step 4. Check pv and pvc have been created
kubectl get pv -n testing-longhorn kubectl get pvc -n testing-longhorn -
Step 5. Connect to the POD and make use of the created volume
Get a shell to the container and create a file on the persistent volume:
kubectl exec -n testing-longhorn -it longhorn-test -- sh echo "testing" > /data/test.txt -
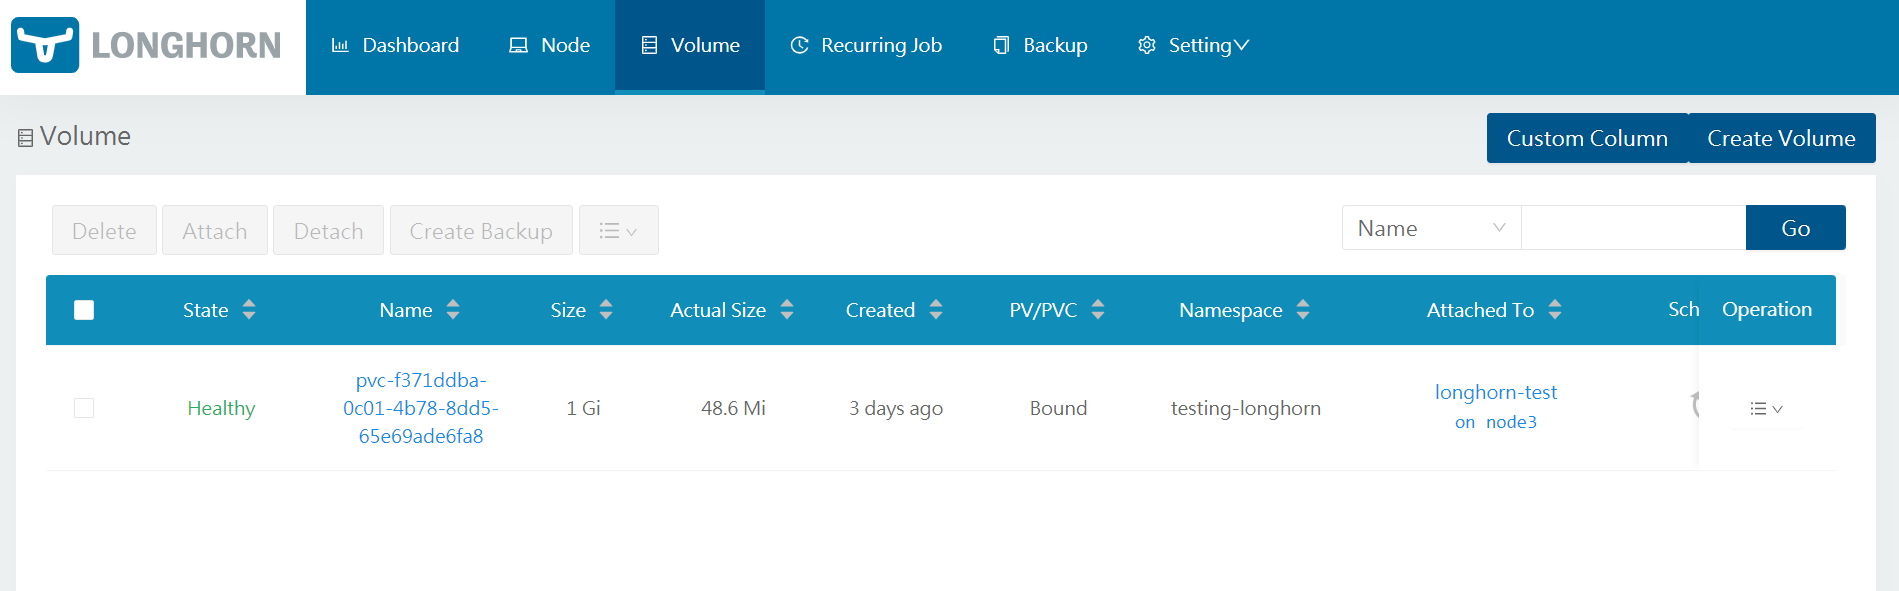
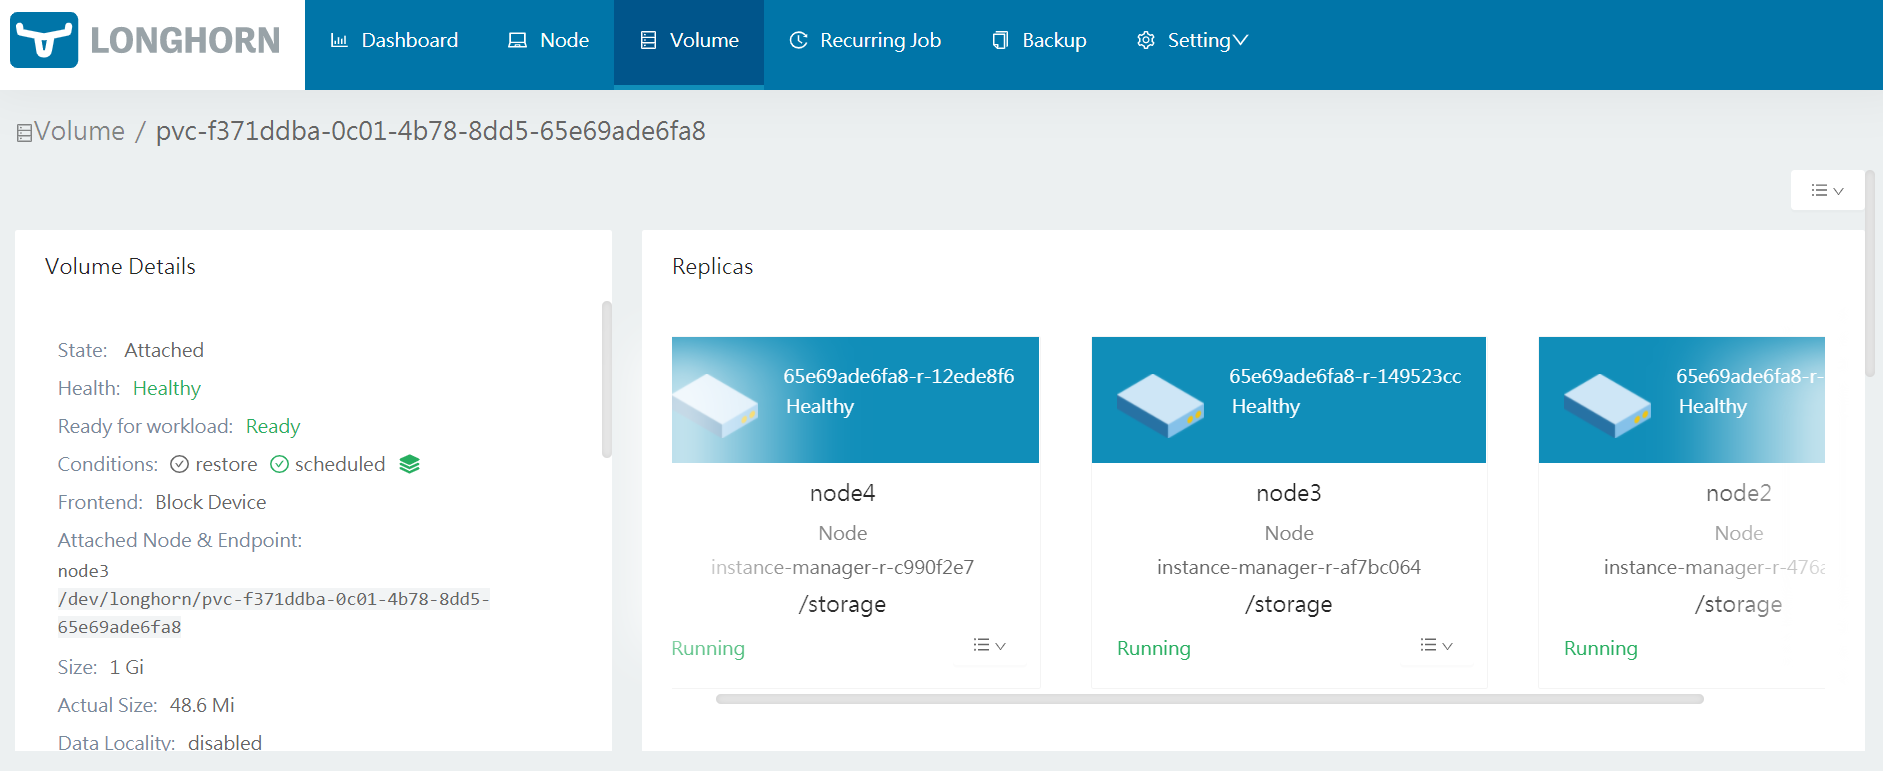
Step 6. Check in the longhorn-UI the created volumes and the replicas.
LongHorn Configuration
Setting Longhorn as default Kubernetes StorageClass
Note:
This step is not needed if K3s is installed disabling Local Path Provisioner (installation option: --disable local-storage).
In case that this parameter is not configured the following procedure need to be applied.
By default K3S comes with Rancher’s Local Path Provisioner and this enables the ability to create persistent volume claims out of the box using local storage on the respective node.
In order to use Longhorn as default storageClass whenever a new Helm is installed, Local Path Provisioner need to be removed from default storage class.
After longhorn installation check default storage classes with command:
kubectl get storageclass
NAME                   PROVISIONER             RECLAIMPOLICY   VOLUMEBINDINGMODE      ALLOWVOLUMEEXPANSION   AGE
local-path (default)   rancher.io/local-path   Delete          WaitForFirstConsumer   false                  10m
longhorn (default)     driver.longhorn.io      Delete          Immediate              true                   3m27s
Both Local-Path and longhorn are defined as default storage classes:
Remove Local path from default storage classes with the command:
kubectl patch storageclass local-path -p '{"metadata": {"annotations":{"storageclass.kubernetes.io/is-default-class":"false"}}}'
Procedure is explained in kubernetes documentation: “Change default Storage Class”.
Securing Longhorn UI
Longhorn dashboard is exposed through an HTTPRoute resource. Longhorn does not have any authentication mechanism configured, and the dashboard is accessible without authentication.
Authentication can be enforced at the Envoy Gateway level using Security Policies. Different authentication mechanisms are supported, including HTTP Basic Auth and OIDC integration with Identity Providers like Keycloak.
See Envoy Gateway documentation where the example to secure Longhorn dashboard with OIDC authentication is provided.
Longhorn backup configuration
Longhorn support snapshot capability. Snapshot in Longhorn is an object that represents content of a Longhorn volume at a particular moment. It is stored inside the cluster. A snapshot6 in Longhorn captures the state of a volume at the time the snapshot is created. Each snapshot only captures changes that overwrite data from earlier snapshots, so a sequence of snapshots is needed to fully represent the full state of the volume. Volumes can be restored from a snapshot.
Snapshots are stored locally, as a part of each replica of a volume. They are stored on the disk of the nodes within the Kubernetes cluster. Snapshots are stored in the same location as the volume data on the host’s physical disk.
Longhorn can also backup the Volume content to backupstore (NFS or S3). A backup7 in longhorn is an object that represent the content of a Longhorn volume at a particular time but stored in a external storage (NFS or S3).
Longhorn support two types of backup: incremental and full-backup
- Incremental backup: A backup of a snapshot is copied to the backupstore. With incremental backup, Longhorn backs up only data that was changed since the last backup. (delta backup)
- Full backup: Longhorn can perform full backups that upload all data blocks in the volume and overwrite existing data blocks in the backupstore.
S3 Backupstore
For configuring Longhorn’s backup capability, it is needed to define a backup target, external storage system where longhorn volumes are backed to and restore from. Longhorn support NFS and S3 based backup targets.
RustFS is used as the S3-compatible backend. See further details about installing the external S3 server for the cluster in: “PiCluster - S3 Backup Backend”
Install S3 backup server
See installation instructions in “PiCluster - S3 Backup Backend”.
Configure S3 bucket and user
| User | Bucket |
|---|---|
| longhorn | k3s-longhorn |
-
Create bucket for storing Longhorn backups/snapshots
rc mb ${S3_ALIAS}/k3s-longhorn - Add
longhornuser using RustFS CLIrc admin user add ${S3_ALIAS} longhorn supersecret -
Define user policy to grant
longhornuser access to backups bucket Create filelonghorn_policy.jsonfile:{ "Version": "2012-10-17", "Statement": [ { "Effect": "Allow", "Action": [ "s3:DeleteObject", "s3:GetObject", "s3:ListBucket", "s3:PutObject" ], "Resource": [ "arn:aws:s3:::k3s-longhorn", "arn:aws:s3:::k3s-longhorn/*" ] } ] }This policy grants read-write access to
k3s-longhornbucket - Add access policy to
longhornuser:rc admin policy create ${S3_ALIAS} longhorn longhorn_policy.json rc admin policy attach ${S3_ALIAS} longhorn longhorn
Configure Longhorn backup target
-
Create kubernetes
Secretresource containing S3 end-point access information and credentials:longhorn-s3-secret.ymlapiVersion: v1 kind: Secret metadata: name: longhorn-s3-secret namespace: longhorn-system type: Opaque data: AWS_ACCESS_KEY_ID: <base64_encoded_access_key> # longhorn AWS_SECRET_ACCESS_KEY: <base64_encoded_secret_key> # longhornpass AWS_ENDPOINTS: <base64_encoded_endpoint> # https://object-store.homelab.ricsanfre.com:9091 AWS_CERT: <base64_encoded_ssl_pem> # ssl_certificate, containing complete chain, including CANote:
AWS_CERTparameter is only needed in case of using a self-signed certificate.For encoding the different access paramenters the following commands can be used:
echo -n s3_url | base64
echo -n access_key_id | base64
echo -n secret_access_key | base64
cat ssl.pem ca.pem | base64 | tr -d "\n"
Important: As the command shows, SSL certificates in the validation chain must be concatenated and
\ncharacters from the base64 encoded SSL pem must be removed. -
Apply manifest file
kubectl apply -f longhorn-s3-secret.yml -
Go to the Longhorn UI. In the top navigation bar, click
Settings. In the Backup Target section, set Backup Target URL to:s3://<bucket-name>@<s3-region>/Important: Make sure that you have
/at the end, otherwise you will get an error.Set Credential Secret to the secret resource created before:
longhorn-s3-secret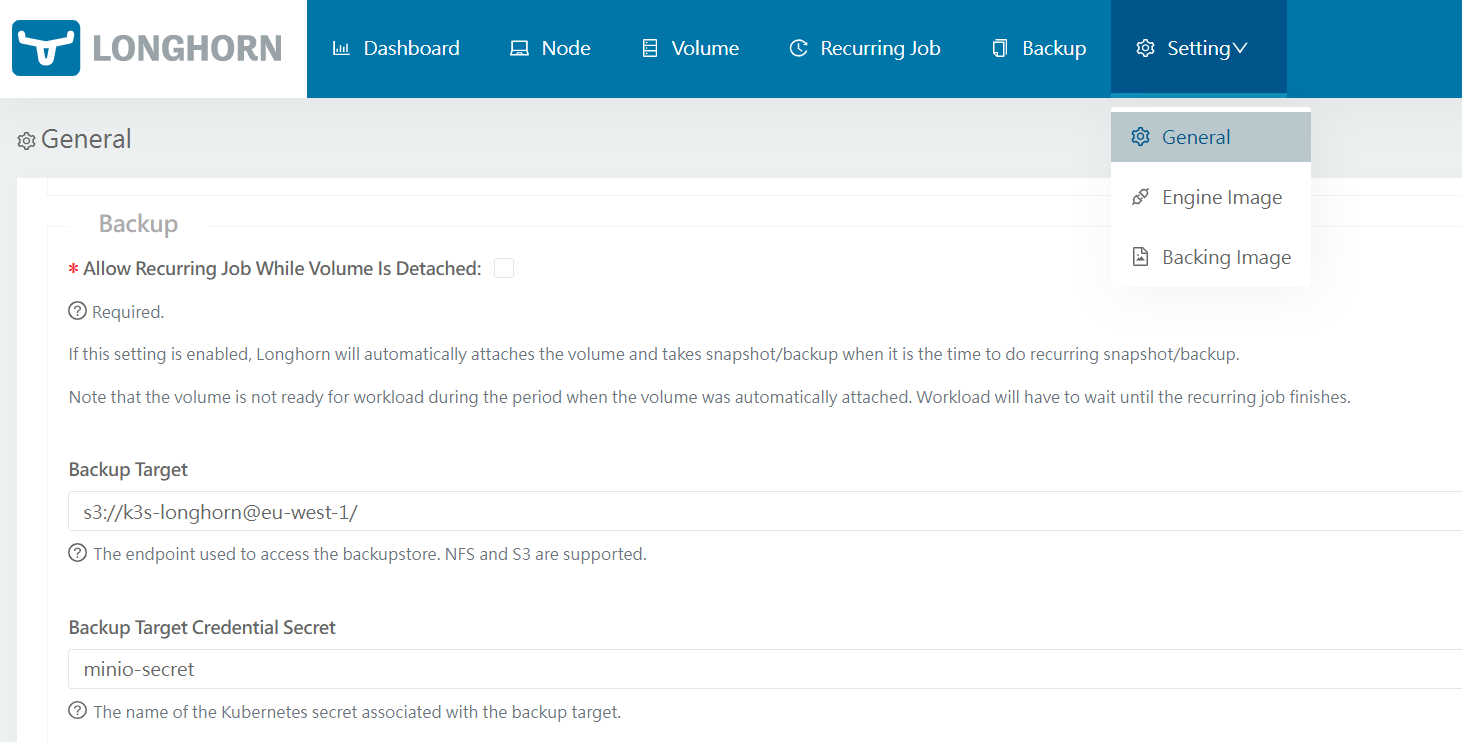
Backup Target can be automatically configured when deploying Longhorn using Helm chart.
Note: Longhorn v1.8.0+ backup store configuration
Starting with Longhorn v1.8.0, backup targets are managed as dedicated
BackupTargetcustom resources. While the legacydefaultSettings.backupTargetHelm value is still accepted, the recommended approach is thedefaultBackupStoreblock:# Longhorn v1.8.0+ backup store configuration defaultBackupStore: backupTarget: "s3://k3s-longhorn@eu-west-1/" backupTargetCredentialSecret: "longhorn-s3-secret" pollInterval: "300"
Scheduling longhorn volumes backup
A Longhorn recurring job can be created for scheduling periodic backups/snapshots of volumes. See details in Longhorn - Scheduling backups and snapshots.
Note: About Velero Integration
If Velero is used to perform full cluster backup, including Longhorn’s Persistent Volumes using CSI Snapshots, configuring this job is not needed.
See details about Velero installation and configuration in “Pi Cluster - Backup and Restore with Velero”
-
Create
RecurringJobmanifest resource--- apiVersion: longhorn.io/v1beta1 kind: RecurringJob metadata: name: backup namespace: longhorn-system spec: cron: "0 5 * * *" task: "backup" groups: - default retain: 2 concurrency: 2 labels: type: 'full' schedule: 'daily'This will create recurring backup job for
default. Longhorn will automatically add a volume to the default group when the volume has no recurring job. -
Apply manifest file
kubectl apply -f recurring_job.yml
Configuring CSI Snapshot API
Longhorn supports creating and restoring Longhorn snapshots/backups via the Kubernetes CSI snapshot mechanism.
Longhorn does support, Kubernetes CSI snapshot API to take snapshots/backups programmatically. See Longhorn documentation: CSI Snapshot Support.
Enable CSI snapshots support in K3S
K3S distribution currently does not come with a preintegrated Snapshot Controller that is needed to enable CSI Snapshot feature. An external snapshot controller need to be deployed. K3S can be configured to use kubernetes-csi/external-snapshotter.
To enable this feature, follow instructions in Longhorn documentation - Enable CSI Snapshot Support.
Note:
Each release of Longhorn is compatible with a specific version external-snapshotter. Do not install latest available version.
For example, in Longhorn 1.9.0, CSI Snapshots support is compatible with kubernetes-csi/external-snapshotter release v8.2.0.
Check which version to use in Longhorn documentation - Enable CSI Snapshot Support.
-
Step 1. Prepare kustomization yaml file to install external csi snaphotter (setting namespace to
kube-system)tmp/kustomization.yamlapiVersion: kustomize.config.k8s.io/v1beta1 kind: Kustomization namespace: kube-system resources: - https://github.com/kubernetes-csi/external-snapshotter/client/config/crd/?ref=v8.2.0 - https://github.com/kubernetes-csi/external-snapshotter/deploy/kubernetes/snapshot-controller/?ref=v8.2.0 -
Step 2. Deploy Snapshot-Controller
kubectl apply -k ./tmp
Configure Longhorn CSI Snapshots
VolumeSnapshotClass objects from CSI Snapshot API need to be configured
-
Create
VolumeSnapshotClassto create Longhorn snapshots (in-cluster snapshots, not backed up to S3 backend),volume_snapshotclass_snap.yml# CSI VolumeSnapshot Associated With Longhorn Snapshot kind: VolumeSnapshotClass apiVersion: snapshot.storage.k8s.io/v1 metadata: name: longhorn-snapshot-vsc driver: driver.longhorn.io deletionPolicy: Delete parameters: type: snap -
Create
VolumeSnapshotClassto create Longhorn backups (backed up to S3 backend),volume_snapshotclass_bak.yml# CSI VolumeSnapshot Associated With Longhorn Backup kind: VolumeSnapshotClass apiVersion: snapshot.storage.k8s.io/v1 metadata: name: longhorn-backup-vsc driver: driver.longhorn.io deletionPolicy: Delete parameters: type: bak -
Apply manifest file
kubectl apply -f volume_snapshotclass_snap.yml volume_snapshotclass_bak.yml
Testing CSI
-
Create a Longhorn Snapshot creation request
VolumeSnapshot can be requested applying following manifest file
apiVersion: snapshot.storage.k8s.io/v1
kind: VolumeSnapshot
metadata:
  name: test-csi-volume-snapshot-longhorn-snapshot
spec:
  volumeSnapshotClassName: longhorn-snapshot-vsc
  source:
    persistentVolumeClaimName: test-vol
A Longhorn snapshot is created. The
VolumeSnapshotobject creation leads to the creation of aVolumeSnapshotContentKubernetes object. The VolumeSnapshotContent refers to a Longhorn snapshot in itsVolumeSnapshotContent.snapshotHandlefield with the namesnap://volume-name/snapshot-name -
Create a Longhorn Backup creation request
apiVersion: snapshot.storage.k8s.io/v1
kind: VolumeSnapshot
metadata:
  name: test-csi-volume-snapshot-longhorn-backup
spec:
  volumeSnapshotClassName: longhorn-backup-vsc
  source:
    persistentVolumeClaimName: test-vol
A Longhorn backup is created. The
VolumeSnapshotobject creation leads to the creation of aVolumeSnapshotContentKubernetes object. TheVolumeSnapshotContentrefers to a Longhorn backup in itsVolumeSnapshotContent.snapshotHandlefield with the namebak://backup-volume/backup-name
Observability
Metrics
As stated by official documentation8, Longhorn natively exposes metrics in Prometheus text format9 at a REST endpoint http://LONGHORN_MANAGER_IP:PORT/metrics.
Longhorn Backend kubernetes service is pointing to the set of Longhorn manager pods. Longhorn’s metrics are exposed in Longhorn manager pods at the endpoint http://LONGHORN_MANAGER_IP:PORT/metrics
Backend endpoint is already exposing Prometheus metrics.
Prometheus Integration
ServiceMonitoring, Prometheus Operator’s CRD, resource can be automatically created so Kube-Prometheus-Stack is able to automatically start collecting metrics from Longhorn
metrics:
  serviceMonitor:
    enabled: true
Grafana Dashboards
See Grafana Operator - Provisioning Dashboards for the general GrafanaDashboard onboarding patterns.
Longhorn dashboard sample can be donwloaded from grafana.com: dashboard id: 13032.
The dashboard can be onboarded with a GrafanaDashboard resource:
apiVersion: grafana.integreatly.org/v1beta1
kind: GrafanaDashboard
metadata:
  name: longhorn
spec:
  allowCrossNamespaceImport: true
  folder: Infrastructure
  instanceSelector:
    matchLabels:
      dashboards: grafana
  grafanaCom:
    id: 16888
    revision: 11
  datasources:
    - inputName: DS_PROMETHEUS
      datasourceName: Prometheus
-
Mount Propagation is a feature activated by defult since Kubernetes v1.14 ↩
-
Prometheus - Instrumenting - Exposition formats: Test-based-format ↩