Identity Access Management with Keycloak
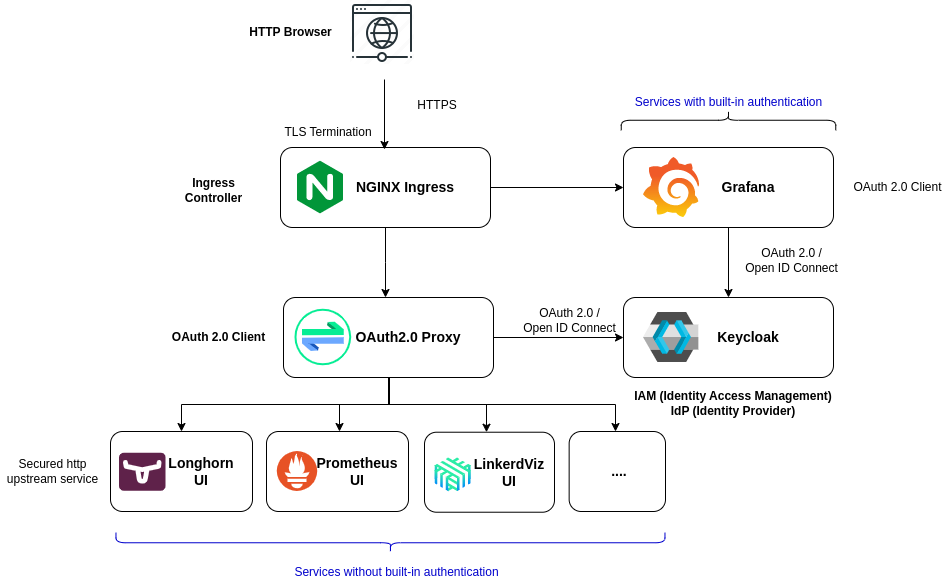
Centralized authentication and Single-Sign On can be implemented using Keycloak. Keycloak is an opensource Identity Access Management solution, providing centralized authentication and authorization services based on standard protocols and provides support for OpenID Connect, OAuth 2.0, and SAML.
sequenceDiagram
  actor User
  participant Keycloak
  participant Application
    User->>Application: User enters URL of an Application
    Application->>Keycloak: Redirects to Keycloak
    Keycloak->>User: Login page
    User->>Keycloak: User gives credentials
    Keycloak-->>Keycloak: Validates User
    Keycloak->>Application: if Valid, Redirect to Application
    Keycloak-->>User: Invalid credentials
-
Some of the GUIs of the Pi Cluster, Grafana, Kibana, Kiali, support SSO to be configured with an external IAM solution, delegating authentication to Keycloak instead of using local accounts.
Note:
Elasticsearch/Kibana SSO integration using OpenID Connect is not available in community edition. So, SSO won’t be configured for this component. Grafana SSO capability is enabled configuring OAuth2.0/OpenID Connect authentication. Follow instructions in Documentation: Monitoring (Prometheus) on how to integrate Grafana with Keycloak.
-
For those applications not providing their own authentication capability (i.e. Longhorn, Prometheus, Alertmanager, Hubble, Kafdrop), Pi Cluster uses Envoy Gateway native OpenID Connect authentication. Authentication is enforced directly at the gateway through
SecurityPolicyresources attached to the correspondingHTTPRoute, with Keycloak acting as the identity provider. See Envoy Gateway - OIDC Authentication for the detailed routing and policy model.
Keycloak
Keycloak Operator
Keycloak is installed using Keycloak Operator. Keycloak Operator is an implementation of Kubernetes Operator design pattern enabling the definition of Keycloak deployment in a declarative way.
Keycloak DB
Keycloak requires a database to store its configuration and data. PostgreSQL is the recommended database for Keycloak.
Deploy PosgreSQL database using CloudNative-PG operator and generate the secrets containing the database credentials
Using CloudNative-PG a, keycload database cluster can be created. See details on how to install CloudNative-PG in “Databases”.
-
Step 1. Create secret for keycloak admin user
apiVersion: v1 kind: Secret metadata: name: keycloak namespace: keycloak type: kubernetes.io/basic-auth data: admin-password: <`echo -n 'supersecret1' | base64`> -
Step 2. Create secret for external database
apiVersion: v1 kind: Secret metadata: name: keycloak-db-secret namespace: keycloak labels: cnpg.io/reload: "true" type: kubernetes.io/basic-auth data: username: <`echo -n 'keycloak' | base64`> password: <`echo -n 'supersecret' | base64`> -
Step 1. Create CloudNative PG database for keycloak
apiVersion: postgresql.cnpg.io/v1
kind: Cluster
metadata:
  name: keycloak-db
  namespace: keycloak
spec:
  instances: 3
  imageName: ghcr.io/cloudnative-pg/postgresql:16.3-4
  storage:
    size: 10Gi
    storageClass: longhorn
  monitoring:
    enablePodMonitor: true
  bootstrap:
    initdb:
      database: keycloak
      owner: keycloak
      secret:
        name: keycloak-db-secret
  # Backup to external Minio (Optional)
  backup:
    barmanObjectStore:
      data:
        compression: bzip2
      wal:
        compression: bzip2
        maxParallel: 8
      destinationPath: s3://k3s-barman/keycloak-db
      endpointURL: https://${S3_BACKUP_SERVER}:9091
      s3Credentials:
        accessKeyId:
          name: keycloak-s3-secret
          key: AWS_ACCESS_KEY_ID
        secretAccessKey:
          name: keycloak-s3-secret
          key: AWS_SECRET_ACCESS_KEY
    retentionPolicy: "30d"
Note: Substitute variables (
${var}) in the above yaml file before deploying helm chart.- Replace
${S3_BACKUP_SERVER}by FQDN of the Minio Backup server to be used. For example:s3.mydomain.com
- Replace
Keycloak Operator Installation
There is no official helm chart maintained by the community to install Keycloak Operator
It can be installed via manifest files which are in keycloak/keycloak-k8s-resources GitHub repository:
The installation process is the following:
- Install the CRDs by entering the following commands:
kubectl apply -f https://raw.githubusercontent.com/keycloak/keycloak-k8s-resources/26.7.0/kubernetes/keycloaks.k8s.keycloak.org-v1.yml kubectl apply -f https://raw.githubusercontent.com/keycloak/keycloak-k8s-resources/26.7.0/kubernetes/keycloakrealmimports.k8s.keycloak.org-v1.yml kubectl apply -f https://raw.githubusercontent.com/keycloak/keycloak-k8s-resources/26.7.0/kubernetes/keycloaksamlclients.k8s.keycloak.org-v1.yml kubectl apply -f https://raw.githubusercontent.com/keycloak/keycloak-k8s-resources/26.7.0/kubernetes/keycloakoidcclients.k8s.keycloak.org-v1.yml -
Install the Keycloak Operator deployment by entering the following command:
kubectl apply -f https://raw.githubusercontent.com/keycloak/keycloak-k8s-resources/26.7.0/kubernetes/kubernetes.yml
Note:
In the previous URLs replace version 26.7.0 by the latest Keycloak version available.
Important: Starting from Keycloak 26.7.0, four CRDs are required: keycloaks, keycloakrealmimports, keycloaksamlclients, and keycloakoidcclients. Earlier versions only needed the first two.
The Operator will watch the namespace where it is installed. You may optionally select a namespace with the -n option.
Kustomized package for Keycloak Operator
A Kustomize package can be created to install automatically the application.
keycloak-operator/
├── base
│   ├── kustomization.yaml
│   └── ns.yaml
└── overlays
    ├── dev
    │   └── kustomization.yaml
    └── prod
        └── kustomization.yaml
-
keycloak-operator/base/kustomization.yamlapiVersion: kustomize.config.k8s.io/v1beta1 kind: Kustomization namespace: keycloak resources: - ns.yaml - https://raw.githubusercontent.com/keycloak/keycloak-k8s-resources/26.7.0/kubernetes/keycloaks.k8s.keycloak.org-v1.yml - https://raw.githubusercontent.com/keycloak/keycloak-k8s-resources/26.7.0/kubernetes/keycloakrealmimports.k8s.keycloak.org-v1.yml - https://raw.githubusercontent.com/keycloak/keycloak-k8s-resources/26.7.0/kubernetes/keycloaksamlclients.k8s.keycloak.org-v1.yml - https://raw.githubusercontent.com/keycloak/keycloak-k8s-resources/26.7.0/kubernetes/keycloakoidcclients.k8s.keycloak.org-v1.yml - https://raw.githubusercontent.com/keycloak/keycloak-k8s-resources/26.7.0/kubernetes/kubernetes.yml -
keycloak-operator/base/ns.yamlapiVersion: v1 kind: Namespace metadata: name: keycloak -
keycloak-operator/overlays/prod/kustomization.yamlapiVersion: kustomize.config.k8s.io/v1beta1 kind: Kustomization resources: - ../../base
Installing kustomize package application using the command:
kubectl kustomize keycloak-operator/overly/product | kubectl apply -f -
Keycloak Deployment
Keycloak CRD need to be applied to the kubernetes cluster, so Operator can deploy Keycloak.
Keycloak operator supports deployment of Keycloak in HA with several nodes of a single clusterr
The following creates a Keycloak server with the following options
- Initial admin bootstrapping (
bootstrapAdmin) from an external secret - Enabling HTTP endpoint (
http.httpEnabled) and not configuring HTTPs. Keycloak runs behind Envoy Gateway, which terminates TLS sessions. - Disable creation of Keycloak-managed Ingress resource (
ingress.enabled). External exposure is configured separately with a Gateway APIHTTPRoute. - Keyclaok cluster of two instances (
instances)
and bootstrapping temporal admin user account
apiVersion: k8s.keycloak.org/v2alpha1
kind: Keycloak
metadata:
  name: keycloak
  namespace: keycloak
spec:
  # Number of instances in the cluster
  instances: 2
  # External Database connection
  db:
    vendor: postgres
    host: keycloak-db-rw
    port: 5432
    database: keycloak
    usernameSecret:
      name: keycloak-db-secret
      key: username
    passwordSecret:
      name: keycloak-db-secret
      key: password

  # Bootstrap admin account
  bootstrapAdmin:
    user:
      secret: keycloak
  # Enabling HTTP communications
  # Keycloak behing HTTP Proxy closing TLS connections
  http:
    httpEnabled: true
  hostname:
    hostname: https://iam.${CLUSTER_DOMAIN}
    strict: true
    # Enabling back channel
    backchannelDynamic: true
  proxy:
    headers: xforwarded # double check your reverse proxy sets and overwrites the X-Forwarded-* headers
  # Do not create ingress
  # External exposure is configured separately with a Gateway API HTTPRoute.
  ingress:
    enabled: false
Bootstrapping admin account
A temporal admin account1 can be provided from a secret through spec.bootstrapAdmin
...
spec:
  # Bootstrap admin account
  bootstrapAdmin:
    user:
      secret: keycloak
Additional Options
Some expert server options are unavailable as dedicated fields in the Keycloak CR.
The spec.additionalOptions2 field of the Keycloak CR enables Keycloak to accept any available configuration in the form of key-value pairs.
You can use this field to include any option that is omitted in the Keycloak CR.
For details on configuring options, see Keycloak configuration reference guide.
The values can be expressed as plain text strings or Secret object references as shown in this example:
apiVersion: k8s.keycloak.org/v2alpha1
kind: Keycloak
metadata:
  name: example-kc
spec:
  # ...
  additionalOptions:
    - name: spi-connections-http-client-default-connection-pool-size
      secret: # Secret reference
        name: http-client-secret # name of the Secret
        key: poolSize # name of the Key in the Secret
    - name: spi-email-template-mycustomprovider-enabled
      value: true # plain text value
Creating HTTPRoute
Create an HTTPRoute resource for Keycloak so traffic is routed through Envoy Gateway. TLS is terminated at the shared public-gateway Gateway, using the certificate configured for Envoy Gateway.
apiVersion: gateway.networking.k8s.io/v1
kind: HTTPRoute
metadata:
  name: keycloak
  namespace: keycloak
spec:
  parentRefs:
    - name: public-gateway
      namespace: envoy-gateway-system
  hostnames:
    - iam.${CLUSTER_DOMAIN}
  rules:
    - matches:
        - path:
            type: PathPrefix
            value: /
      backendRefs:
        - name: keycloak-service
          port: 8080
Note:
External-DNS can automatically create the DNS record for iam.${CLUSTER_DOMAIN} from the HTTPRoute hostname when Gateway API route sources are enabled. See DNS (CoreDNS and External-DNS) - Gateway API support.
For Gateway listener and TLS configuration details, see Envoy Gateway - Gateway and TLS termination.
Important:
Only http port (8080) is exposed. Management port (9000) is not exposed
Keycloak Realm Import
Realm configuration can be imported also in a declarative way using Keycloak Operator3.
To import a realm, KeycloakRealmImport Kubernetes CRD has to be created:
Create keycloak-realm-import.yaml
apiVersion: k8s.keycloak.org/v2alpha1
kind: KeycloakRealmImport
metadata:
  name: mycluster
  namespace: keycloak
spec:
  keycloakCRName: keycloak
  realm:
   <realm representation>
This CR should be created in the same namespace as the Keycloak Deployment CR, defined in the field keycloakCRName. The realm field accepts a full RealmRepresentation.
The recommended way to obtain a RealmRepresentation is by leveraging the export functionality Importing and Exporting Realms.
- Export the Realm to a single file.
-
Convert the JSON file to YAML.
Tip: Conversion can be done automatically with
yqtoolsudo apt install yq cat realm.json | yq -y -
Copy and paste the obtained YAML file as body for the
spec.realmkey in KeycloakrRealmImport manifest, making sure the indentation is correct. -
Apply the changes:
kubectl apply -f keycloak-realm-import.yaml -
To check the status of the running import, enter the following command:
kubectl get keycloakrealmimports/mycluster -o go-template='{{range .status.conditions}}CONDITION: {{.type}}{{"\n"}} STATUS: {{.status}}{{"\n"}} MESSAGE: {{.message}}{{"\n"}}{{end}}'
Realm Import Limitations
- If a Realm with the same name already exists in Keycloak, it will not be overwritten.
- The Realm Import CR only supports creation of new realms and does not update or delete those. Changes to the realm performed directly on Keycloak are not synced back in the CR
After testing the functionality additional limitation has been discovered:
- Client Scopes import is not working as expected (default Client Scopes are not present after doing the import of only new client scopes)
| Resource | Test Status | Result |
|---|---|---|
| client | ✅ | Defined Clients are added to default clients (added by default when creating a new realm): account, broker, account-console, etc. |
| client-roles | ✅ | New Client roles are added properly to the corresponding client. |
| users | ✅ | Users added. Default realm creation does not create any users |
| groups | ✅ | Groups added. Default realm creation does not create any group |
| clientScopes | ❌ | Only client scopes included in the json realm are imported. Default client-scopes, created by default when creating a new realm are deleted |
Note: For importing realm configuration using GitOps paradigm, better use keycloak-config-cli tool see section below.
This tools support import/re-import of configuration including the support for importing clientScopes without purging the existing ones.
Keycloak Configuration
Manual Configuration
-
Step 1: Login as admin to Keycloak console
Open URL:
https://iam.${CLUSTER_DOMAIN} -
Step 2: Create a new realm
piclusterFollow procedure in Keycloak documentation:Keycloak: Creating a Realm
-
Step 3: Start on-boarding applications
For configuring Grafana’s application in Keycloak to enable SSO, follows steps described in “Grafana Installation - Configuring SSO”
For configuration OAuth Proxy authentication middleware follow steps described below
-
Step 4: Create user
Admin user:
piadmincan be created manually and assigning the required roles of the different applications.Follow procedrure in Keycloak documentation: Keycoak: Managing Users
Automating configuration changes with keycloak-config-cli
keycloak-config-cli is a Keycloak utility to ensure the desired configuration state for a realm based on a JSON/YAML file. It can be used to apply GitOps and IaC (Infrastructure as Code) concepts to Keycloak configuration
The config files are based on the keycloak export files, and they can be used to import or update Keycloak configuration without having to restart Keycloak.
keyclaok-config-cli utility can be executed in Kubernetes environment as a Job.
The kubernetes application can be packaged using kustomize
keycloak-config-cli
├── base
│   ├── config
│   │   ├── 01-realm.json
│   │   ├── 02-clients.json
│   │   ├── 03-groups.json
│   │   └── 04-users.json
│   ├── job.yaml
│   ├── kc-config-cli-env-secret.yaml
│   └── kustomization.yaml
└── overlays
    ├── dev
    │   └── kustomization.yaml
    └── prod
        └── kustomization.yaml
Where base/config directory stores the keycloak configuration files in json format. keycloak-config-cli will be configured to import all files in sequence order
keycloak-config-cli/base/kustomization.yamlapiVersion: kustomize.config.k8s.io/v1beta1 kind: Kustomization namespace: keycloak configMapGenerator: # Generate keycloak config realm - name: keycloak-realm-configmap files: - config/01-realm.json - config/02-clients.json - config/03-groups.json - config/04-users.json resources: - kc-config-cli-env-secret.yaml - job.yamlKustomize application automatically generates a configMap
kecloak-realm-configmapcontaining the keyclaok configuration json files. This configMap will be automatically mounted by the POD running the Kubernetes Job to import the configuration-
keycloak-config-cli/base/kc-config-cli-env-secret.yamlSecret containing environment variables that will be used by
keycloak-config-cli.apiVersion: v1 kind: Secret metadata: name: kc-config-cli-secret namespace: keycloak stringData: KEYCLOAK_ADMIN: admin KEYCLOAK_PASSWORD: supersecret -
keycloak-config-cli/base/job.yamlapiVersion: batch/v1 kind: Job metadata: name: keycloak-import-realm labels: app.kubernetes.io/name: keycloak-config-cli spec: backoffLimit: 1 template: metadata: labels: app.kubernetes.io/name: keycloak-config-cli spec: restartPolicy: Never containers: - name: keycloak-config-cli image: "docker.io/adorsys/keycloak-config-cli:6.4.0-26.1.0" imagePullPolicy: IfNotPresent env: - name: "IMPORT_PATH" value: "/config/" - name: "KEYCLOAK_URL" value: "http://keycloak-service:8080" # Enable variable substitution - name: "IMPORT_VARSUBSTITUTION_ENABLED" value: "true" - name: "CLUSTER_DOMAIN" value: ${CLUSTER_DOMAIN} - name: "PI_ADMIN_FIRSTNAME" value: ${PI_ADMIN_FISTNAME} - name: "PI_ADMIN_LASTNAME" value: ${PI_ADMIN_LASTNAME} # Additional environment variables in secret envFrom: - secretRef: name: kc-config-cli-env volumeMounts: - name: config mountPath: /config volumes: - name: config configMap: name: "keycloak-realm-configmap" defaultMode: 0555The following environment variables are configured
KEYCLOAK_URL: Endpoint where keycloak service is accessibleIMPORT_VARSIBSTITUTION_ENABLED: So variables defined within json configuration files can be substituted before importing the filesIMPORT_PATH: Path where the config files to be imported are located. Pointing to ConfigMap mount point.
Additional environment variables are provided by
kc-config-cli-envSecret.KEYCLOAK_USERandKEYCLOAK_PASSWORDKeycloak admin user and password.
Also any variable used in configuration json files need to be provided to the POD.
-
keycloak-config-cli/overlays/prod/kustomization.yamlapiVersion: kustomize.config.k8s.io/v1beta1 kind: Kustomization resources: - ../../base
The following keycloak config files can be used to configure automatically Keycloak
-
keycloak-config-cli/base/config/01-realm.json. Used to create a new realmpicluster{ "enabled": true, "realm": "picluster" } -
keycloak-config-cli/base/config/04-clients.json. Containing configuration of different client applications (grafana, longhorn, prometheus, alertmanager, etc.)
As example, a client for the Longhorn dashboard protected by Envoy Gateway can be automatically imported with the following:
```json
{
    "enabled": true,
    "realm": "picluster",
    "clients": [
      {
        "clientId": "$(env:LONGHORN_CLIENT_ID)",
        "name": "Longhorn Dashboard",
        "description": "Longhorn Dashboard",
        "surrogateAuthRequired": false,
        "enabled": true,
        "clientAuthenticatorType": "client-secret",
        "secret": "$(env:LONGHORN_CLIENT_SECRET)",
        "redirectUris": [
          "https://longhorn.$(env:CLUSTER_DOMAIN)/oauth2/callback"
        ],
        "webOrigins": [
          "https://longhorn.$(env:CLUSTER_DOMAIN)"
        ],
        "standardFlowEnabled": true,
        "directAccessGrantsEnabled": false,
        "protocol": "openid-connect",
        "protocolMappers": [
          {
            "name": "aud-mapper-proxy-oauth2",
            "protocol": "openid-connect",
            "protocolMapper": "oidc-audience-mapper",
            "consentRequired": false,
            "config": {
              "included.client.audience": "$(env:LONGHORN_CLIENT_ID)",
              "id.token.claim": "true",
              "access.token.claim": "true"
            }
          }
        ],
        "defaultClientScopes": [
          "web-origins",
          "acr",
          "roles",
          "profile",
          "email"
        ],
        "optionalClientScopes": [
          "address",
          "phone",
          "offline_access",
          "microprofile-jwt"
        ],
        "access": {
          "view": true,
          "configure": true,
          "manage": true
        }
      }
    ]
}
```
  `keycloak-config-cli` pod has to be executed with environment variables containing client application credentials (`LONGHORN_CLIENT_ID` and `LONGHORN_CLIENT_SECRET`) and cluster services base DNS domain (`CLUSTER_DOMAIN`).
-
keycloak-config-cli/base/config/03-groups.json. Used to create aadminof users, with roles in differente applications (example :grafana admins){ "enabled": true, "realm": "picluster", "groups": [ { "name": "admin", "path": "/admin", "subGroups": [], "attributes": {}, "realmRoles": [], "clientRoles": { "grafana": [ "admin" ] } } ] } -
keycloak-config-cli/base/config/04-users.json. Used to create apiadminuser, belonging toadmingroup. All attributes of the user can be provided to keycloak-config-cli as environment variables (PI_ADMIN_USERNAME,PI_ADMIN_FIRSTNAME,PI_ADMIN_LAST_NAME,PI_ADMIN_PASSWORD, etc.){ "enabled": true, "realm": "picluster", "users": [ { "username": "$(env:PI_ADMIN_USERNAME)", "firstName": "$(env:PI_ADMIN_FIRSTNAME)", "lastName": "$(env:PI_ADMIN_LASTNAME)", "email": "admin@$(env:CLUSTER_DOMAIN)", "enabled": true, "emailVerified": true, "credentials": [ { "type": "password", "value": "$(env:PI_ADMIN_PASSWORD)" } ], "realmRoles": [ "default-roles-picluster" ], "groups": [ "admin" ] } ] }
To execute configuration import:
kubectl kustomization keycloak-config-cli/overlays/prod | kubectl apply -f -
Note: About re-executing the import job
Attempting to update the Job manifest after it has been applied to the cluster will not be allowed, as changes to the Job spec.Completions, spec.Selector and spec.Template are not permitted by the Kubernetes API. To be able to update a Kubernetes Job, the Job has to be recreated by first being removed and then reapplied to the cluster.
In case of integrating with GitOps tool, like FluxCD, the following annotation need to be added to the job, so FluxCD will automatically recreate it whenever there are changes to be applied: kustomize.toolkit.fluxcd.io/force: enabled
apiVersion: batch/v1
kind: Job
metadata:
  name: keycloak-import-realm
  labels:
    app.kubernetes.io/name: keycloak-config-cli
  annotations:
    # Update the Job manifest after it has been applied to the cluster is not allowed:
    #  - changes to the Job spec.Completions, spec.Selector and spec.Template are not permitted by the Kubernetes API (inmutable fields)
    # Force recreation of the Job
    # Kubernetes does not allow to patch Jobs
    # Ref: https://fluxcd.io/flux/use-cases/running-jobs/
    # Ref: https://fluxcd.io/flux/components/kustomize/kustomizations/#force
    kustomize.toolkit.fluxcd.io/force: enabled
  spec:
    # ...
Automating configuration with Terraform and Flux Tofu Controller
As an alternative to keycloak-config-cli, Keycloak realm configuration can be managed with OpenTofu/Terraform.
The project repository pi-cluster already includes a Keycloak Terraform module to configure Keycloak realm, clients, groups and users in a declarative way. The module can be executed manually or automatically with Flux Tofu Controller:
Module: terraform/keycloak/ that uses the official Keycloak provider to manage Keycloak realm configuration in a declarative way and HashiCorp Vault provider to read credentials and secrets from Vault at runtime.
Providers used in the module:
- Keycloak provider: keycloak/keycloak (OpenTofu Registry)
- Vault provider: hashicorp/vault (OpenTofu Registry)
The Terraform module manages realm resources from JSON files in terraform/keycloak/resources/:
JSON schema and examples are documented in terraform/keycloak/JSON_FORMAT_GUIDE.md.
realm/realm.jsonclients/*.jsonclient_roles/*.jsongroups/*.jsonusers/*.jsonscopes/*.json
For further details read README in the module directory: terraform/keycloak/README.md.
Automating with Tofu Controller
The Terraform module can be automatically reconciled by Flux Tofu Controller, which executes the Terraform code and applies the configuration to Keycloak.
For general controller installation and operational concepts, see Flux Tofu Controller Usage.
How it works
- Flux source-controller publishes the Git artifact.
- Tofu Controller reconciles the
Terraformcustom resource. - The module logs in to Vault using Kubernetes auth role
tf-runner. - Credentials/secrets are read from Vault, then Keycloak realm objects are created/updated declaratively.
Example Terraform custom resource (already present in this repo):
apiVersion: infra.contrib.fluxcd.io/v1alpha2
kind: Terraform
metadata:
  name: config-keycloak
  namespace: flux-system
spec:
  interval: 30m
  approvePlan: auto
  path: ./terraform/keycloak
  sourceRef:
    kind: GitRepository
    name: flux-system
    namespace: flux-system
  vars:
    - name: tofu_controller_execution
      value: "true"
    - name: vault_address
      value: "https://vault.${CLUSTER_DOMAIN}:8200"
    - name: vault_kubernetes_auth_login_path
      value: "auth/kubernetes/login"
    - name: vault_kubernetes_auth_role
      value: "tf-runner"
    - name: keycloak_url
      value: "http://keycloak-service.keycloak.svc:8080"
    - name: cluster_domain
      value: "${CLUSTER_DOMAIN}"
Operational workflow
- Edit realm/client/group/user/scope JSON files under
terraform/keycloak/resources/. - Commit and push changes to the Git branch watched by Flux.
- Reconcile and verify:
flux reconcile terraform config-keycloak -n flux-system
kubectl -n flux-system get terraform config-keycloak
kubectl -n flux-system describe terraform config-keycloak
Note:
Prerequisite: Vault Kubernetes auth must include the tf-runner role bound to the Tofu runner service account in flux-system, and policies must allow reading all secrets required by the Keycloak Terraform module.
For the actual tf-runner Vault role/policy configuration and CLI snippets, see Flux Tofu Controller: Vault access from tf-runner (Kubernetes auth).
Keycloak Observability
Traces
Keycloak can export distributed tracing data directly to the OpenTelemetry Collector.
In Pi Cluster, tracing is enabled in the Keycloak custom resource and the collector endpoint is set to the in-cluster OpenTelemetry Collector service:
apiVersion: k8s.keycloak.org/v2alpha1
kind: Keycloak
metadata:
  name: keycloak
spec:
  tracing:
    enabled: true
    endpoint: http://otel-collector.otel:4317
This makes Keycloak send trace spans to the OpenTelemetry Collector, which then forwards them to Tempo through its OTLP exporter.
The resulting trace flow is:
- Keycloak generates spans for incoming authentication and authorization requests.
- Keycloak exports those spans to the OpenTelemetry Collector at
otel-collector.otel:4317. - The collector processes the spans and exports them to Tempo.
- Traces can then be explored from Grafana.
Note:
The tracing endpoint must point to the OTLP gRPC port exposed by the OpenTelemetry Collector. In this cluster that is the internal service endpoint otel-collector.otel:4317.
See Distributed Tracing (Tempo) for trace analysis, and OpenTelemetry Collector for collector deployment and exporter configuration.
Metrics
Keycloak exposes Prometheus-format metrics at the following endpoint on the management interface (default TCP port 9000) at /metrics.
See details on how to enable the metrics in Keycloak documentation: Observability Configuring Metrics. Keycloak metrics description can be found in Keycloak documentation: Observability Metrics for Troubleshooting.
To enable Prometheus’ /metric endpoint (management interface) add the following additionalOptions to Keycloak resource
spec:
  additionalOptions:
      # Enable metrics endpoint
    - name: metrics-enabled
      value: 'true'
Important: Management port (:9000) should not be exposed externally.
Additional options can be provided to enable additional metrics
spec:
  additionalOptions:
      # Enable metrics endpoint
    - name: metrics-enabled
      value: 'true'
      # Enable cache metrics histograms
    - name: cache-metrics-histograms-enabled
      value: 'true'
      # Enable HTTP request histograms
    - name: http-metrics-histograms-enabled
      value: 'true'
      # Enable user metrics
    - name: event-metrics-user-enabled
      value: 'true'
| parameter | VAR | Description | value |
|---|---|---|---|
metrics-enabled |
KC_METRICS_ENABLE |
Enable metrics endpoint | true/false (default) |
cache-metrics-histograms-enabled |
KC_CACHE_METRICS_HISTOGRAMS_ENABLED |
Enable histograms for metrics for the embedded caches. | true/false(default) |
http-metrics-histograms-enabled |
KC_HTTP_METRICS_HISTOGRAMS_ENABLED |
Enables a histogram with default buckets for the duration of HTTP server requests. | true/false(default) |
event-metrics-user-enabled |
KC_EVENT_METRICS_USER_ENABLED |
Create metrics based on user events4. | true, false (default) |
Prometheus Integration
ServiceMonitoring, Prometheus Operator’s CRD, resource can be automatically created so Kube-Prometheus-Stack is able to automatically start collecting metrics from Keycloak.
Apply following manifest:
apiVersion: monitoring.coreos.com/v1
kind: ServiceMonitor
metadata:
  name: keycloak-service-monitor
  namespace: keycloak
spec:
  endpoints:
    - interval: 30s
      path: /metrics
      port: management
  selector:
    matchLabels:
      app: keycloak
Grafana dashboards
See Grafana Operator - Provisioning Dashboards for the general GrafanaDashboard onboarding patterns.
Keycloak provides Grafana Dashboards to display metrics collected by Prometheus. They are available at keycloak/keycloak-grafana-dashboard GitHub repo.
There are 2 Dashboards available:
Find further details in Keycloak documentation: Observability Grafana Dashboards
These dashboards can be onboarded with GrafanaDashboard resources:
apiVersion: grafana.integreatly.org/v1beta1
kind: GrafanaDashboard
metadata:
  name: keycloak-planning
spec:
  allowCrossNamespaceImport: true
  folder: Keycloak
  instanceSelector:
    matchLabels:
      dashboards: grafana
  url: https://raw.githubusercontent.com/keycloak/keycloak-grafana-dashboard/refs/heads/main/dashboards/keycloak-capacity-planning-dashboard.json
  plugins:
    - name: grafana-piechart-panel
      version: 1.6.4
---
apiVersion: grafana.integreatly.org/v1beta1
kind: GrafanaDashboard
metadata:
  name: keycloak-troubleshooting
spec:
  allowCrossNamespaceImport: true
  folder: Keycloak
  instanceSelector:
    matchLabels:
      dashboards: grafana
  url: https://raw.githubusercontent.com/keycloak/keycloak-grafana-dashboard/refs/heads/main/dashboards/keycloak-troubleshooting-dashboard.json
  plugins:
    - name: grafana-piechart-panel
      version: 1.6.4
Protecting Applications with Envoy Gateway
For applications that do not implement their own authentication, Pi Cluster uses Envoy Gateway native OpenID Connect authentication instead of a separate oauth2-proxy deployment.
The implementation has three building blocks:
- A Keycloak OIDC client for each protected application.
- An
HTTPRouteexposing the application through Envoy Gateway. - A
SecurityPolicyattached to that route, configured with the application’s OIDC client credentials.
The detailed Gateway-side flow and additional examples are documented in Envoy Gateway - OIDC Authentication.
Configure Keycloak clients for protected applications
Each protected application needs its own OIDC client in the picluster realm.
Procedure in Keycloak documentation: Keycloak: Creating an OpenID Connect client
For example, for Longhorn:
- Client Type:
OpenID Connect - Client ID:
longhorn - Client authentication:
On - Standard flow:
On - Direct access grants:
Off - Valid redirect URIs:
https://longhorn.${CLUSTER_DOMAIN}/oauth2/callback - Root URL:
https://longhorn.${CLUSTER_DOMAIN} - Home URL:
https://longhorn.${CLUSTER_DOMAIN} - Web Origins:
https://longhorn.${CLUSTER_DOMAIN}
The same pattern applies to other protected dashboards such as Hubble, Kafdrop, Prometheus and Alertmanager, each one with its own hostname and callback URL.
Protect routes with SecurityPolicy
After creating the Keycloak client and exposing the application through an HTTPRoute, attach an Envoy Gateway SecurityPolicy to that route.
Example for Longhorn:
apiVersion: gateway.envoyproxy.io/v1alpha1
kind: SecurityPolicy
metadata:
  name: longhorn-dashboard
spec:
  targetRefs:
    - group: gateway.networking.k8s.io
      kind: HTTPRoute
      name: longhorn-httproute
  oidc:
    provider:
      issuer: "https://iam.${CLUSTER_DOMAIN}/realms/picluster"
    clientIDRef:
      name: oauth2-externalsecret
    clientSecret:
      name: oauth2-externalsecret
    redirectURL: "https://longhorn.${CLUSTER_DOMAIN}/oauth2/callback"
    logoutPath: "/longhorn/logout"
The same pattern is used in this repository for:
- Longhorn
- Hubble
- Kafdrop
- Prometheus
- Alertmanager
Supplying OIDC client credentials
Client credentials are stored in Vault and synchronized into Kubernetes through ExternalSecret resources. The resulting Kubernetes Secret is referenced by clientIDRef and clientSecret in the SecurityPolicy.
Example:
apiVersion: external-secrets.io/v1
kind: ExternalSecret
metadata:
  name: oauth2-externalsecret
spec:
  secretStoreRef:
    name: vault-backend
    kind: ClusterSecretStore
  target:
    name: oauth2-externalsecret
  data:
    - secretKey: client-id
      remoteRef:
        key: longhorn/oauth2
        property: client-id
    - secretKey: client-secret
      remoteRef:
        key: longhorn/oauth2
        property: client-secret
This keeps OIDC credentials out of Git and aligns with the rest of the cluster secret-management model.
Request flow
- A user requests an application URL exposed by an
HTTPRoute. - Envoy Gateway evaluates the
SecurityPolicyattached to that route. - If the user is not authenticated, Envoy redirects the user to Keycloak.
- After a successful login, Keycloak redirects the user back to the configured callback URL.
- Envoy validates the OIDC response and forwards the request to the backend service.