PXE sever
Ubuntu server autoinstallation can be done through network using PXE (Preboot eXecution Environment). x86-64 systems boot in either UEFI or legacy (“BIOS”) mode (many systems can be configured to boot in either mode). The precise details depend on the system firmware, but both modes supports the PXE specification, which allows the provisioning of a bootloader over the network.
See details in Ubuntu’s documentation: “Ubuntu Advance Installation - Netbooting the server installer in amd64”
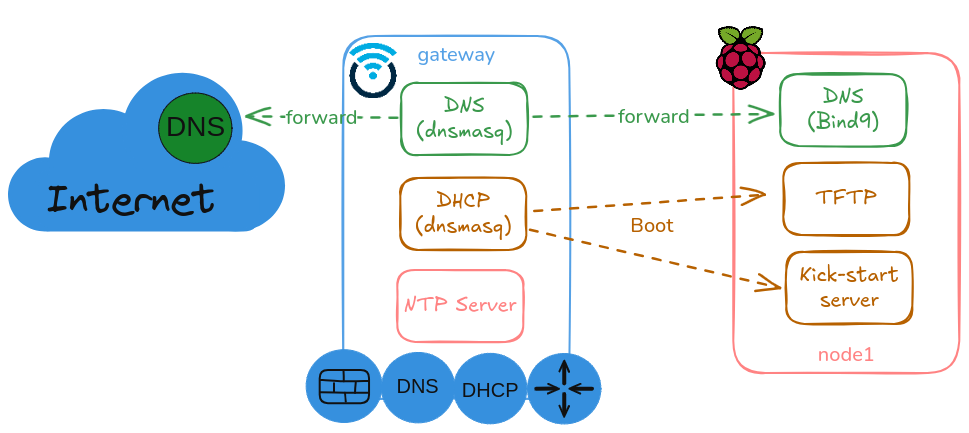
A PXE server will be deployed in the Cluster for automatically autoinstall Ubuntu 24.04 in x86 nodes. This PXE server will be deployed in node1 node, installing a TFTP server and a Kick-start web service to serve cloud-init files and ISO live image. DHCP service, running in gateway, has to be configured to provide the proper boot options.
Install process is like this
- The to-be-installed machine boots, and is directed to network boot.
- The DHCP server tells the machine its network configuration and where to get the bootloader.
- The machine’s firmware downloads the bootloader over TFTP and executes it.
- The bootloader downloads configuration, also over TFTP, telling it where to download the kernel (vmlinuz), RAM Disk (initrd) and kernel command line to use (grub.cfg or pxelinux.cfg).
- The RAM Disk looks at the kernel command line to learn how to configure the network and where to download the server ISO from.
- The RAM Disk downloads the ISO and mounts it as a loop device.
- From this point on the install follows the same path as if the ISO was on a local block device
sequenceDiagram
    autonumber
	participant Bare metal node
	participant DHCP server
	participant TFTP server
  participant Web server
  Bare metal node->>Bare metal node: netboot
  activate Bare metal node
  Bare metal node->>DHCP server: DHCP Request(PXE Arch)
  activate DHCP server
  DHCP server->>Bare metal node: IP TFTP Boot Server, Bootloader File
  deactivate DHCP server
  Bare metal node->>TFTP server: Get bootloader file
  activate TFTP server
  TFTP server-->>Bare metal node: pxelinux.0/boot64.efi
  Bare metal node->>TFTP server: Get boot config
  TFTP server-->>Bare metal node: pxelinux.cfg/grub.cfg
  Bare metal node->>TFTP server: Get kernel files
  TFTP server-->>Bare metal node: vmlinuz, initrd
  deactivate TFTP server
  Bare metal node->>Web server: Get ISO file
  activate Web server
  Web server-->>Bare metal node: ubuntu.iso
  Bare metal node->>Web server: Get cloud-init files
  Web server-->>Bare metal node: meta-data, user-data
  deactivate Web server
  Bare metal node->>Bare metal node: launch live CD installer
  deactivate Bare metal node
PXE server installation
PXE server will have installed all required components for enabling net boot and autoinstall of Ubuntu OS.
The components required are:
- DHCP server:
- TFTP server
- Web server
Kick-start server installation (Webserver)
Webserver will be used as kick-start server providing to the netboot installer, via HTTP, Ubuntu’s live ISO and the cloud-init files required for launching the installation.
-
Step 1. Install apache2
sudo apt install apache2 -
Step 2. Created a new file ks-server.conf under /etc/apache2/sites-available/ with the following content
<VirtualHost 10.0.0.11:80> ServerAdmin root@server1.example.com DocumentRoot / ServerName server.example.com ErrorLog ${APACHE_LOG_DIR}/ks-server.example.com-error_log CustomLog ${APACHE_LOG_DIR}/ks-server.example.com-access_log common <Directory /ks> Options Indexes MultiViews AllowOverride All Require all granted </Directory> <Directory /images> Options Indexes MultiViews AllowOverride All Require all granted </Directory> </VirtualHost> -
Step 3. Create HTTP serving directories
kswhich will contain cloud-init files andimageswhere we will place our ubuntu live-server iso image.sudo mkdir -p /var/www/html/ks sudo mkdir -p /var/www/html/images -
Step 4. Enable apache2
sudo systemctl enable apache2 --now -
Step 4. Check apache status
sudo systemctl status apache2
Serving ubuntu live ISO file via HTTP
Ubuntu live ISO need to be served by the HTTP server
-
Step 1. Download Ubuntu 24.03 server live ISO
wget https://releases.ubuntu.com/noble/ubuntu-24.04.3-live-server-amd64.iso -
Step 2. Copy to images directory
cp ubuntu-22.04.3-live-server-amd64.iso /var/www/html/images/.
Serving cloud-init files via HTTP
auto-install cloud-init files are served by HTTP server
-
Step 1. Create a directory with name
<server-macaddress>within/var/www/html/ksmkdir -p /var/www/html/ks/<server-macaddress>This directory should contain two files per /var/www/html/ks/aa:bb:cc:dd:ee:00/meta-data /var/www/html/ks/aa:bb:cc:dd:ee:00/user-data
-
Step 2. Create user-data file in
/var/www/html/ks/<server-macaddress>This must be a cloud-init ubuntu auto-install file
Minimal config
#cloud-config
autoinstall:
  identity:
    hostname: ubuntu-minimal
    password: $6$gnqbMUzHhQzpDEw.$.cCNVVDsDfj5Feebh.5O4VbOmib7tyjmeI2ZsFP7VK2kWwgJFbfjvXo3chpeAqCgXWVIW9oNQ/Ag85PR0IsKD/
    username: ubuntu
  version: 1
The above cloud-init user-data file creates a minimum installation, setting server hostname, and ubuntu default password (ubuntu)
-
Step 3. Create meta-data file in
/var/www/html/ks/<server-macaddress>Create cloud-init meta-data file containing the hostname of the server or a empty file.
cat > /var/www/html/ks/<mac-address>/meta-data <<EOF
instance-id: ubuntu-server
EOF
Note:
These files must be placed under /var/www/html/ks/
DHCP configuration
Assuming that DHCP is already installed and configured as part of gateway deployment, only additional configuration need to be added for PXE boot. dnsmasq TFTP server won`t be used to serve the required boot files.
See Gateway DHCP/DNS Configuration
-
Step 1. Configure dnsmasq service
Edit file
/etc/dnsmasq.d/dnsmasq.confadding the following lines# Enabling PXE boot x86 servers # Legacy BIOS boot dhcp-match=set:bios,60,PXEClient:Arch:00000 dhcp-boot=tag:bios,pxelinux.0,node1,10.0.0.11 # UEFI boot dhcp-match=set:efi-x86_64,PXEClient:Arch:00007 dhcp-boot=tag:efi-x86_64,bootx64.efi,node1,10.0.0.11With this configuration uefi x86 clients (pxe-client-arch=7), uses
bootx64.efiboot file that can be downloaded from TFTP servernode1with IP10.0.0.11. Bios x86 clients (pxe-client-arch=0) will usepxelinux.0file to boot. -
Step 2. Restart dnsmasq service
sudo systemctl restart dnsmasq
TFTP Server
TFTP server will be installed in external services node: node1
-
Step 1. Install
tftpd-hpapackagesudo apt-get install tftpd-hpaDefault configuration stored in
/etc/default/tftpd-hpa, uses TFTP directory/srv/tftp -
Step 2. Create TFTP server directories to store installation files.
sudo mkdir /srv/tftp/grub
sudo mkdir /srv/tftp/pxelinux.cfg
Serving boot loading files via TFTP
Copying kernel and initrd files
-
Step 1. Download Ubuntu 24.04 server live ISO
wget https://releases.ubuntu.com/noble/ubuntu-24.04.3-live-server-amd64.iso -
Step 2. Mount the ISO file
mount ubuntu-24.04.3-live-server-amd64.iso /mnt -
Step 3. Copy linux kernel and initrd files to TFTP server root
cp /mnt/casper/{vmlinuz,initrd} /srv/tftp/
Copying files for UEFI boot
-
Step 1. Copy the signed shim binary into place:
apt download shim-signed dpkg-deb --fsys-tarfile shim-signed*deb | tar x ./usr/lib/shim/shimx64.efi -O > /srv/tftp/bootx64.efi -
Step 2. Copy the signed GRUB binary into place:
apt download grub-efi-amd64-signed dpkg-deb --fsys-tarfile grub-efi-amd64-signed*deb | tar x ./usr/lib/grub/x86_64-efi-signed/grubnetx64.efi.signed -O > /srv/tftp/grubx64.efi -
Step 3. Copy
unicode.pf2apt download grub-common dpkg-deb --fsys-tarfile grub-common*deb | tar x ./usr/share/grub/unicode.pf2 -O > /srv/tftp/unicode.pf2 -
Step 4. Prepare grub.cfg file and copy to /srv/tftp/grub
set default="0"
set timeout=5

if loadfont unicode ; then
  set gfxmode=auto
  set locale_dir=$prefix/locale
  set lang=en_US
fi
terminal_output gfxterm

set menu_color_normal=white/black
set menu_color_highlight=black/light-gray
if background_color 44,0,30; then
  clear
fi

function gfxmode {
        set gfxpayload="${1}"
        if [ "${1}" = "keep" ]; then
                set vt_handoff=vt.handoff=7
        else
                set vt_handoff=
        fi
}

set linux_gfx_mode=keep

export linux_gfx_mode

menuentry 'Install Ubuntu 24.04' {
        gfxmode $linux_gfx_mode
        linux vmlinuz ip=dhcp url=http://10.0.0.11/images/ubuntu-24.04.3-live-server-amd64.iso autoinstall ds=nocloud-net\;s=http://10.0.0.11/ks/${net_default_mac}/ cloud-config-url=/dev/null
        initrd initrd
}
This configuration launch live ISO in autoinstall mode using cloud-init files downloaded from Kick-start web server under ks/
/ (`${net_default_mac}`).
Copying files for legacy boot
-
Step 1. Copy the
pxelinux.0binary:apt download pxelinux dpkg-deb --fsys-tarfile pxelinux*deb | tar x ./usr/lib/PXELINUX/pxelinux.0 -O > /srv/tftp/pxelinux.0 -
Step 2. Copy
syslinux-commonpackages:apt download syslinux-common dpkg-deb --fsys-tarfile pxelinux*deb | tar x ./usr/lib/PXELINUX/pxelinux.0 -O > /srv/tftp/pxelinux.0 dpkg-deb --fsys-tarfile syslinux-common*deb | tar x ./usr/lib/syslinux/modules/bios/ldlinux.c32 -O > /srv/tftp/ldlinux.c32 dpkg-deb --fsys-tarfile syslinux-common*deb | tar x ./usr/lib/syslinux/modules/bios/menu.c32 -O > /build/menu.c32 dpkg-deb --fsys-tarfile syslinux-common*deb | tar x ./usr/lib/syslinux/modules/bios/libutil.c32 -O > /srv/tftp/libutil.c32 -
Step 4. Prepare
pxe.conffile and copy to/srv/tftp/pxelinux.cfgPXE looks for a file containing in the name the MAC address, using as separator ‘-‘
01-
, ie: 01-10-e7-c6-16-54-10 for MAC address 10:e7:c6:16:54:10 default menu.c32 menu title Ubuntu installer label noble menu label Install Ubuntu N^oble (24.04) menu default kernel vmlinuz initrd initrd append ip=dhcp url=http://10.0.0.11/images/ubuntu-24.04.3-live-server-amd64.iso autoinstall ds=nocloud-net;s=http://10.0.0.11/ks/10:e7:c6:16:54:10/ cloud-config-url=/dev/null prompt 0 timeout 300This configuration launch live ISO in autoinstall mode using cloud-init files downloaded from Kick-start web server under ks/
/.
Alternative booting ISO contents via nfsroot.
Netboot installation requires to download the ISO and keep it in RAM, which is not possible if the server RAM is not > 4GB. Testing with servers with less than 5 GB of memory, for example for testing PXE server in virtualized environment like Virtualbox, installation hangs with initdram message “not space left”.
-
Step 1: Intall NFS server
sudo apt install nfs-kernel-server -
Step 2: Make shared NFS directory
sudo mkdir -p /mnt/ubuntu-live-server-amd64-iso-nfs/ -
Step 3: Mount ubuntu ISO file
sudo mount /var/www/html/images/ubuntu-24.04.3-live-server-amd64.iso /mnt/ubuntu-live-server-amd64-iso-nfs/Configure mount on start
Add to
/etc/fstabfile the following line/var/www/html/images/ubuntu-24.04.3-live-server-amd64.iso /mnt/ubuntu-live-server-amd64-iso-nfs iso9660 loop 0 0 -
Step 4: Configure NFS
Edit
/etc/exportsfile adding the following line:/mnt/ubuntu-live-server-amd64-iso-nfs 10.0.0.0/24(ro,sync,no_subtree_check) -
Step 5: export NFS directory
sudo exportfs -a -
Step 6: Restart NFS service
sudo systemctl restart nfs-kernel-server -
Step 7: Show NFS directories
sudo exportfs -v -
Step 8: Update
/srv/tftp/grub/grub.cfgfileset default="0" set timeout=-30 if loadfont unicode ; then set gfxmode=auto set locale_dir=$prefix/locale set lang=en_US fi terminal_output gfxterm set menu_color_normal=white/black set menu_color_highlight=black/light-gray if background_color 44,0,30; then clear fi function gfxmode { set gfxpayload="${1}" if [ "${1}" = "keep" ]; then set vt_handoff=vt.handoff=7 else set vt_handoff= fi } set linux_gfx_mode=keep export linux_gfx_mode menuentry 'Install Ubuntu 24.04' { gfxmode $linux_gfx_mode linux vmlinuz netboot=nfs nfsroot=10.0.0.11:/mnt/ubuntu-live-server-amd64-iso-nfs ip=dhcp autoinstall ds=nocloud-net\;s=http://10.0.0.11/ks/ cloud-config-url=/dev/null initrd initrd }
References
- Setup PXE Boot Server using cloud-init for Ubuntu 20.04
- Setup IPv4 UEFI PXE Boot Server Ubuntu 20.04 [cloud-init]
- Ubuntu Automated Server Installation
- Netbooting the server installer on amd64
- Ubuntu 22.04 (Jammy) autoinstall over PXE
- Using Ubuntu Live-Server to automate Desktop installation
- Configuring PXE Network Boot Server on Ubuntu 22.04 LTS
- How to manage multiple Ubuntu servers with UEFI PXE boot