TLS Certificates (Cert-Manager)
In the Kubernetes cluster, Cert-Manager can be used to automate the certificate management tasks (issue certificate request, renewals, etc.). Cert-manager adds certificates and certificate issuers as resource types in Kubernetes clusters, and simplifies the process of obtaining, renewing and using those certificates.
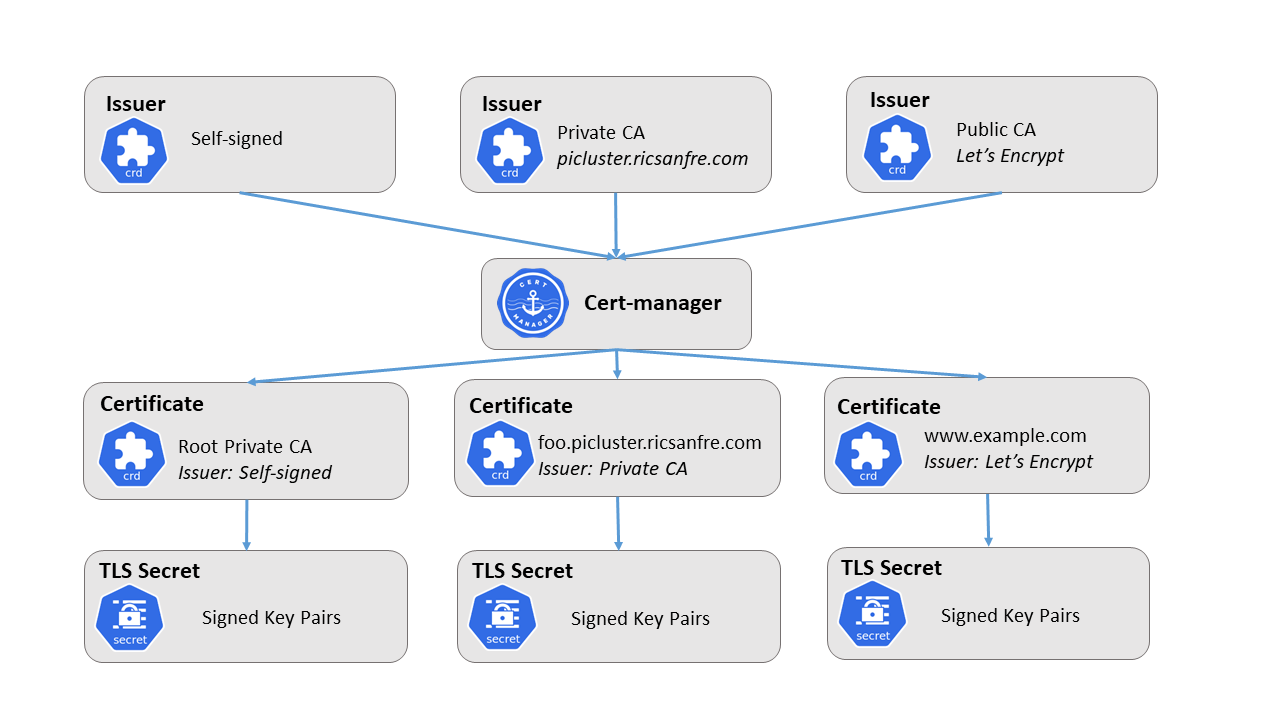
It can issue certificates from a variety of certificate authorities, including support for private PKI, Private CA1, to generate non publivly trusted auto-signed certificates, or use Let’s Encrypt service to obtain publicly trusted TLS certificates. It will ensure certificates are valid and up to date, and attempt to renew certificates at a configured time before expiry. It also keep up to date the associated Kubernetes Secrets storing key pairs used by Ingress resources when securing the incoming communications.
How does it work?
cert-manager adds certificates and certificate issuers as resource types in Kubernetes clusters, and simplifies the process of obtaining, renewing and using those certificates.
It follows Kubernetes Controller pattern extending Kubernetes API with new custom resource types (Kubernetes Custom Resources Definition (CRD)).
With cert-manager’s Certificate resource, the private key and certificate are stored in a Kubernetes Secret which is mounted by an application Pod or used by an Ingress controller.
Cert-Manager certificates issuers
In cert-manager different kind of certificate issuer can be configured to generate signed TLS certificates
Self-signed Issuer
The SelfSigned issuer doesn’t represent a certificate authority as such, but instead denotes that certificates will “sign themselves” using a given private key. In other words, the private key of the certificate will be used to sign the certificate itself.
This Issuer type is useful for bootstrapping a root certificate (CA) for a custom PKI (Public Key Infrastructure).
CA Issuer
The CA issuer represents a Certificate Authority whereby its certificate and private key are stored inside the cluster as a Kubernetes Secret, and will be used to sign incoming certificate requests. This internal CA certificate can then be used to trust resulting signed certificates.
This issuer type is typically used in a private Public Key Infrastructure (PKI) setup to secure your infrastructure components to establish mTLS or otherwise provide a means to issue certificates where you also own the private key. Signed certificates with this custom CA will not be trusted by clients, such a web browser, by default.
ACME issuers (Let’s Encrypt)
The ACME Issuer type represents a single account registered with the Automated Certificate Management Environment (ACME) Certificate Authority server. See section Let’s Encrypt certificates.
Cert Manager Usage
Requesting Certificates
Cert-manager add a set of Kubernetes custom resource (CRD):
-
IssuerandClusterIssuer: resources that represent certificate authorities (CA) able to genertate signed certificates in response to certificate signed request (CSR).Issueris a namespaced resource, able to issue certificates only for the namespace where the issuer is located.ClusterIssueris able to issue certificates across all namespaces. -
Certificate, resources that represent a human readable definition of a certificate request that need to be generated and keep up to date by an issuer.
In order to generate new TLS certificates a Certificate resource has to be created.
apiVersion: cert-manager.io/v1
kind: Certificate
metadata:
  name: example-test-com
spec:
  dnsNames:
    - 'example.com'
  issuerRef:
    name: nameOfClusterIssuer
  secretName: example-test-com-tls
Once the Certificate resource is created, Cert-manager signed the certificate issued by the specified issuer and stored it in a kubernetes.io/tls Secret resource, which is the one used to secure Ingress resource. See kubernetes Ingress TLS documentation
apiVersion: v1
kind: Secret
metadata:
  name: example-test-com-tls
  namespace: default
data:
  tls.crt: base64 encoded cert
  tls.key: base64 encoded key
type: kubernetes.io/tls
See further details in the cert-manager documentation
Securing Ingress resources
Ingress resources can be configured using annotations, so cert-manager can automatically generate the needed self-signed certificates to secure the incoming communications using HTTPS/TLS
As stated in the documentation, cert-manager can be used to automatically request TLS signed certificates to secure any Ingress resources. By means of annotations cert-manager can generate automatically the needed certificates and store them in corresponding secrets used by Ingress resource
Ingress annotation cert-manager.io/cluster-issuer indicates the ClusterIssuer to be used.
Ingress rule example:
apiVersion: networking.k8s.io/v1
kind: Ingress
metadata:
  annotations:
    # add an annotation indicating the issuer to use.
    cert-manager.io/cluster-issuer: nameOfClusterIssuer
  name: myIngress
  namespace: myIngress
spec:
  rules:
  - host: example.com
    http:
      paths:
      - pathType: Prefix
        path: /
        backend:
          service:
            name: myservice
            port:
              number: 80
  tls: # < placing a host in the TLS config will determine what ends up in the cert's subjectAltNames
  - hosts:
    - example.com
    secretName: myingress-cert # < cert-manager will store the created certificate in this secret.
Securing Gateway resources
cert-manager can also manage certificates for Gateway resources defined with Kubernetes Gateway API. This is the integration used in Pi Cluster for Envoy Gateway.
Note:
Before enabling cert-manager Gateway API support, the Gateway API CRDs must already be installed in the cluster. In practice this means installing the Gateway API manifests directly, or installing a controller that ships them, such as Envoy Gateway through its Helm chart.
To enable Gateway API support manually, follow these steps:
-
Step 1: Install the Gateway API bundle in the cluster
kubectl apply --server-side -f https://github.com/kubernetes-sigs/gateway-api/releases/download/v1.4.1/standard-install.yaml -
Step 2: Enable Gateway API support in cert-manager Helm values
config: enableGatewayAPI: true -
Step 3: Upgrade or install cert-manager with the updated values
helm upgrade --install cert-manager jetstack/cert-manager --namespace cert-manager -f cert-manager-values.yaml -
Step 4: If the Gateway API CRDs were installed after cert-manager was already running, restart the cert-manager controller so it detects the new CRDs
kubectl rollout restart deployment cert-manager -n cert-manager
As described in the cert-manager documentation, cert-manager can watch Gateway listeners and reconcile the Secret referenced in tls.certificateRefs when the Gateway is annotated with the issuer to use.
Example:
apiVersion: gateway.networking.k8s.io/v1
kind: Gateway
metadata:
  name: public-gateway
  annotations:
    cert-manager.io/cluster-issuer: letsencrypt-issuer
spec:
  gatewayClassName: envoy
  listeners:
    - name: https
      protocol: HTTPS
      port: 443
      hostname: app.example.com
      tls:
        mode: Terminate
        certificateRefs:
          - kind: Secret
            name: app-example-com-tls
In this example cert-manager creates and renews Secret app-example-com-tls, which is then used by the Gateway listener for TLS termination.
Cert Manager Installation
Installation using Helm (Release 3):
-
Step 1: Add the JetStack Helm repository:
helm repo add jetstack https://charts.jetstack.io -
Step 2: Fetch the latest charts from the repository:
helm repo update -
Step 3: Create namespace
kubectl create namespace cert-manager -
Step 4: Create
cert-manager-values.yamlfilecrds: enabled: true config: enableGatewayAPI: trueconfig.enableGatewayAPI: trueenables Gateway API support so cert-manager can manage certificates referenced byGatewaylisteners.Gateway API support should only be enabled after the Gateway API CRDs are available in the cluster, either because the upstream Gateway API manifests were installed first or because a controller such as Envoy Gateway installed them as part of its Helm chart.
-
Step 5: Install Cert-Manager
helm install cert-manager jetstack/cert-manager --namespace cert-manager -f cert-manager-values.yaml -
Step 6: Confirm that the deployment succeeded, run:
kubectl -n cert-manager get pod
Cert-Manager Configuration
Private PKI
A Private CA (Private PKI (Public Key Infrastructure)) can be created in the cluster, so all certificates can be auto-signed by this CA. That removes the need to use a of valid certificates signed by a trusted public CA. Certificates issued by Private CA won’t be trusted certificates and some applications using them need to be configured to ignore the certificate validation.
For creating a private PKI,a CA ClusterIssuer resource need to be created.
Root CA certificate is needed for generated this CA Issuer. A selfsigned ClusterIssuer resource will be used to generate that root CA certificate (self-signed root CA).
-
Step 1: Create selfsigned
ClusterIssuerFirst step is to create the self-signed issuer for being able to selfsign a custom root certificate of the PKI (CA certificate).
In order to obtain certificates from cert-manager, we need to create an issuer to act as a certificate authority. We have the option of creating an Issuer which is a namespaced resource, or a ClusterIssuer which is a global resource. We’ll create a self-signed ClusterIssuer using the following definition:
```yml
apiVersion: cert-manager.io/v1
kind: ClusterIssuer
metadata:
  name: self-signed-issuer
spec:
  selfSigned: {}
```
-
Step 2: Bootstrapping CA Issuers
Bootstrap a custom root certificate for a private PKI (custom CA) and create the corresponding cert-manager CA issuer
---
apiVersion: cert-manager.io/v1
kind: Certificate
metadata:
  name: my-selfsigned-ca
  namespace: cert-manager
spec:
  isCA: true
  commonName: my-selfsigned-ca
  secretName: root-secret
  privateKey:
    algorithm: ECDSA
    size: 256
  issuerRef:
    name: self-signed-issuer
    kind: ClusterIssuer
    group: cert-manager.io
---
apiVersion: cert-manager.io/v1
kind: ClusterIssuer
metadata:
  name: ca-issuer
  namespace: cert-manager
spec:
  ca:
    secretName: root-secret
Public PKI with Let’s Encrypt
Let’s Encrypt provide publicly trusted TLS certificates for free. Not need to generate auto-signed TLS Certificates for the websites that are not automatically trusted by HTTP browsers.
Let’s Encrypt uses ACME Protocol2 to issue certificates.
The process is the following, ACME client issues a request for a certificate to ACME server (Let’s Encrypt), for a domain name that we own. Let’s Encrypt verifies that we own that domain by using an ACME Challenge (DNS or HTTP validation mechanism). If the verification is successful, Let’s Encrypt provides us with certificates that cert-manager installs in our website (or other TLS encrypted endpoint). These certificates are good for 90 days before the process needs to be repeated. Cert-manager, however, will automatically keep the certificates up-to-date for us.
Cert-Manager takes the role of ACME client automating the process to obtain and renew the certificate from the ACME Server, Let’s Encrypt.
Cert-Manager supports two type of ACME Protocol Challenges: DNS-01 and HTTP-01 challenges:
HTTP01 challenges are completed by presenting a computed key, that should be present at a HTTP URL endpoint and is routable over the internet. This URL will use the domain name requested for the certificate. Once the ACME server is able to get this key from this URL over the internet, the ACME server can validate you are the owner of this domain. When a HTTP01 challenge is created, cert-manager will automatically configure your cluster ingress to route traffic for this URL to a small web server that presents this key.
DNS01 challenges are completed by providing a computed key that is present at a DNS TXT record. Once this TXT record has been propagated across the internet, the ACME server can successfully retrieve this key via a DNS lookup and can validate that the client owns the domain for the requested certificate. With the correct permissions, cert-manager will automatically present this TXT record for your given DNS provider.
For details see cert-manager ACME issuer type documentation
Configuring ACME DNS-01 Challenge
DNS validation method requires to expose a “challenge DNS” record within the DNS domain associated to the TLS certificate. This method do not require to expose to the Public Internet the web services hosted within my K3S cluster and so it would be the preferred method to use Let’s Encrypt.
- Cert-manager issues a certifate request to Let’s Encrypt
- Let’s Encript request an ownership verification challenge in response. The challenge will be to put a DNS TXT record with specific content that proves that we have the control of the DNS domain. The theory is that if we can put that TXT record and Let’s Encrypt can retrieve it remotely, then we must really be the owners of the domain
- Cert-manager temporary creates the requested TXT record in the DNS. If Let’s Encrypt can read the challenge and it is correct, it will issue the certificates back to cert-manager.
- Cert-manager will then store the certificates as secrets, and our website (or whatever) will use those certificates for securing our traffic with TLS.
DNS Split horizon
In case of using DNS split horizon architecture, where an internal private DNS server is used, cert-manager has to be configured so internal DNS server is not used during DNS01 challenge process. See further details about DNS split horizon in “Pi Cluster - DNS Homelab Architecture.
-
Step 1: Create
cert-manager-values.yamlfilecrds: enabled: true # Setting Nameservers for DNS01 ACME challenge. # For more information, see the [cert-manager documentation](https://cert-manager.io/docs/configuration/acme/dns01/#setting-nameservers-for-dns01-self-check). # A comma-separated string with the host and port of the recursive nameservers cert-manager should query. dns01RecursiveNameservers: 8.8.8.8:53,1.1.1.1:53 # Forces cert-manager to use only the recursive nameservers for verification. # Enabling this option could cause the DNS01 self check to take longer owing to caching performed by the recursive nameservers. dns01RecursiveNameserversOnly: true -
Step 2: Reinstall cert-manager
helm upgrade --install cert-manager jetstack/cert-manager --namespace cert-manager -f cert-manager-values.yaml
Configuring different DNS providers
Cert-manager by default support several DNS providers to automatically configure the requested DNS record challenge.
For supporting additional DNS providers webhooks can be developed. See supported list and further documentation in Certmanager documentation: “ACME DNS01” .
Some of the supported DNS service providers are:
- AWS Route53
- Google CloudDNS
- AzureDNS
- CloudFlare
- Dynamic DNS (DDNS). Support RFC-2136 compliant DNS server like Bind9.
IONOS as DNS provider
IONOS, DNS server provider, is not supported by Certmanager (neither OOTB support nor through supported external webhooks).
Even when it is not officially supported by the community, there is a github project providing a IONOS cert-manager webhook.
This ionos-webhook uses the IONOS developer API, allowing the remote configuration of the DNS using a RESTFUL API.
Note:
To use IONOS developer API, first API key must be created.
Follow IONOS developer API: Get Started instructions to obtain API key.
API key is composed of two parts: Public Prefix (public key) and Secret (private key)
-
Step 1: Install cert-manager-webhook-ionos chart repo:
helm repo add cert-manager-webhook-ionos https://fabmade.github.io/cert-manager-webhook-ionos -
Step 2: Fetch the latest charts from the repository:
helm repo update -
Step 3: Create values.yml file for customizing helm chart
--- groupName: acme.<your-domain> certManager: namespace: certmanager serviceAccountName: certmanager-cert-managergroupNameis a unique identifier that need to be referenced in each Issuer’swebhookstanza to inform cert-manager of where to send challengePayload resources in order to solve the DNS01 challenge.acme.<yourdomain>can be used.CertManager namespace and its servceAccount name need to be specified.
-
Step 4: Install cert-manager-webhook-ionos
helm install cert-manager-webhook-ionos cert-manager-webhook-ionos/cert-manager-webhook-ionos -n cert-manager -f values-certmanager-ionos.yml -
Step 5: Create IONOS API secret
apiVersion: v1 stringData: IONOS_PUBLIC_PREFIX: <your-public-key> IONOS_SECRET: <your-private-key> kind: Secret metadata: name: ionos-secret namespace: cert-manager type: Opaque -
Step 6: Configure a Letsencrypt Cluster Issuer
---
apiVersion: cert-manager.io/v1
kind: ClusterIssuer
metadata:
  name: letsencrypt-issuer
  namespace: cert-manager
  spec:
    acme:
      # The ACME server URL
      server: https://acme-v02.api.letsencrypt.org/directory
      # Email address used for ACME registration
      email: <your-email-address>
      # Name of a secret used to store the ACME account private key
      privateKeySecretRef:
        name: letsencrypt-ionos-prod
      # Enable the dns01 challenge provider
      solvers:
        - dns01:
            webhook:
              groupName: acme.<your-domain>
              solverName: ionos
              config:
                apiUrl: https://api.hosting.ionos.com/dns/v1
                publicKeySecretRef:
                  key: IONOS_PUBLIC_PREFIX
                  name: ionos-secret
                secretKeySecretRef:
                  key: IONOS_SECRET
                  name: ionos-secret
Observability
Metrics
Cert-manager exposes metrics in the[Prometheus format from the controller, webhook and cainjector components. These are available at the standard /metrics endpoint on port 9402 of each component Pod.
Prometheus Integration
ServiceMonitoring, Prometheus Operator’s CRD, resource can be automatically created so Kube-Prometheus-Stack is able to automatically start collecting metrics from cert-manager
prometheus:
  enabled: true
  servicemonitor:
    enabled: true
Grafana Dashboards
See Grafana Operator - Provisioning Dashboards for the general GrafanaDashboard onboarding patterns.
cert-manager’s Grafana dashboard can be downloaded from grafana.com: dashboard id: 20842
The dashboard can be onboarded with a GrafanaDashboard resource:
apiVersion: grafana.integreatly.org/v1beta1
kind: GrafanaDashboard
metadata:
  name: cert-manager
spec:
  allowCrossNamespaceImport: true
  folder: Infrastructure
  instanceSelector:
    matchLabels:
      dashboards: grafana
  grafanaCom:
    id: 20842
    revision: 3
  resyncPeriod: 10m
resyncPeriod forces periodic retries if the Grafana instance was temporarily unavailable when the dashboard resource was first reconciled.
-
A Private CA (Private PKI) is an enterprise-specific certificate authority that functions like a publicly trusted CA. With a private CA, an enterprise creates its own internal root certificate that can issue other private certificates for internal servers and users.
Certificates issued by private CAs are not publicly trusted and should not be used outside of their enterprise’s trusted members and infrastructure. A private CA is also known as private public key infrastructure (private PKI) or internal certificate authority. ↩
-
The Automatic Certificate Management Environment (ACME) protocol is a communications protocol for automating interactions between certificate authorities and their users’ servers, allowing the automated deployment of public key infrastructure at very low cost. It was designed by the Internet Security Research Group (ISRG) for their Let’s Encrypt service.
The protocol, based on passing JSON-formatted messages over HTTPS has been published as an Internet Standard in RFC 8555 by its own chartered IETF working group ↩