Kubernetes Backup & Restore (Velero)
Backup Architecture and Design
A backup strategy is needed for Kubernetes cluster. This backup strategy should, at least, contains a backup infrastructure, and backup and restore procedures for Kubernetes cluster configuration and PODs Persistent Volumes.
Note: About OS Filesystem backup
Operating Filesystem backup/restore procedures have been also defined using Restic. See details in “Pi Cluster: OS Filesystem Backup”
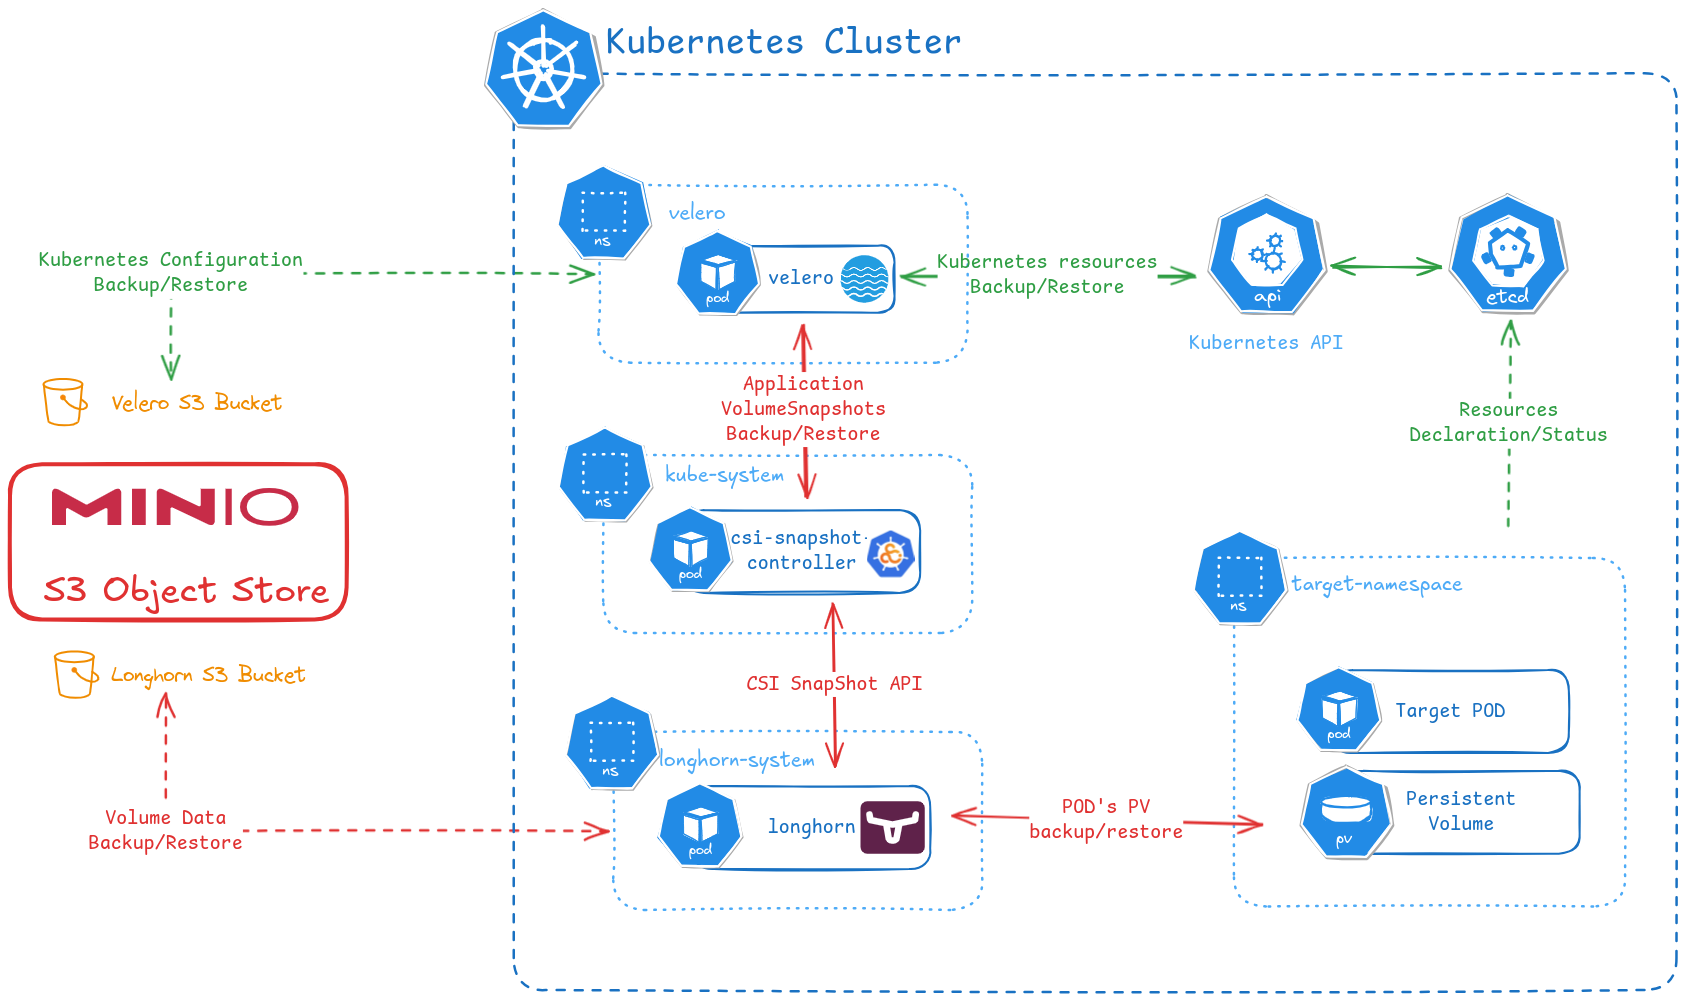
The backup architecture for the Kubernetes cluster is the following:
-
Kubernetes cluster configuration backup and restore.
In K3S, this could be achieved backing up and restoring the etcd Kubernetes cluster database as official documentation states. The supported backup procedure is only supported in case
etcddatabase is deployed.As an alternative Velero, a CNCF project, can be used to backup and restore kubernetes cluster configuration. Velero is kubernetes-distribution agnostic since it uses Kubernetes API for extracting and restoring the configuration, instead relay on backups/restores of etcd database.
Since for the backup and restore is using standard Kubernetes API, Velero can be used as a tool for migrating the configuration from one kubernetes cluster to another having a differnet kubernetes flavor. From K3S to K8S for example.
Velero can be intregrated with different storage backends, including Cloud Service Provider Storage services (AWS S3, Google Cloud Storage, Microsoft Azure Blob Storage, etc). It also supports S3-compatible servers like RustFS.
Since Velero is a most generic way to backup any Kubernetes cluster (not just K3S) it will be used to implement my cluster K3S backup.
-
PODs Persistent Volumes backup and restore.
Applications running in Kubernetes needs to be backed up in a consistent state. It means that before copying the filesystem is it required to freeze the application and make it flush all the pending changes to disk before making the copy. Once the backup is finished, the application can be unfreeze. 1) Application Freeze and flush to disk 2) Filesystem level backup 3) Application unfreeze.
Longhorn provides its own mechanisms for doing the backups and to take snapshots of the persistent volumes. See Longhorn documentation.
Longhorn does not currently support application consistent volumes snapshots/backups, see longhorn open issue #2128.
Longhorn does support, from release 1.2.4, Kubernetes CSI snapshot API to take snapshots/backups programmatically. See Longhorn documentation: CSI Snapshot Support.
With this functionality application-consistent backups can be orchestrated:
# Freeze POD filesystem
kubectl exec pod -- app_feeze_command
# Take snapshot using CSI Snapshot CRDs
kubectl apply -f volume_snapshot.yml
# wait till snapshot finish
# Unfreeze POD filesystem
kubectl exec pod -- app_unfreeze_command
Velero also support CSI snapshot API to take Persistent Volumes snapshots, through CSI provider, Longorn, when backing-up the PODs. See Velero CSI snapshot support documentation.
Integrating Container Storage Interface (CSI) snapshot support into Velero and Longhorn enables Velero to backup and restore CSI-backed volumes using the Kubernetes CSI Snapshot feature.
For orchestrating application-consistent backups, Velero supports the definition of backup hooks, commands to be executed before and after the backup, that can be configured at POD level through annotations.
So Velero, with its buil-in functionality, CSI snapshot support and backup hooks, is able to perform the orchestration of application-consistent backups. Velero delegates the actual backup/restore of PV to the CSI provider, Longhorn.
Note:
Velero also supports Persistent Volumes backup/restore procedures using File System Backup (FSB shortly) or Pod Volume Backup. restic or kopia can be used to transfer the data using the same S3 backend configured within Velero for backing up the cluster configuration. Velero node agent has to be installed to enable this functionality. FSB support is not enabled when deploying Velero, instead CSI snapshots will be used.
-
S3 as backup backend
All the above mechanisms supports as backup backend, a S3-compliant storage infrastructure. For this reason, RustFS has been deployed as the S3 server for the Pi Cluster.
Note:
The S3 server is installed as a stand-alone service and configured as described in “PiCluster - S3 Backup Backend”.
Configuring CSI (Longhorn)
Longhorn Backups configuration
Longhorn has to be configured so it can perform backups to a en external backupstore. See how to configure it in Pi Cluster - Longhorn - Backup configuration.
Longhorn CSI Snapshot configuration
Kubernetes CSI Snapshot API used by Velero to automate backup of POD’s volumes need to be configured and enabled for Longhorn. See how to enable CSI Snapshot using Longhorn in PiCluster- Longhorn - Configuring CSI Snapshot API.
Installing and configuring S3 backupstore
S3 Server Installation
See installation instructions in “PiCluster - S3 Backup Backend”.
Configuring S3 bucket and user for Velero
Velero requires an object storage bucket to store backups in.
A dedicated S3 bucket is created for Velero:
| User | Bucket |
|---|---|
| velero | k3s-velero |
-
Create bucket for storing Velero backups
rc mb ${S3_ALIAS}/k3s-velero - Add
velerouser using RustFS CLIrc admin user add ${S3_ALIAS} velero supersecret -
Define user policy to grant
velerouser access to backups bucket Create filevelero_policy.jsonfile:{ "Version": "2012-10-17", "Statement": [ { "Effect": "Allow", "Action": [ "s3:DeleteObject", "s3:GetObject", "s3:ListMultipartUploadParts", "s3:PutObject", "s3:AbortMultipartUpload" ], "Resource": [ "arn:aws:s3:::k3s-velero/*" ] }, { "Effect": "Allow", "Action": [ "s3:ListBucket" ], "Resource": [ "arn:aws:s3:::k3s-velero" ] } ] }This policy grants read-write access to
k3s-velerobucket - Add access policy to
velerouser:rc admin policy create ${S3_ALIAS} velero velero_policy.json rc admin policy attach ${S3_ALIAS} velero velero
See more details in Velero plugin for aws.
Velero Installation
Velero defines a set of Kubernetes’ CRDs (Custom Resource Definition) and Controllers that process those CRDs to perform backups and restores. Velero also provides a CLI to execute backup/restore commands using Kubernetes API. More details in official documentation, How Velero works
The complete backup workflow is the following:
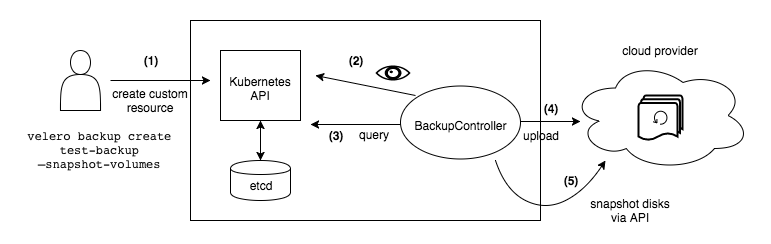
As storage provider, an S3-compatible backend will be used. See Velero’s installation documentation using S3 as backend.
Velero CLI
Before installing Velero CLI, kubectl has to be installed. velero uses kubectl config file (~/.kube/config) to connect to Kubernetes API.
Important: k3s config file is located in /etc/rancher/k3s/k3s.yaml and it need to be copied into $HOME/kube/config in the server where kubectl and velero is going to be executed.
-
Step 2: Download latest stable velero release from https://github.com/vmware-tanzu/velero/releases
cd /tmp wget https://github.com/vmware-tanzu/velero/releases/download/${VELERO_RELEASE}/velero-${VELERO_RELEASE}-linux-${ARCH}.tar.gz -
Step 3: unarchive
tar -xvf velero-${VELERO_RELEASE}-linux-${ARCH}.tar.gz -C /tmp/. - Step 4: Copy
velerobinary to/usr/local/binsudo cp /tmp/velero-${VELERO_RELEASE}-linux-${ARCH}}/velero /usr/local/bin/velero sudo chmod +x /usr/local/bin/velero -
Step 5: Customize namespace for operational commands
CLI commands expects velero to be running in default namespace (named velero
velero). If namespace is different it must be specified with any execution of the command (–namespace option)Velero CLI can be configured to use a different namespace and avoid passing –namespace option with each execution
velero client config set namespace=${VELERO_NAMESPACE}
Velero Kubernetes Service
Installation using Helm (Release 3):
-
Step 1: Add the vmware-tanzu Helm repository:
helm repo add vmware-tanzu https://vmware-tanzu.github.io/helm-charts -
Step2: Fetch the latest charts from the repository:
helm repo update -
Step 3: Create namespace
kubectl create namespace velero -
Step 4: Create values.yml for Velero helm chart deployment
# AWS backend plugin configuration
initContainers:
  - name: velero-plugin-for-aws
    image: velero/velero-plugin-for-aws:${VELERO_AWS_PLUGIN_VERSION}
    imagePullPolicy: IfNotPresent
    volumeMounts:
      - mountPath: /target
        name: plugins

# S3 storage configuration
configuration:
  backupStorageLocation:
    - provider: aws
      bucket: ${S3_VELERO_BUCKET}
      # caCert is only needed if self-signed certificates are used
      # caCert: <ca.pem_base64> # cat CA.pem | base64 | tr -d "\n"
      config:
        region: eu-west-1
        s3ForcePathStyle: true
        s3Url: https://${S3_BACKUP_SERVER}:9091
        # insecureSkipTLSVerify true only if using self-signed certificates
        # insecureSkipTLSVerify: true
  # Enable CSI snapshot support
  features: EnableCSI
credentials:
  secretContents:
    cloud: |
      [default]
      aws_access_key_id: ${S3_VELERO_USER} # Not encoded
      aws_secret_access_key: ${S3_VELERO_PASSWD} # Not encoded

# Disable VolumeSnapshotLocation CRD. It is not needed for CSI integration
snapshotsEnabled: false
Note:
Substitute variables (
${var}) in the above yaml file before deploying helm chart.- Replace
${VELERO_AWS_PLUGIN_VERSION}by the version ofvelero-plugin-for-awsthat is compatible with Velero version. See compatibility matrix in velero-plugin-for-aws repor (i.e.: v1.12.1) - Replace
${S3_BACKUP_SERVER}by the DNS name of the backup server (i.e.s3.mydomain.com) - Replace
${S3_VELERO_BUCKET}by the bucket name configured for velero (i.e.:k3s-velero) - Replace
${S3_VELERO_USER}and${S3_VELERO_PASSWD}by the user and password configured in the S3 server
- Replace
-
Step 5: Install Velero in the
veleronamespace with the overriden valueshelm install velero vmware-tanzu/velero --namespace velero -f values.yml -
Step 6: Confirm that the deployment succeeded, run:
kubectl -n velero get pod -
Step 7: Configure VolumeSnapshotClass
Create manifest file
volume_snapshotclass_velero.yml# CSI VolumeSnapshot Associated With Longhorn Backup kind: VolumeSnapshotClass apiVersion: snapshot.storage.k8s.io/v1 metadata: name: velero-longhorn-backup-vsc labels: velero.io/csi-volumesnapshot-class: "true" driver: driver.longhorn.io deletionPolicy: Retain parameters: type: bakThis
VolumeSnapshotClasswill be used by Velero to create VolumeSnapshot objects when orchestrating PV backups. TheVolumeSnapshotClassto be used, from all the configured in the system, is the one with the labelvelero.io/csi-volumesnapshot-class.Setting a
deletionPolicy: Retainin theVolumeSnapshotClassdeclaration will preserve the volume snapshot in the storage system for the lifetime of the Velero backup and will prevent the deletion of the volume snapshot, in the storage system, in the event of a disaster where the namespace with the VolumeSnapshot object may be lost.Apply manifest file
kubectl apply -f volume_snapshotclass_velero.yml
Velero chart configuration details
-
Velero plugins installation
The chart configuration deploys the following velero plugin as
initContainers:velero-plugin-for-awsto enable S3 as backup backend.
# AWS backend and CSI plugins configuration initContainers: - name: velero-plugin-for-aws image: velero/velero-plugin-for-aws:v1.12.1 imagePullPolicy: IfNotPresent volumeMounts: - mountPath: /target name: plugins -
Enable Velero CSI Snapshots
configuration: # Enable CSI snapshot support features: EnableCSI # Disable VolumeSnapshotLocation CRD. It is not needed for CSI integration snapshotsEnabled: false -
Configure S3 server as backup backend
# S3 storage configuration
configuration:
  # Cloud provider being used
  provider: aws
  backupStorageLocation:
    provider: aws
    bucket: ${S3_VELERO_BUCKET}
    # caCert is only needed if self-signed certificates are used
    # caCert: <ca.pem_base64> # cat CA.pem | base64 | tr -d "\n"
    config:
      region: eu-west-1
      s3ForcePathStyle: true
      s3Url: https://${S3_BACKUP_SERVER}:9091
      # insecureSkipTLSVerify true only if using self-signed certificates
      # insecureSkipTLSVerify: true
credentials:
  secretContents:
    cloud: |
      [default]
      aws_access_key_id: ${S3_VELERO_USER} # Not encoded
      aws_secret_access_key: ${S3_VELERO_PASSWD} # Not encoded
S3 server connection data (
configuration.backupStorageLocation.config), S3 credentials (credentials.secretContents), and bucket(configuration.backupStorageLocation.bucket) to be used.Note: In case of using a self-signed certificate for the S3 server, custom CA certificate must be passed as
configuration.backupStorageLocation.caCertparameter (base64 encoded and removing any ‘\n’ character)
GitOps installation
As alternative, for GitOps deployment, instead of putting S3 credentials into helm values in plain text, a Secret can be used to store the credentials.
apiVersion: v1
kind: Secret
metadata:
  name: velero-secret
  namespace: velero
type: Opaque
data:
  cloud: <velero_secret_content | b64encode>
Where
[default]
aws_access_key_id: <s3_velero_user> # Not encoded
aws_secret_access_key: <s3_velero_pass> # Not encoded
And the following helm values need to be provided, instead of credentias.secretContent
credentials:
  existingSecret: velero-secret
Testing Velero
Deploy a testing application (nginx), which uses a Longhorn’s Volume for storing its logs (/var/logs/nginx)
-
Step 1. Create manifest file:
nginx-example.yml--- apiVersion: v1 kind: Namespace metadata: name: nginx-example labels: app: nginx --- kind: PersistentVolumeClaim apiVersion: v1 metadata: name: nginx-logs namespace: nginx-example labels: app: nginx spec: storageClassName: longhorn accessModes: - ReadWriteOnce resources: requests: storage: 50Mi --- apiVersion: apps/v1 kind: Deployment metadata: name: nginx-deployment namespace: nginx-example spec: replicas: 1 selector: matchLabels: app: nginx template: metadata: labels: app: nginx annotations: pre.hook.backup.velero.io/container: fsfreeze pre.hook.backup.velero.io/command: '["/sbin/fsfreeze", "--freeze", "/var/log/nginx"]' post.hook.backup.velero.io/container: fsfreeze post.hook.backup.velero.io/command: '["/sbin/fsfreeze", "--unfreeze", "/var/log/nginx"]' spec: volumes: - name: nginx-logs persistentVolumeClaim: claimName: nginx-logs containers: - image: nginx:1.17.6 name: nginx ports: - containerPort: 80 volumeMounts: - mountPath: "/var/log/nginx" name: nginx-logs readOnly: false - image: ubuntu:bionic name: fsfreeze securityContext: privileged: true volumeMounts: - mountPath: "/var/log/nginx" name: nginx-logs readOnly: false command: - "/bin/bash" - "-c" - "sleep infinity" --- apiVersion: v1 kind: Service metadata: labels: app: nginx name: my-nginx namespace: nginx-example spec: ports: - port: 80 targetPort: 80 selector: app: nginx type: LoadBalancerNote: Deployment template is annotated so, volume is included in the backup (
backup.velero.io/backup-volumes) and before doing the backup the filesystem is freeze (pre.hook.backup.velero.ioandpost.hook.backup.velero.io) -
Step 2. Apply manifest file
nginx-example.ymlkubectl apply -f nginx-example.yml -
Step 3. Connect to nginx pod and create manually a file within
/var/log/nginxkubectl exec <nginx-pod> -n nginx-example -it -- /bin/sh # touch /var/log/nginx/testing -
Step 4. Create a backup for any object included in nginx-example namespace:
velero backup create nginx-backup --include-namespaces nginx-example --wait -
Step 5. Simulate a disaster:
kubectl delete namespace nginx-example -
Step 6. To check that the nginx deployment and service are gone, run:
kubectl get deployments --namespace=nginx-example kubectl get services --namespace=nginx-example kubectl get namespace/nginx-example -
Step 7. Run the restore
velero restore create --from-backup nginx-backup -
Step 8. Check the status of the restore:
velero restore getAfter the restore finishes, the output looks like the following:
NAME BACKUP STATUS STARTED COMPLETED ERRORS WARNINGS CREATED SELECTOR nginx-backup-20211220180613 nginx-backup Completed 2021-12-20 18:06:13 +0100 CET 2021-12-20 18:06:50 +0100 CET 0 0 2021-12-20 18:06:13 +0100 CET <none> -
Step 9. Check nginx deployment and services are back
kubectl get deployments --namespace=nginx-example kubectl get services --namespace=nginx-example kubectl get namespace/nginx-example -
Step 10. Connect to the restored pod and check that
testingfile is in/var/log/nginx
Schedule a periodic full backup
Set up daily full backup can be on with velero CLI
velero schedule create full --schedule "0 4 * * *"
Or creating a Schedule kubernetes resource:
apiVersion: velero.io/v1
kind: Schedule
metadata:
  name: full
  namespace: velero
spec:
  schedule: 0 4 * * *
  template:
    hooks: {}
    includedNamespaces:
    - '*'
    includedResources:
    - '*'
    includeClusterResources: true
    metadata:
      labels:
        type: 'full'
        schedule: 'daily'
    ttl: 720h0m0s
Observability
Integration with Kube-prom-stack
ServiceMonitoring, Prometheus Operator’s CRD, resource can be automatically created so Kube-Prometheus-Stack is able to automatically start collecting metrics from fluentf.
Add following to the helm chart values.yaml file,
# Settings for Velero's prometheus metrics. Enabled by default.
metrics:
  enabled: true
  scrapeInterval: 30s
  scrapeTimeout: 10s
  serviceMonitor:
    enabled: true
  prometheusRule:
    enabled: true
Corresponding Prometheus Operator’s resource, ServiceMonitor will be created, so Kube-Prometheus-Stack can automatically start scraping metrics endpoint.
Grafana Dashboards
See Grafana Operator - Provisioning Dashboards for the general GrafanaDashboard onboarding patterns.
Velero dashboard sample can be donwloaded from grafana.com: dashboard id: 11055
The dashboard can be onboarded with a GrafanaDashboard resource:
apiVersion: grafana.integreatly.org/v1beta1
kind: GrafanaDashboard
metadata:
  name: velero
spec:
  allowCrossNamespaceImport: true
  folder: Infrastructure
  instanceSelector:
    matchLabels:
      dashboards: grafana
  grafanaCom:
    id: 11055
    revision: 2
  datasources:
    - inputName: DS_PROMETHEUS
      datasourceName: Prometheus