K3S Installation
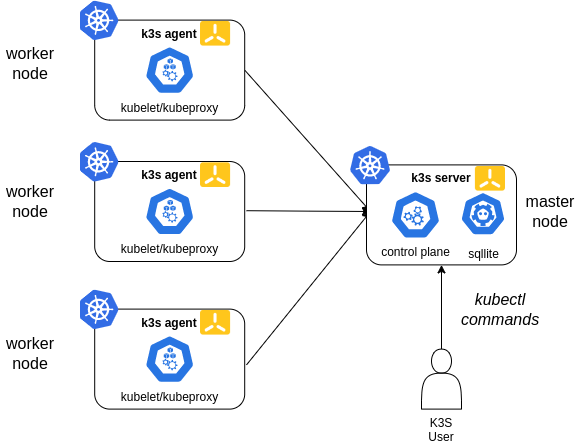
K3S is a lightweight kubernetes built for IoT and edge computing, provided by the company Rancher. The following picture shows the K3S architecture (source K3S).

In K3S all kubernetes processes are consolidated within one single binary. The binary is deployed on servers with two different k3s roles (k3s-server or k3s-agent).
- k3s-server: starts all kubernetes control plane processes (API, Scheduler and Controller) and worker proceses (Kubelet and kube-proxy), so master node can be used also as worker node.
- k3s-agent: consolidating all kubernetes worker processes (Kubelet and kube-proxy).
Control-plane nodes will be configured so no load is deployed in it.
Nodes preconfiguration
-
Step 1: Enable iptables to see bridged traffic
Load
br_netfilterkernel module an modify settings to letiptablessee bridged trafficcat <<EOF | sudo tee /etc/modules-load.d/k8s.conf br_netfilter EOF cat <<EOF | sudo tee /etc/sysctl.d/k8s.conf net.bridge.bridge-nf-call-ip6tables = 1 net.bridge.bridge-nf-call-iptables = 1 EOF sudo sysctl --system -
Step 2: Increase inotify limits for container workloads
Kubernetes nodes running multiple container runtimes, CNI plugins (Cilium, Istio CNI), and storage drivers (Longhorn) can exhaust the default inotify user instances limit (
fs.inotify.max_user_instances = 128). This causes CNI agents to fail withcouldn't initialize inotify: too many open files.Add the following to
/etc/sysctl.d/k8s.conf(update the file created in Step 1):cat <<EOF | sudo tee -a /etc/sysctl.d/k8s.conf fs.inotify.max_user_instances = 512 fs.inotify.max_user_watches = 256000 EOF sudo sysctl --system -
Step 3: Disable swap memory (only x86 nodes)
sudo swapoff -aModify /etc/fstab to make this change permanent, commenting line corresponding to swap.
-
Step 4: Enable
cgroupon Raspberry PI nodes.Modify file
/boot/firmware/cmdline.txtto include the line:cgroup_enable=cpuset cgroup_memory=1 cgroup_enable=memory -
Step 5: Reboot the server
Single-server Setup with an Embedded DB
In this case a single node will be configured as master node. K3s embedded sqlite database is used in this case.
In this configuration, each agent node is registered to the same server node. A K3s user can manipulate Kubernetes resources by calling the K3s API on the server node.
Master node installation
-
Step 1: Prepare K3S kubelet configuration file
Create file
/etc/rancher/k3s/kubelet.configapiVersion: kubelet.config.k8s.io/v1beta1 kind: KubeletConfiguration shutdownGracePeriod: 30s shutdownGracePeriodCriticalPods: 10sThis kubelet configuration enables new kubernetes feature Graceful node shutdown. This feature is available since Kubernetes 1.21, it is still in beta status, and it ensures that pods follow the normal pod termination process during the node shutdown.
See further details in “Kubernetes documentation: Graceful-shutdown”.
Note:
After installation, we will see that
kubelet(k3s-server process) has taken systemd’s inhibitor lock, which is the mechanism used by Kubernetes to implement the gracefully shutdown the pods.sudo systemd-inhibit --list WHO UID USER PID COMM WHAT WHY MODE ModemManager 0 root 728 ModemManager sleep ModemManager needs to reset devices delay Unattended Upgrades Shutdown 0 root 767 unattended-upgr shutdown Stop ongoing upgrades or perform upgrades before shutdown delay kubelet 0 root 4474 k3s-server shutdown Kubelet needs time to handle node shutdown delay -
Step 2: Installing K3S control plane node
For installing the master node execute the following command:
curl -sfL https://get.k3s.io | K3S_TOKEN=<server_token> sh -s - server --write-kubeconfig-mode '0644' --node-taint 'node-role.kubernetes.io/control-plane:NoSchedule' --disable 'servicelb' --disable 'traefik' --disable 'local-storage' --kube-controller-manager-arg 'bind-address=0.0.0.0' --kube-proxy-arg 'metrics-bind-address=0.0.0.0' --kube-scheduler-arg 'bind-address=0.0.0.0' --kubelet-arg 'config=/etc/rancher/k3s/kubelet.config' --kube-controller-manager-arg 'terminated-pod-gc-threshold=10'Where:
server_tokenis shared secret within the cluster for allowing connection of worker nodes--write-kubeconfig-mode '0644'gives read permissions to kubeconfig file located in/etc/rancher/k3s/k3s.yaml--node-taint 'node-role.kubernetes.io/control-plane:NoSchedule'makes master node not schedulable to run any pod. Only pods marked with specific tolerance will be scheduled on master node.--disable servicelbto disable default service load balancer installed by K3S (Klipper Load Balancer). Metallb will be used instead.--disable local-storageto disable local storage persistent volumes provider installed by K3S (local-path-provisioner). Longhorn will be used instead--disable traefikto disable default ingress controller installed by K3S (Traefik). Traefik will be installed from helm chart.--kube-controller-manager.arg,--kube-scheduler-argand--kube-proxy-argto bind those components not only to 127.0.0.1 and enable metrics scraping from a external node.--kubelet-arg 'config=/etc/rancher/k3s/kubelet.config'provides kubelet configuraion parameters. See Kubernetes Doc: Kubelet Config File--kube-controller-manager-arg 'terminated-pod-gc-threshold=10'. Setting limit to 10 terminated pods that can exist before the terminated pod garbage collector starts deleting terminated pods. See Kubernetes Doc: Pod Garbage collection
Important:
Avoid the use of documented taint
k3s-controlplane=true:NoExecuteused to avoid deployment of pods on master node. We are interested on running certain pods on master node, like the ones needed to collect logs/metrics from the master node.Instead, use the taint
node-role.kubernetes.io/control-plane:NoSchedule.K3S common services: core-dns, metric-service, service-lb are configured with tolerance to
node-role.kubernetes.io/control-planetaint, so they will be scheduled on master node.Metal-lb, load balancer to be used within the cluster, uses this tolerance as well, so daemonset metallb-speaker can be deployed on master node.
Other Daemonset pods, like fluent-bit, have to specify this specific tolerance to be able to get logs from master nodes.
See this K3S PR where this feature was introduced.
-
Step 3: Install Helm utility
Kubectl is installed as part of the k3s server installation (
/usr/local/bin/kubectl), but helm need to be installed following this instructions. -
Step 4: Copy k3s configuration file to Kubernets default directory (
$HOME/.kube/config), sokubectlandhelmutilities can find the way to connect to the cluster.mkdir $HOME/.kube cp /etc/rancher/k3s/k3s.yaml $HOME/.kube/.
Workers installation
-
Step 1: Prepare K3S kubelet configuration file
Create file
/etc/rancher/k3s/kubelet.configapiVersion: kubelet.config.k8s.io/v1beta1 kind: KubeletConfiguration shutdownGracePeriod: 30s shutdownGracePeriodCriticalPods: 10s -
Step 2: Installing K3S worker node
For installing the master node execute the following command:
curl -sfL https://get.k3s.io | K3S_URL='https://<k3s_master_ip>:6443' K3S_TOKEN=<server_token> sh -s - --node-label 'node_type=worker' --kubelet-arg 'config=/etc/rancher/k3s/kubelet.config' --kube-proxy-arg 'metrics-bind-address=0.0.0.0'Where:
server_tokenis shared secret within the cluster for allowing connection of worker nodesk3s_master_ipis the k3s master node ip--node-label 'node_type=worker'add a custom labelnode_typeto the worker node.--kubelet-arg 'config=/etc/rancher/k3s/kubelet.config'provides kubelet configuraion parameters. See Kubernetes Doc: Kubelet Config File--kube-proxy-arg 'metrics-bind-address=0.0.0.0'to enable kube-proxy metrics scraping from a external node
-
Step 3: Specify role label for worker nodes
From master node, assign a role label to worker nodes, so when executing
kubectl get nodescommand ROLE column show worker role for workers nodes.kubectl label nodes <worker_node_name> kubernetes.io/role=worker
High-Availability K3s
Three or more server nodes that will serve the Kubernetes API and run other control plane services, using an embedded etcd datastore (as opposed to the embedded SQLite datastore used in single-server setups).
A load balancer is required to provide high availability (HA) for the Kubernetes API.
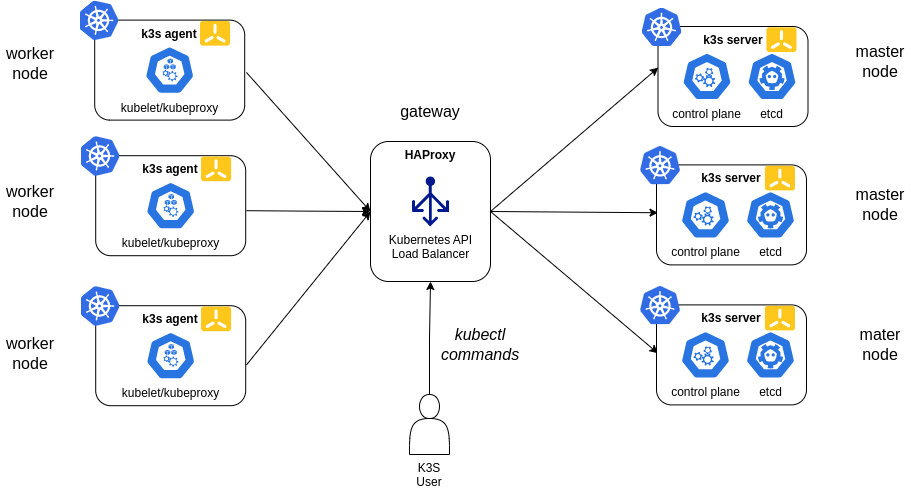
For K3S there are two main options for the Kubernetes API load balancer in HA configuration:
Option 1: External Load Balancer (HAProxy)
You can use a traditional network load balancer such as HAProxy to provide a highly available endpoint for the Kubernetes API. This approach is suitable for environments where you want to separate the load balancer from the cluster nodes.
Option 2: kube-vip (Recommended)
kube-vip is a modern, cloud-native solution that provides a virtual IP (VIP) managed directly by the Kubernetes control plane nodes, eliminating the need for an external load balancer like HAProxy.
Why kube-vip?
- Native Kubernetes integration (runs as a DaemonSet)
- No external dependencies or single point of failure
- Supports ARP and BGP modes for VIP advertisement
- Recommended by the K3s project for HA clusters
Reserve VIP address for Kubernetes API
In both cases, the Kubernetes API will be exposed through a highly available endpoint, ensuring that the cluster remains accessible even if one or more control plane nodes fail and a floating virtual IP address is used to access the cluster.
VIP address need to be part of the same subnet as the control plane nodes, and it should not be used by any other device on the network.
That VIP address need to be included as Subject Alternative Name (SAN) in the TLS certificate used by K3S API, so it is important to include it in the tls-san parameter during installation of master nodes.
Master nodes installation
Embedded etcd data store will be used. Installation procedure is described in K3S documentation: High Availability Embedded etcd.
-
Step 1: Create config directory
sudo mkdir -p /etc/rancher/k3s -
Step 2: Create token file in all nodes
Create file
/etc/rancher/k3s/cluster-tokencontaining token value. K3s token is a shared secret among all nodes of the cluster (master and worker nodes)Instead of using
K3S_TOKENenvironment variable during installation,--token-fileargument will be used.echo "supersecrettoken" > /etc/rancher/k3s/cluster-token -
Step 3: Prepare K3S kubelet configuration file.
Create file
/etc/rancher/k3s/kubelet.configapiVersion: kubelet.config.k8s.io/v1beta1 kind: KubeletConfiguration shutdownGracePeriod: 30s shutdownGracePeriodCriticalPods: 10sThis kubelet configuration enables new kubernetes feature Graceful node shutdown. This has been explained in the previous section: single master node installation.
-
Step 4: Prepare K3s config file
Create file
/etc/rancher/k3s/config.yamlcontaining all configuration options needed. They are equivalent to the K3s argumentstoken-file: /etc/rancher/k3s/cluster-token disable: - local-storage - servicelb - traefik etcd-expose-metrics: true kube-controller-manager-arg: - bind-address=0.0.0.0 - terminated-pod-gc-threshold=10 kube-proxy-arg: - metrics-bind-address=0.0.0.0 kube-scheduler-arg: - bind-address=0.0.0.0 kubelet-arg: - config=/etc/rancher/k3s/kubelet.config node-taint: - node-role.kubernetes.io/master=true:NoSchedule tls-san: - 10.0.0.10 write-kubeconfig-mode: 644This configuration is equivalent to the following k3s arguments:
--toke-file /etc/rancher/k3s/cluster-token
--write-kubeconfig-mode '0644'
--disable 'servicelb'
--disable 'traefik'
--disable 'local-storage'
--node-taint 'node-role.kubernetes.io/master=true:NoSchedule'
--etcd-expose-metrics
--tls-san 10.0.0.10
--kube-controller-manager-arg 'bind-address=0.0.0.0'
--kube-proxy-arg 'metrics-bind-address=0.0.0.0'
--kube-scheduler-arg 'bind-address=0.0.0.0'
--kubelet-arg 'config=/etc/rancher/k3s/kubelet.config'
--kube-controller-manager-arg 'terminated-pod-gc-threshold=10'
Parameters are the same which have been configured during installation in single master node deployment, adding the following:
token-fileparameter instead K3S_TOKEN environment variabletls-sanparameter to add k3s api VIP (Virtual IP) as Subject Alternative Names on TLS cert created by K3S.etcd-expose-metricsto expose etcd metrics
-
Step 5. Install primary master node
curl -sfL https://get.k3s.io | sh -s - server --cluster-init -
Step 6. Install secondary master nodes
curl -sfL https://get.k3s.io | sh -s - server --server https://<ip_hostname_first_primary_server>:6443
Kubernetes API Load Balancing
HAProxy (External Load Balancer)
A load balancer is needed for providing High availability to Kubernetes API. In this case, a network load balancer, HAProxy, can be used.
HAProxy is an open source option that provides a TCP load balancer. It also supports HA for the load balancer itself, ensuring redundancy at all levels.
Additionally, KeepAlived can be used to generate a virtual IP (VIP) that will be used to access the cluster.
In my cluster I decided use kube-vip based LoadBalancer because I only have one non-cluster node to be used (node1).
Example HAProxy Configuration
Install HAProxy and keep alive on external nodes (lb-1 and lb-2), so they can be configured in active-passive mode to avoid single point of failure on load balancer:
-
Install HAProxy and KeepAlived
sudo apt install haproxy keepalived -
Add the following to
/etc/haproxy/haproxy.cfgon all nodes:global log /dev/log local0 log /dev/log local1 notice chroot /var/lib/haproxy stats socket /run/haproxy/admin.sock mode 660 level admin expose-fd listeners stats timeout 30s user haproxy group haproxy daemon defaults log global mode http option httplog option dontlognull retries 3 timeout http-request 10s timeout queue 20s timeout connect 10s timeout client 1h timeout server 1h timeout http-keep-alive 10s timeout check 10s errorfile 400 /etc/haproxy/errors/400.http errorfile 403 /etc/haproxy/errors/403.http errorfile 408 /etc/haproxy/errors/408.http errorfile 500 /etc/haproxy/errors/500.http errorfile 502 /etc/haproxy/errors/502.http errorfile 503 /etc/haproxy/errors/503.http errorfile 504 /etc/haproxy/errors/504.http #--------------------------------------------------------------------- # apiserver frontend which proxys to the control plane nodes #--------------------------------------------------------------------- frontend k3s_apiserver bind *:6443 mode tcp option tcplog tcp-request inspect-delay 5s tcp-request content accept if { req.ssl_hello_type 1 } default_backend k3s_controlplane #--------------------------------------------------------------------- # round robin balancing for apiserver #--------------------------------------------------------------------- backend k3s_controlplane option httpchk GET /healthz http-check expect status 200 mode tcp option ssl-hello-chk option tcp-check default-server inter 10s downinter 5s rise 2 fall 2 slowstart 60s maxconn 250 maxqueue 256 weight 100 balance roundrobin server node2 10.0.0.12:6443 check server node3 10.0.0.13:6443 check server node4 10.0.0.14:6443 check #--------------------------------------------------------------------- # Enable Prometheus metrics endpoint #--------------------------------------------------------------------- frontend prometheus bind *:8405 mode http http-request use-service prometheus-exporter if { path /metrics } no log -
Add the following to
/etc/keepalived/keepalived.confon lb-1 and lb-2:global_defs { enable_script_security script_user root } vrrp_script chk_haproxy { script 'killall -0 haproxy' # faster than pidof interval 2 } vrrp_instance haproxy-vip { interface eth1 state <STATE> # MASTER on lb-1, BACKUP on lb-2 priority <PRIORITY> # 200 on lb-1, 100 on lb-2 virtual_router_id 51 virtual_ipaddress { 10.0.0.10/24 } track_script { chk_haproxy } } -
Restart and enable HAProxy and KeepAlived services on both load balancer nodes:
sudo systemctl restart haproxy
sudo systemctl enable haproxy
sudo systemctl restart keepalived
sudo systemctl enable keepalived
Kube-vip
kube-vip runs as a DaemonSet on all control-plane nodes and manages a floating virtual IP address for the Kubernetes API. This VIP automatically fails over between nodes, ensuring API availability even if a node goes down.
Kube-VIP will be configured to manage a VIP for the Kubernetes API on the control-plane nodes. The VIP will be advertised using ARP and kube-vip will handle failover between control-plane nodes.
LoadBalancer functionality will be disabled in this setup since we are only using kube-vip for the API VIP. The VIP will be bound to the specified network interface on the control-plane nodes (in my case, control plane runs on Raspberry PI nodes using eth0 interface)
IPVS load balancing will be enabled for the API port (6443) to ensure efficient traffic distribution to the active control-plane node.
Kube-VIP Installation
Installation using Helm (Release 3):
-
Step 1: Add kube-vip Helm repository:
helm repo add kube-vip https://kube-vip.github.io/helm-charts/ -
Step 2: Fetch the latest charts from the repository:
helm repo update -
Step 3: Create helm values file
kube-vip-values.ymlconfig: address: 10.0.0.10 # VIP address to be used for Kubernetes API env: # See Installation flags: https://kube-vip.io/docs/installation/flags/ # Enable only kube-vip control plane functionality cp_enable: "true" svc_enable: "false" # VIP configuration vip_interface: "eth0" vip_arp: "true" vip_leaderelection: "true" vip_leaseduration: "15" vip_renewdeadline: "10" vip_retryperiod: "2" vip_ddns: "false" vip_subnet: "32,128" cp_namespace: "kube-system" # ARP configuration enable_node_labeling: "true" # Enables IPVS LoadBalancer functionality lb_enable: "true" lb_port: "6443" # Enable Prometheus metrics prometheus_server: ":2112" envValueFrom: vip_nodename: fieldRef: fieldPath: spec.nodeName resources: limits: cpu: 500m memory: 500Mi requests: cpu: 100m memory: 100Mi serviceAccount: create: true name: kube-vip tolerations: - key: node-role.kubernetes.io/control-plane operator: Exists effect: NoSchedule affinity: nodeAffinity: requiredDuringSchedulingIgnoredDuringExecution: nodeSelectorTerms: - matchExpressions: - key: node-role.kubernetes.io/control-plane operator: Exists podMonitor: enabled: falsewhere:
Option Example Value Description config.address10.0.0.10The virtual IP (VIP) that kube-vip will manage for the Kubernetes API. env.cp_enable"true"Enable control plane (API) VIP management. env.svc_enable"false"Enable Service type LoadBalancer support (set to false for only API VIP). env.vip_interface"eth0"Network interface to bind the VIP to. env.vip_arp"true"Use ARP for VIP advertisement (default for most home labs). env.vip_leaderelection"true"Enable leader election for VIP failover. env.vip_leaseduration"15"Lease duration for leader election (seconds). env.vip_renewdeadline"10"Renew deadline for leader election (seconds). env.vip_retryperiod"2"Retry period for leader election (seconds). env.vip_ddns"false"Enable dynamic DNS updates for the VIP. env.vip_subnet"32,128"Subnet mask(s) for the VIP. env.vip_nodenamevalueFrom: fieldRef: fieldPath: spec.nodeNameUse the node’s name for VIP configuration. env.cp_namespace"kube-system"Namespace where kube-vip runs. env.enable_node_labeling"true"Enable automatic node labeling for VIP ownership. env.lb_enable"true"Enable IPVS LoadBalancer functionality. env.lb_port"6443"Port for the Kubernetes API. env.prometheus_server":2112"Expose Prometheus metrics on this port. resources.limits.cpu500mCPU limit for the kube-vip pod. resources.limits.memory500MiMemory limit for the kube-vip pod. resources.requests.cpu100mCPU request for the kube-vip pod. resources.requests.memory100MiMemory request for the kube-vip pod. serviceAccount.createtrueCreate a dedicated service account for kube-vip. For a full list of options and advanced flags, see the kube-vip documentation
Additionally DaemonSet is configured with toleration and node affinity to ensure it is only scheduled on control-plane nodes.
-
Step 4: Install kube-vip in kube-system namespace
helm install kube-vip kube-vip/kube-vip --namespace kube-system -f kube-vip-values.yaml -
Step 5: Confirm that the deployment succeeded
Check pods are running
kubectl -n kube-system get pods -l app.kubernetes.io/name=kube-vipOn a control-plane host, confirm the VIP is in the ARP/neighbor table
ip neigh show | grep 10.0.0.10 -
Update K3s config in all control-plane nodes to use the VIP
-
In
/etc/rancher/k3s/config.yamlon secondary control plane nodes, set:server: https://10.0.0.10:6443 tls-san: - 10.0.0.10This ensures all nodes and clients use the VIP for API access and that the VIP is included in the server certificate.
-
-
Restart K3s on all nodes
# control plane nodes sudo systemctl restart k3s -
Step 7. Renew TLS certificates
If K3s was installed before the VIP was added to the API server certificate SANs, kubelets and API clients will not trust the server certificate for the VIP. To include the VIP in control plane node certificates:
# Stop K3s service systemctl stop k3s # Rotate server certificates to include the configured tls-san/VIP k3s certificate rotate # Start K3s service systemctl start k3s -
Step 8. Verify API access via VIP
kubectl get nodes --server https://10.0.0.10:6443
Worker nodes installation
-
Step 1: Create config directory
sudo mkdir -p /etc/rancher/k3s -
Step 2: Create token file in all nodes
Create file
/etc/rancher/k3s/cluster-tokencontaining token value. K3s token is a shared secret among all nodes of the cluster (master and worker nodes)Instead of using
K3S_TOKENenvironment variable during installation,--token-fileargument will be used.echo "supersecrettoken" > /etc/rancher/k3s/cluster-token -
Step 3: Prepare K3S kubelet configuration file.
Create file
/etc/rancher/k3s/kubelet.configapiVersion: kubelet.config.k8s.io/v1beta1 kind: KubeletConfiguration shutdownGracePeriod: 30s shutdownGracePeriodCriticalPods: 10s -
Step 4: Prepare K3s config file
Create file
/etc/rancher/k3s/config.yamlcontaining all configuration options needed.token-file: /etc/rancher/k3s/cluster-token node-label: - 'node_type=worker' kubelet-arg: - 'config=/etc/rancher/k3s/kubelet.config' kube-proxy-arg: - 'metrics-bind-address=0.0.0.0'This configuration is equivalent to the following k3s arguments:
--toke-file /etc/rancher/k3s/cluster-token --node-label 'node_type=worker' --kubelet-arg 'config=/etc/rancher/k3s/kubelet.config' --kube-proxy-arg 'metrics-bind-address=0.0.0.0' -
Step 5. Install agent node
curl -sfL https://get.k3s.io | sh -s - agent --server https://<kube_api_vip>:6443
Installing custom CNI
By default K3S install Flannel as CNI. If other CNI is going to be used default Flannel CNI need to be disabled during installation.
See details in K3S Networking - Use custom CNI
K3S master nodes need to be installed with the following additional options:
--flannel-backend=none: to disable Fannel instalation--disable-network-policy: Most CNI plugins come with their own network policy engine, so it is recommended to set –disable-network-policy as well to avoid conflicts.
Enabling Embedded Registry Mirror
K3s embeds Spegel, a stateless distributed OCI registry mirror that allows peer-to-peer sharing of container images between nodes in a Kubernetes cluster.
The distributed registry mirror is disabled by default.
Enabling The Distributed OCI Registry Mirror
In order to enable the embedded registry mirror, server nodes (not agent nodes) must be started with the --embedded-registry flag, or with embedded-registry: true in the configuration file. This option enables the embedded mirror for use on all nodes in the cluster.
When enabled at a cluster level, all nodes will host a local OCI registry on port 6443, and publish a list of available images via a peer to peer network on port 5001.
Any image available in the containerd image store on any node, can be pulled by other cluster members without access to an external registry.
Enabling Registry Mirroring
Enabling mirroring for a registry allows a node to both pull images from that registry from other nodes, and share the registry’s images with other nodes. If a registry is enabled for mirroring on some nodes, but not on others, only the nodes with the registry enabled will exchange images from that registry.
In order to enable mirroring of images from an upstream container registry, nodes must have an entry in the mirrors section of /etc/rancher/k3s/registries.yaml for that registry. The registry does not need to have any endpoints listed, it just needs to be present.
The "*" wildcard mirror entry can be used to enable distributed mirroring of all registries. Note that the asterisk MUST be quoted:
mirrors: "*":
If no registries are enabled for mirroring on a node, that node does not participate in the distributed registry in any capacity.
Verifying Spegel is working
Verify if Spegel is working in K3s
Check exposed metrics:
kubectl get --raw /api/v1/nodes/${NODENAME}/proxy/metrics | grep -F 'spegel'
K3S Packaged Components
Auto-deployed Manifests (Add-ons)
K3s provides the capability to automatically deploy manifest files (AddOns).
On server nodes, any file found in /var/lib/rancher/k3s/server/manifests is automatically deployed to Kubernetes in a manner similar to kubectl apply command, both on startup and when the file is changed on disk. Deleting files out of this directory will not delete the corresponding resources from the cluster.
K3s comes with a number of packaged components that are deployed as AddOns via that manifests directory: coredns, traefik, local-path-storage, and metrics-server.
Manifests are tracked as AddOn custom resources (CRD) in the kube-system namespace.
Installation of this addOns can be disabled during k3s installation:
--disable '<addon>': Where<addon>can becoredns,traefik,local-storageormetric-server
Helm Add-ons
K3s includes also a built-in Helm Controller that manages installing, upgrading/reconfiguring, and uninstalling Helm charts using a HelmChart Custom Resource Definition (CRD). Paired with auto-deploying AddOn manifests, installing a Helm chart can be automated by creating a single manifiest file on /var/lib/rancher/k3s/server/manifests.
K3s uses this built-in helm chart controller only to deploy traefik. Rest of add-ons are instralled using Kubernetes manifest files.
HelmChart controller can be disabled to avoid conflicts with other controllers (i.e.: Helm Controller deployed by GitOps solution FluxCD) and all the add-ons can be installed manually, following same installation process of any other K8S distribution.
To disable K3s HelmChart Controller the following additional installation option need to be added:
--disable-helm-controller: to disable K3s helm controller
If HelmChart controller is disabled Traefik add-ons need to be disabled as well
--disable 'traefik': to disable Traefik installation
See further details in K3s documentationt - Managing k3s packaged components
Remote Access
To enable remote access to the cluster using kubectl and helm applications follow the following procedure
-
Step 1: Install
helmandkubectlutilities -
Step 2: Copy k3s configuration file, located in
/etc/rancher/k3s/k3s.yaml, to$HOME/.kube/config. -
Step 3: Modify
k3s.yamlconfiguration file for using the IP address instead of localhost -
Step 4: Enable HTTPS connectivity on port 6443 between the server and the k3s control node
In case of HA deployment, k3s api load balancer ip can be used instead of the IP of any of the single nodes.
K3S Automatic Upgrade
K3s cluster upgrade can be automated using Rancher’s system-upgrade-controller. This controller uses a custom resource definition (CRD), Plan, to schedule upgrades based on the configured plans
See more details in K3S Automated Upgrades documentation
-
Step 1. Install Rancher’s system-upgrade-controller
kubectl apply -f https://github.com/rancher/system-upgrade-controller/releases/latest/download/system-upgrade-controller.yaml -
Step 2. Configure upgrade plans
At least two upgrade plans need to be configured: a plan for upgrading server (master) nodes and a plan for upgrading agent (worker) nodes.
Plan for master:
k3s-master-upgrade.ymlapiVersion: upgrade.cattle.io/v1 kind: Plan metadata: name: k3s-server namespace: system-upgrade labels: k3s-upgrade: server spec: nodeSelector: matchExpressions: - key: node-role.kubernetes.io/control-plane operator: Exists serviceAccountName: system-upgrade concurrency: 1 # Cordon node before upgrade it cordon: true upgrade: image: rancher/k3s-upgrade version: <new_version>Plan for worker:
k3s-agent-upgrade.ymlapiVersion: upgrade.cattle.io/v1 kind: Plan metadata: name: k3s-agent namespace: system-upgrade labels: k3s-upgrade: agent spec: nodeSelector: matchExpressions: - key: node-role.kubernetes.io/control-plane operator: DoesNotExist # Enable plan deployment on master node (noSchedulable by installation) tolerations: - key: node-role.kubernetes.io/control-plane operator: Exists effect: NoSchedule serviceAccountName: system-upgrade # Wait for k3s-server upgrade plan to complete before executing k3s-agent plan prepare: image: rancher/k3s-upgrade args: - prepare - k3s-server concurrency: 1 # Cordon node before upgrade it cordon: true upgrade: image: rancher/k3s-upgrade version: <new_version> -
Step 3. Execute upgrade plans
kubectl apply -f k3s-server-upgrade.yml k3s-agent-upgrade.yml
Reset the cluster
To reset the cluster execute k3s uninstall script in master and worker nodes
On each worker node, execute:
/usr/local/bin/k3s-agent-uninstall.sh
On each master node, execute
/usr/local/bin/k3s-uninstall.sh
Ansible Automation
K3s cluster installation and reset procedures have been automated with Asible playbooks
For installing the cluster execute:
ansible-playbook k3s_install.yml
For resetting the cluster execute:
ansible-playbook k3s_reset.yml