Cluster Nodes
A K3S cluster is composed of:
- 3 master nodes (
node2,node3,node4), running on Raspberry Pi 4B (4GB) - 5 worker nodes:
node5andnode6running on Raspberry Pi 4B (8GB)node-hp-1,node-hp-2andnode-hp-3running on HP Elitedesk 800 G3 (16GB)
Raspberry PI nodes
Storage Configuration
node2-6 are based on a Raspberry Pi 4B booting from SSD disk attached through USB 3.0.
-
Dedicated disks storage architecture: Kingston A400 480GB SSD Disk and a USB3.0 to SATA adapter will be used connected to
node1. Kingston A400 240GB SSD Disk and USB3.0 to SATA adapter will be used connected tonode2-node6.SSD disk is partitioned to separate root filesystem (mountpoit
/) from data storage destinated for Longhorn data (mountpoint/storage)
Network Configuration
Only ethernet interface (eth0) will be used connected to the lan switch. Wifi interface won’t be used. Ethernet interface will be configured with static IP address.
Unbuntu OS Installation
Ubuntu can be installed on Raspbery PI using a preconfigurad cloud image that need to be copied to SDCard or USB Flashdisk/SSD.
Raspberry Pis will be configured to boot Ubuntu OS from USB conected disk (Flash Disk or SSD disk). The initial Ubuntu 24.04 LTS configuration on a Raspberry Pi 4 will be automated using cloud-init.
In order to enable boot from USB, Raspberry PI firmware might need to be updated. Follow the producedure indicated in “Raspberry PI - Firmware Update”.
Follow the procedure indicated in “Ubuntu OS Installation - Raspberry PI” using cloud-init configuration files (user-data and network-config) described in the table below.
user-data file for Raspberry Pi nodes:
| user-data |
|---|
| user-data |
Note:
In user-data file hostname field need to be changed for each node (node1-node6).
network-config file for Raspberry Pi nodes:
| Network configuration |
|---|
| network-config |
Note:
In network-config file addresses field need to be updated for each node (node1-node6), assigned the proper 10.0.0.X/24 address.
cloud-init partitioning configuration (SSD Disks)
By default, during first boot, cloud image partitions grow to fill the whole capacity of the SDCard/USB Flash Disk or SSD disk). So root partition (/) will grow to fill the full capacity of the disk.
cloud-init partition SSD Disk will be partitioned during first boot. cloud-init will be configured to reserve 30 GB for root filesystem (OS installation) and the rest will be used for creating a Linux partition (ext4) mounted as /storage. This will provide local storage capacity in each node of the cluster, used mainly by Kubernetes distributed storage solution and by backup solution.
cloud-init configuration (user-data file) includes commands to be executed once in boot time changing partition table and creating a new partition before the automatic growth of root partitions to fill the entire disk happens.
bootcmd:
  # Create second Linux partition. Leaving 30GB for root partition
  # sgdisk /dev/sda -g -e -n=0:30G:0 -t 0:8300
  # First convert MBR partition to GPT (-g option)
  # Second moves the GPT backup block to the end of the disk where it belongs (-e option)
  # Then creates a new partition starting 10GiB into the disk filling the rest of the disk (-n=0:10G:0 option)
  # And labels it as a Linux partition (-t option)
  - [cloud-init-per, once, addpartition, sgdisk, /dev/sda, "-g", "-e", "-n=0:30G:0", -t, "0:8300"]

runcmd:
  # reload partition table
  - "sudo partprobe /dev/sda"
  # configure new partition
  - "mkfs.ext4 /dev/sda3"
  - "e2label /dev/sda3 DATA"
  - "mkdir -p /storage"
  - "mount -t ext4 /dev/sda3 /storage"
  - "echo LABEL=DATA /storage ext4 defaults 0 0 | sudo tee -a /etc/fstab"
Command executed in boot time (cloud-init’s bootcmd section) is:
sgdisk /dev/sda -e .g -n=0:30G:0 -t 0:8300
This command:
- First convert MBR partition to GPT (-g option)
- Second moves the GPT backup block to the end of the disk (-e option)
- then creates a new partition starting 30GiB into the disk filling the rest of the disk (-n=0:10G:0 option)
- And labels it as an Linux partition (-t option)
For node1-node6, the new partition created in boot time, /dev/sda3, uses most of the disk space leaving just 30GB for the root filesystem, /dev/sda2.
Then cloud-init executes the commands (cloud-init’s runcmd section) to format (ext4) and mounted the new partition as /storage.
cloud-init: network configuration
Ubuntu’s netplan yaml configuration file used, part of cloud-init boot /boot/network-config is the following:
version: 2
ethernets:
  eth0:
    dhcp4: false
    dhcp6: false
    addresses:
      - 10.0.0.X/24
    routes:
      - to: default
        via: 10.0.0.1
    nameservers:
      addresses:
        - 10.0.0.1
      search:
        - homelab.ricsanfre.com
It assigns static IP address 10.0.0.X to eth0 port using as gateway and DNS server 10.0.0.1 (gateway).
Also homelab.ricsanfre.com domain is added to dns search
x86 mini PC nodes
Storage Configuration
hp-node1-3 are based on HP EliteDesk 800 G3 mini PCs. This model, is able to have two types of integrated disk:
- 2.5 SSD SATA disk
- NvME disk via M2.PCIe interface
Partitioning to be performed on the servers is the following:
For nodes having only SATA disk (hp-node-1)
| Partition | Description | Mount Point | Format | Size |
|---|---|---|---|---|
| /dev/sda1 | EFI system Partition (ESP) | /boot/efi | fat32 | 1075 MB |
| /dev/sda2 | Boot partition | /boot | ext4 | 2GB |
| /dev/sda3 | LVM Volume Group: ubuntu-vg | Rest of space available |
For nodes having NvME disks (hp-node-2 and hp-node-3)
| Partition | Description | Mount Point | Format | Size |
|---|---|---|---|---|
| /dev/nvme0n1p1 | EFI system Partition (ESP) | /boot/efi | fat32 | 1075 MB |
| /dev/nvme0n1p2 | Boot partition | /boot | ext4 | 2GB |
| /dev/nvme0n1p3 | LVM Volume Group: ubuntu-vg | Rest of space available |
LVM logical volumes configuration is the same in both cases:
| LVM Logical Volueme | Description | Mount Point | Format | Size |
|---|---|---|---|---|
| ubuntu-lv | Root filesystem | / | ext4 | 30 GB |
| lv-data | Storage filesystem | /storage | ext4 | Rest of space available in ubuntu-vg |
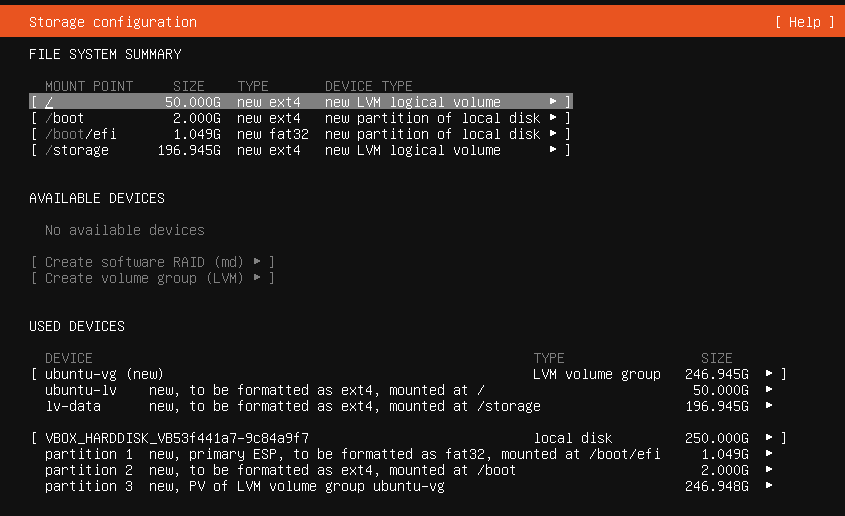
This partitioning scheme in installer GUI, will looks like
Network Configuration
Ethernet interface (eth0) will be used connected to the lan switch. Ethernet interface will be configured with static IP address.
Unbuntu OS Installation
Since version 20.04, the server installer supports automated unattended installation mode (autoinstallation mode).
The autoinstall config is provided via cloud-init configuration file:
#cloud-config
autoinstall:
  version: 1
  ...
Note:
When any system is installed using the server installer, an autoinstall file for repeating the install is created at /var/log/installer/autoinstall-user-data.
Server autoinstallation can be done through network using PXE (Preboot eXecution Environment). x86-64 systems boot in either UEFI or legacy (“BIOS”) mode (many systems can be configured to boot in either mode). The precise details depend on the system firmware, but both modes supports the PXE specification, which allows the provisioning of a bootloader over the network.
See details in Ubuntu’s documentation: “Ubuntu Advance Installation - Netbooting the server installer in amd64”
A PXE server need to be deployed in the Cluster for automatically autoinstall Ubuntu 24.04 in x86 nodes. To install PXE server follow the producedure indicated in “PXE Server”.
Follow the procedure indicated in “Ubuntu OS Installation - x86 (PXE Server)” to install Ubuntu on HP Elitedesk 800 G3 mini PCs.
cloud-init autoinstall configuration
For the x86 servers the cloud-init autoinstall configuration to be served from PXE server are similar to the sample provided here:
#cloud-config
autoinstall:
  version: 1
  keyboard:
    layout: es
  ssh:
    allow-pw: false
    install-server: true
  network:
    version: 2
    ethernets:
      eth0:
        dhcp4: false
        dhcp6: false
        addresses:
          - 10.0.0.X/24
        routes:
          - to: default
            via: 10.0.0.1
        nameservers:
          addresses:
            - 10.0.0.1
          search:
            - homelab.ricsanfre.com
  storage:
    config:
    - ptable: gpt
      path: /dev/sda
      wipe: superblock-recursive
      preserve: false
      name: ''
      grub_device: false
      type: disk
      id: disk-sda
    - device: disk-sda
      size: 1075M
      wipe: superblock
      flag: boot
      number: 1
      preserve: false
      grub_device: true
      path: /dev/sda1
      type: partition
      id: partition-0
    - fstype: fat32
      volume: partition-0
      preserve: false
      type: format
      id: format-0
    - device: disk-sda
      size: 2G
      wipe: superblock
      number: 2
      preserve: false
      grub_device: false
      path: /dev/sda2
      type: partition
      id: partition-1
    - fstype: ext4
      volume: partition-1
      preserve: false
      type: format
      id: format-1
    - device: disk-sda
      size: -1
      wipe: superblock
      number: 3
      preserve: false
      grub_device: false
      path: /dev/sda3
      type: partition
      id: partition-2
    - name: ubuntu-vg
      devices:
      - partition-2
      preserve: false
      type: lvm_volgroup
      id: lvm_volgroup-0
    - name: ubuntu-lv
      volgroup: lvm_volgroup-0
      size: 100G
      wipe: superblock
      preserve: false
      path: /dev/ubuntu-vg/ubuntu-lv
      type: lvm_partition
      id: lvm_partition-0
    - fstype: ext4
      volume: lvm_partition-0
      preserve: false
      type: format
      id: format-3
    - path: /
      device: format-3
      type: mount
      id: mount-3
    - name: lv-data
      volgroup: lvm_volgroup-0
      size: -1
      wipe: superblock
      preserve: false
      path: /dev/ubuntu-vg/lv-data
      type: lvm_partition
      id: lvm_partition-1
    - fstype: ext4
      volume: lvm_partition-1
      preserve: false
      type: format
      id: format-4
    - path: /storage
      device: format-4
      type: mount
      id: mount-4
    - path: /boot
      device: format-1
      type: mount
      id: mount-1
    - path: /boot/efi
      device: format-0
      type: mount
      id: mount-0
  user-data:
    # Set TimeZone and Locale
    timezone: UTC
    locale: es_ES.UTF-8

    # Hostname
    hostname: server_name

    # cloud-init not managing hosts file. only hostname is added
    manage_etc_hosts: localhost

    users:
      - name: ricsanfre
        primary_group: users
        groups: [adm, admin]
        shell: /bin/bash
        sudo: ALL=(ALL) NOPASSWD:ALL
        lock_passwd: true
        ssh_authorized_keys:
          - ssh-rsa AAAAB3NzaC1yc2EAAAABJQAAAQEAusTXKfFoy6p3G4QAHvqoBK+9Vn2+cx2G5AY89WmjMikmeTG9KUseOCIAx22BCrFTNryMZ0oLx4u3M+Ibm1nX76R3Gs4b+gBsgf0TFENzztST++n9/bHYWeMVXddeV9RFbvPnQZv/TfLfPUejIMjFt26JCfhZdw3Ukpx9FKYhFDxr2jG9hXzCY9Ja2IkVwHuBcO4gvWV5xtI1nS/LvMw44Okmlpqos/ETjkd12PLCxZU6GQDslUgGZGuWsvOKbf51sR+cvBppEAG3ujIDySZkVhXqH1SSaGQbxF0pO6N5d4PWus0xsafy5z1AJdTeXZdBXPVvUSNVOUw8lbL+RTWI2Q== ricardo@dol-guldur
          - ssh-rsa AAAAB3NzaC1yc2EAAAADAQABAAABAQDsVSvxBitgaOiqeX4foCfhIe4yZj+OOaWP+wFuoUOBCZMWQ3cW188nSyXhXKfwYK50oo44O6UVEb2GZiU9bLOoy1fjfiGMOnmp3AUVG+e6Vh5aXOeLCEKKxV3I8LjMXr4ack6vtOqOVFBGFSN0ThaRTZwKpoxQ+pEzh+Q4cMJTXBHXYH0eP7WEuQlPIM/hmhGa4kIw/A92Rm0ZlF2H6L2QzxdLV/2LmnLAkt9C+6tH62hepcMCIQFPvHVUqj93hpmNm9MQI4hM7uK5qyH8wGi3nmPuX311km3hkd5O6XT5KNZq9Nk1HTC2GHqYzwha/cAka5pRUfZmWkJrEuV3sNAl ansible@pimaster
Note:
PXE server and nodes autoinstall configuration is automatically created by Ansible for all nodes in group ‘x86’ (inventory file)
Ubuntu OS configuration
After booting for the first time, cluster nodes will have SSH connectivity and it will be ready to be automatically configured from the ansible control node pimaster.
Basic configuration
Initial configuration tasks includes removal of snap package, and Raspberry PI specific configurations tasks such as: intallation of fake hardware clock, installation of some utility packages scripts and change default GPU Memory Split configuration. See instructions in “Ubuntu OS initial configurations”.
For automating all this initial configuration tasks, ansible role basic_setup has been developed.
NTP Service Configuration
Cluster nodes will be configured as NTP clients using NTP server running in gateway
See “NTP Configuration instructions”.
NTP configuration in cluster nodes has been automated using ansible role ricsanfre.ntp
iSCSI configuration.
Raspberry Pi and x86 nodes
Open-iscsi is used by Longhorn as a mechanism to expose Volumes within Kubernetes cluster. All nodes of the cluster need to be configured as iSCSI initiators, When configuring iSCSI initiator, authentication default parameters should not be included in iscsid.conf file and per target authentication parameters need to be specified because Longhorn local iSCSI target is not using any authentication.
iSCSI initiator configuration in cluster nodes has been automated with Ansible developing the ansible role: ricsanfre.iscsi_initiator.
Important:
open-iscsi is used by Longhorn as a mechanism to expose Volumes within Kubernetes cluster. Authentication default parameters should not be included in iscsid.conf file and per target authentication parameters need to be specified because Longhorn local iSCSI target is not using any authentication.