OS Installation - x86 (PXE sever)
About Ubuntu autoinstall
Since version 20.04, the server installer (live ISO) supports automated unattended installation mode (autoinstallation mode).
Autoinstallation lets you answer all those configuration questions ahead of time with an autoinstall config, and lets the installation process run without any interaction.
Autoinstall config is provided via cloud-init. In most scenarios, the easiest way will be to provide user data via the NoCloud datasource. This can be provided mainly using two methods:
-
Local filesystem, labeled filesystem (i.e. USB Flash Disk) To provide cloud-init configurations from the local filesystem, a labeled vfat or iso9660 filesystem containing user data and metadata may be used. For this method to work, the filesystem volume must be labelled CIDATA.
-
Custom webserver: kernel commandline Configuration files can be provided to cloud-init using a custom webserver at a URL dictated by kernel commandline (GRUB commmand line)
ds=nocloud-net;s=http://<ip>/cloud-init/configs/
Option number 2 will be used when automating installation using PXE.
The autoinstall config should be provided under the autoinstall key in the cloud-init user-data config file. For example:
#cloud-config
autoinstall:
  version: 1
  keyboard:
    ## keyboard layout
  identity:
    ## hostname and default user credentials
  ssh:
    ## configure SSH options
  storage:
    ## cofigure disk partitioning

  user-data:
    ## cloud-init `user-data` for first boot
Note:
user-data section, provides cloud-init user data configuration for the first boot after the installation. This user-data will be merged with the user data the installer produces.
Note:
When any system is installed using Ubuntu’s server installer, an autoinstall file for repeating the install is created at /var/log/installer/autoinstall-user-data.
Server autoinstallation can be done through network using PXE (Preboot eXecution Environment). x86-64 systems boot in either UEFI or legacy (“BIOS”) mode (many systems can be configured to boot in either mode). The precise details depend on the system firmware, but both modes supports the PXE specification, which allows the provisioning of a bootloader over the network.
See details in Ubuntu’s documentation: “Ubuntu Advance Installation - Netbooting the server installer in amd64”
Deploying PXE server
Follow the procedure indicated in “PXE Server” to deploy PXE server in the cluster.
Preparing x86 mini PCs
HP EliteDesk 800 G3 mini PCs need to be configured to enable Netboot (PXE)
HP Elitedesk 800 G3 mini PCs support both legacy and UEFI boot and in both modes netbooting (PXE) is supported.
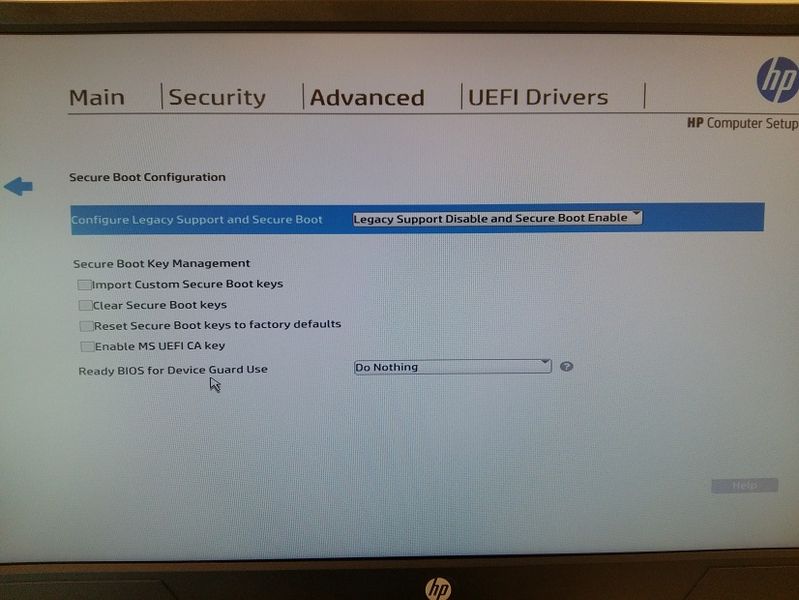
BIOS might need to be configured, so mini PC can net boot using UEFI mode. To do that Secure Boot need to be enabled and legacy mode disable
See “Secure Boot Options” in BIOS configuration (Press F10 button when restarting or turning-on the PC).

When using secure mode, an error could appear “Selected boot image did not authenticate” when trying to boot from USB or network. In this case, within “Secure boot Options” menu, select the option “Clear Secure Boot Keys”
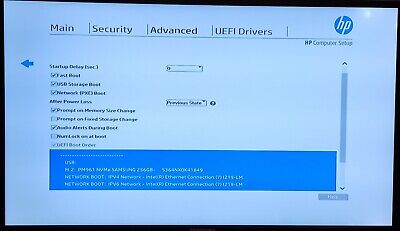
Enabling secure mode, UEFI network boot options should appear when selected boot options (F9 button when restaring or turning-on the PC) or in the menu “Boot Order”

In Boot order IPv6 netbooting should be disabled and only IPv4 (IPv6 is not configured in my cluster)
Note:
For more details see HP EliteDesk 800 G3 mini PC manuals
Copy autoinstall cloud-init files to PXE server
Cloud-init (autoinstall configuration files), need to be copied to PXE server, so they can be serve by HTTP when triggering the installation.
-
Step 1. Create a directory in PXE server with name
within /var/www/html/ks mkdir -p /var/www/html/ks/<server-macaddress> -
Step 2. Create user-data file, containing autoinstall configuration, in /var/www/html/ks/
This must be a cloud-init ubuntu auto-install file
Minimal config
#cloud-config
autoinstall:
  identity:
    hostname: jammy-minimal
    password: $6$gnqbMUzHhQzpDEw.$.cCNVVDsDfj5Feebh.5O4VbOmib7tyjmeI2ZsFP7VK2kWwgJFbfjvXo3chpeAqCgXWVIW9oNQ/Ag85PR0IsKD/
    username: ubuntu
  version: 1
The above cloud-init user-data file creates a minimum installation, setting server hostname, and ubuntu default password (ubuntu)
-
Step 3. Create meta-data file in /var/www/html/ks/
Create cloud-init meta-data file containing the hostname of the server or a empty file.
cat > /var/www/html/ks/<mac-address>/meta-data <<EOF
instance-id: ubuntu-server
EOF
Netbooting miniPC and triggering installation process
Net installation, in HP EliteDesk 800 G3, can be triggered pressing F12 when turninng on or restarting the computer. Also pressing F9, to open boot menu, and select the media to use for booting
Autoinstall user-data sample files
Ubuntu Autoistall files follows cloud-init YAML format.
Minimal configuration
The followin autointall configuration installs a host jammy-minimal with default user ubuntu with password ubuntu. Rest auto-install parmeters as default.
#cloud-config
autoinstall:
  identity:
    hostname: jammy-minimal
    password: $6$gnqbMUzHhQzpDEw.$.cCNVVDsDfj5Feebh.5O4VbOmib7tyjmeI2ZsFP7VK2kWwgJFbfjvXo3chpeAqCgXWVIW9oNQ/Ag85PR0IsKD/
    username: ubuntu
  version: 1
Simple server installation
The following configures a server, enablig SSH, enabling users passwords, disabling default user (ubuntu) and creating a single user (ricsanfre).
In this case storage is keep to its defaults, letting the installer to configured a default partitioning using LVM.
user-data section is only used for setting timezone and locale parameters.
#cloud-config
autoinstall:
  version: 1
  identity:
    hostname: server
    password: $6$gnqbMUzHhQzpDEw.$.cCNVVDsDfj5Feebh.5O4VbOmib7tyjmeI2ZsFP7VK2kWwgJFbfjvXo3chpeAqCgXWVIW9oNQ/Ag85PR0IsKD/
    username: ricsanfre
  keyboard:
    layout: es
  ssh:
    allow-pw: true
    install-server: true
  storage:
    layout:
      name: lvm
  user-data:
    # Set TimeZone and Locale
    timezone: UTC
    locale: es_ES.UTF-8
Server installation - Disabling passwords
In this configuration identity section is not provided since hostname and default user is configured under user-data section.
In this case storage is keep to its defaults, letting the installer to configured a default partitioning using LVM.
This configuration installs SSH server and disables user passwords. SSH authorized keys are addedd to default user configured ricsanfre.
#cloud-config
autoinstall:
  keyboard:
    layout: es
  ssh:
    allow-pw: false
    install-server: true
  storage:
    layout:
      name: lvm
  user-data:
    # Set TimeZone and Locale
    timezone: UTC
    locale: es_ES.UTF-8

    # Hostname
    hostname: server

    # cloud-init not managing hosts file. only hostname is added
    manage_etc_hosts: localhost

    users:
      # not using default ubuntu user
      - name: ricsanfre
        primary_group: users
        groups: [adm, admin]
        shell: /bin/bash
        sudo: ALL=(ALL) NOPASSWD:ALL
        lock_passwd: true
        ssh_authorized_keys:
          - ssh-rsa AAAAB3NzaC1yc2EAAAABJQAAAQEAusTXKfFoy6p3G4QAHvqoBK+9Vn2+cx2G5AY89WmjMikmeTG9KUseOCIAx22BCrFTNryMZ0oLx4u3M+Ibm1nX76R3Gs4b+gBsgf0TFENzztST++n9/bHYWeMVXddeV9RFbvPnQZv/TfLfPUejIMjFt26JCfhZdw3Ukpx9FKYhFDxr2jG9hXzCY9Ja2IkVwHuBcO4gvWV5xtI1nS/LvMw44Okmlpqos/ETjkd12PLCxZU6GQDslUgGZGuWsvOKbf51sR+cvBppEAG3ujIDySZkVhXqH1SSaGQbxF0pO6N5d4PWus0xsafy5z1AJdTeXZdBXPVvUSNVOUw8lbL+RTWI2Q== ricardo@dol-guldur
          - ssh-rsa AAAAB3NzaC1yc2EAAAADAQABAAABAQDsVSvxBitgaOiqeX4foCfhIe4yZj+OOaWP+wFuoUOBCZMWQ3cW188nSyXhXKfwYK50oo44O6UVEb2GZiU9bLOoy1fjfiGMOnmp3AUVG+e6Vh5aXOeLCEKKxV3I8LjMXr4ack6vtOqOVFBGFSN0ThaRTZwKpoxQ+pEzh+Q4cMJTXBHXYH0eP7WEuQlPIM/hmhGa4kIw/A92Rm0ZlF2H6L2QzxdLV/2LmnLAkt9C+6tH62hepcMCIQFPvHVUqj93hpmNm9MQI4hM7uK5qyH8wGi3nmPuX311km3hkd5O6XT5KNZq9Nk1HTC2GHqYzwha/cAka5pRUfZmWkJrEuV3sNAl ansible@pimaster
Network configuration
Network configuration can be specified in the autoinstall configuration: network section.
network section contains a Netplan-formatted network configuration.
This is applied during installation as well as in the installed system. The default is to interpret the configuration for the installation media, which runs DHCP version 4 on any interface with a name matching eth* or en* but then disables any interface that does not receive an address.
To specify a static IP address following configuration can be provided
#cloud-config
autoinstall:
  keyboard:
    layout: es
  ssh:
    allow-pw: false
    install-server: true
  network:
    version: 2
    ethernets:
      eth0:
        dhcp4: false
        dhcp6: false
        addresses:
          - 10.0.0.X/24
        routes:
          - to: default
            via: 10.0.0.1
        nameservers:
          addresses:
            - 10.0.0.1
          search:
            - homelab.ricsanfre.com
  storage:
    layout:
      name: lvm
  user-data:
    # Set TimeZone and Locale
    timezone: UTC
    locale: es_ES.UTF-8

    # Hostname
    hostname: server

    # cloud-init not managing hosts file. only hostname is added
    manage_etc_hosts: localhost

    users:
      # not using default ubuntu user
      - name: ricsanfre
        primary_group: users
        groups: [adm, admin]
        shell: /bin/bash
        sudo: ALL=(ALL) NOPASSWD:ALL
        lock_passwd: true
        ssh_authorized_keys:
          - ssh-rsa AAAAB3NzaC1yc2EAAAABJQAAAQEAusTXKfFoy6p3G4QAHvqoBK+9Vn2+cx2G5AY89WmjMikmeTG9KUseOCIAx22BCrFTNryMZ0oLx4u3M+Ibm1nX76R3Gs4b+gBsgf0TFENzztST++n9/bHYWeMVXddeV9RFbvPnQZv/TfLfPUejIMjFt26JCfhZdw3Ukpx9FKYhFDxr2jG9hXzCY9Ja2IkVwHuBcO4gvWV5xtI1nS/LvMw44Okmlpqos/ETjkd12PLCxZU6GQDslUgGZGuWsvOKbf51sR+cvBppEAG3ujIDySZkVhXqH1SSaGQbxF0pO6N5d4PWus0xsafy5z1AJdTeXZdBXPVvUSNVOUw8lbL+RTWI2Q== ricardo@dol-guldur
          - ssh-rsa AAAAB3NzaC1yc2EAAAADAQABAAABAQDsVSvxBitgaOiqeX4foCfhIe4yZj+OOaWP+wFuoUOBCZMWQ3cW188nSyXhXKfwYK50oo44O6UVEb2GZiU9bLOoy1fjfiGMOnmp3AUVG+e6Vh5aXOeLCEKKxV3I8LjMXr4ack6vtOqOVFBGFSN0ThaRTZwKpoxQ+pEzh+Q4cMJTXBHXYH0eP7WEuQlPIM/hmhGa4kIw/A92Rm0ZlF2H6L2QzxdLV/2LmnLAkt9C+6tH62hepcMCIQFPvHVUqj93hpmNm9MQI4hM7uK5qyH8wGi3nmPuX311km3hkd5O6XT5KNZq9Nk1HTC2GHqYzwha/cAka5pRUfZmWkJrEuV3sNAl ansible@pimaster
Storage Configuration
Disk partitioning can be specified in the autoinstall configuration: storage section.
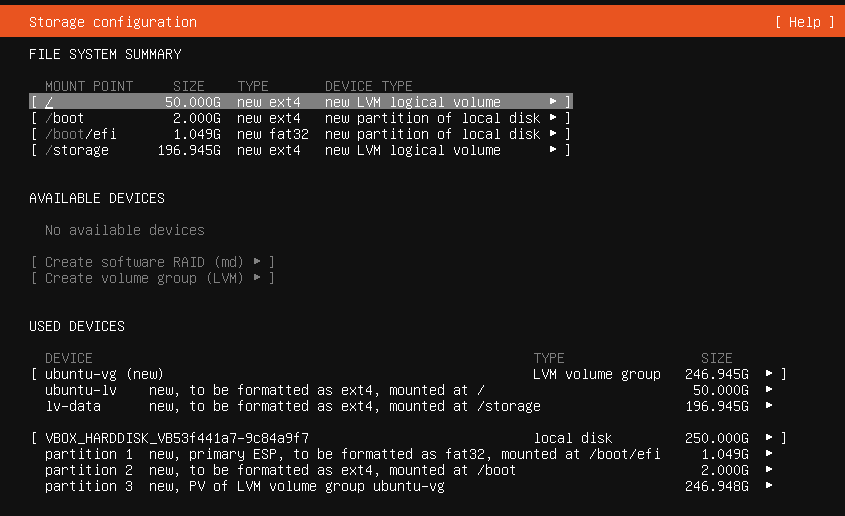
The following autoinstall configuration performs the following disk partitioning (UEFI system partitioning):
| Partition | Description | Mount Point | Format | Size |
|---|---|---|---|---|
| /dev/sda1 | EFI system Partition (ESP) | /boot/efi | fat32 | 1075 MB |
| /dev/sda2 | Boot partition | /boot | ext4 | 2GB |
| /dev/sda3 | LVM Volume Group: ubuntu-vg | Rest of space available |
| LVM Logical Voluem | Description | Mount Point | Format | Size |
|---|---|---|---|---|
| ubuntu-lv | Root filesystem | / | ext4 | 30 GB |
| lv-data | Storage filesystem | /storage | ext4 | Rest of space available in ubuntu-vg |
This partitioning scheme in installer GUI, will looks like

#cloud-config
autoinstall:
  version: 1
  keyboard:
    layout: es
  ssh:
    allow-pw: false
    install-server: true
  network:
    version: 2
    ethernets:
      eth0:
        dhcp4: false
        dhcp6: false
        addresses:
          - 10.0.0.X/24
        routes:
          - to: default
            via: 10.0.0.1
        nameservers:
          addresses:
            - 10.0.0.1
          search:
            - homelab.ricsanfre.com
  storage:
    config:
    - ptable: gpt
      path: /dev/sda
      wipe: superblock-recursive
      preserve: false
      name: ''
      grub_device: false
      type: disk
      id: disk-sda
    - device: disk-sda
      size: 1075M
      wipe: superblock
      flag: boot
      number: 1
      preserve: false
      grub_device: true
      path: /dev/sda1
      type: partition
      id: partition-0
    - fstype: fat32
      volume: partition-0
      preserve: false
      type: format
      id: format-0
    - device: disk-sda
      size: 2G
      wipe: superblock
      number: 2
      preserve: false
      grub_device: false
      path: /dev/sda2
      type: partition
      id: partition-1
    - fstype: ext4
      volume: partition-1
      preserve: false
      type: format
      id: format-1
    - device: disk-sda
      size: -1
      wipe: superblock
      number: 3
      preserve: false
      grub_device: false
      path: /dev/sda3
      type: partition
      id: partition-2
    - name: ubuntu-vg
      devices:
      - partition-2
      preserve: false
      type: lvm_volgroup
      id: lvm_volgroup-0
    - name: ubuntu-lv
      volgroup: lvm_volgroup-0
      size: 100G
      wipe: superblock
      preserve: false
      path: /dev/ubuntu-vg/ubuntu-lv
      type: lvm_partition
      id: lvm_partition-0
    - fstype: ext4
      volume: lvm_partition-0
      preserve: false
      type: format
      id: format-3
    - path: /
      device: format-3
      type: mount
      id: mount-3
    - name: lv-data
      volgroup: lvm_volgroup-0
      size: -1
      wipe: superblock
      preserve: false
      path: /dev/ubuntu-vg/lv-data
      type: lvm_partition
      id: lvm_partition-1
    - fstype: ext4
      volume: lvm_partition-1
      preserve: false
      type: format
      id: format-4
    - path: /storage
      device: format-4
      type: mount
      id: mount-4
    - path: /boot
      device: format-1
      type: mount
      id: mount-1
    - path: /boot/efi
      device: format-0
      type: mount
      id: mount-0
  user-data:
    # Set TimeZone and Locale
    timezone: UTC
    locale: es_ES.UTF-8

    # Hostname
    hostname: erebor

    # cloud-init not managing hosts file. only hostname is added
    manage_etc_hosts: localhost

    users:
      - name: ricsanfre
        primary_group: users
        groups: [adm, admin]
        shell: /bin/bash
        sudo: ALL=(ALL) NOPASSWD:ALL
        lock_passwd: true
        ssh_authorized_keys:
          - ssh-rsa AAAAB3NzaC1yc2EAAAABJQAAAQEAusTXKfFoy6p3G4QAHvqoBK+9Vn2+cx2G5AY89WmjMikmeTG9KUseOCIAx22BCrFTNryMZ0oLx4u3M+Ibm1nX76R3Gs4b+gBsgf0TFENzztST++n9/bHYWeMVXddeV9RFbvPnQZv/TfLfPUejIMjFt26JCfhZdw3Ukpx9FKYhFDxr2jG9hXzCY9Ja2IkVwHuBcO4gvWV5xtI1nS/LvMw44Okmlpqos/ETjkd12PLCxZU6GQDslUgGZGuWsvOKbf51sR+cvBppEAG3ujIDySZkVhXqH1SSaGQbxF0pO6N5d4PWus0xsafy5z1AJdTeXZdBXPVvUSNVOUw8lbL+RTWI2Q== ricardo@dol-guldur
          - ssh-rsa AAAAB3NzaC1yc2EAAAADAQABAAABAQDsVSvxBitgaOiqeX4foCfhIe4yZj+OOaWP+wFuoUOBCZMWQ3cW188nSyXhXKfwYK50oo44O6UVEb2GZiU9bLOoy1fjfiGMOnmp3AUVG+e6Vh5aXOeLCEKKxV3I8LjMXr4ack6vtOqOVFBGFSN0ThaRTZwKpoxQ+pEzh+Q4cMJTXBHXYH0eP7WEuQlPIM/hmhGa4kIw/A92Rm0ZlF2H6L2QzxdLV/2LmnLAkt9C+6tH62hepcMCIQFPvHVUqj93hpmNm9MQI4hM7uK5qyH8wGi3nmPuX311km3hkd5O6XT5KNZq9Nk1HTC2GHqYzwha/cAka5pRUfZmWkJrEuV3sNAl ansible@pimaster