Cluster Gateway (OpenWrt)
To isolate my kubernetes cluster from my home network, a Router/Firewall running OpenWRT will be used, gateway node.
OpenWrt (from open wireless router) is a highly extensible GNU/Linux distribution for embedded devices to route traffic. OpenWrt can run on various types of devices, including CPE routers, residential gateways, smartphones and SBC (like Raspeberry Pis). It is also possible to run OpenWrt on personal computers.
For my homelab, the router need to be able to support WiFi connectivity as uplink (Wan interface), so Raspberry Pi 4B can be used to run OpenWRT-based router/firewall. Raspberry PI will be connected to my home network using its WIFI interface (wlan0) and to the LAN Switch using the eth interface (eth0).
As an alternative to Raspberry PI, a wifi pocket-sized travel router running OpenWRT as OS can be used. For example, Slate Plus (GL-A1300) from GL-Inet can be used for this purpose.
OpenWRT installation in Raspberry Pi
This is the process to flash OpenWRT into SD-Card that can be used to boot Raspberry Pi
-
Step 1. Download the appropriate bcm27xx image for your Raspberry Pi and desired OpenWrt release from Firmware Selector.
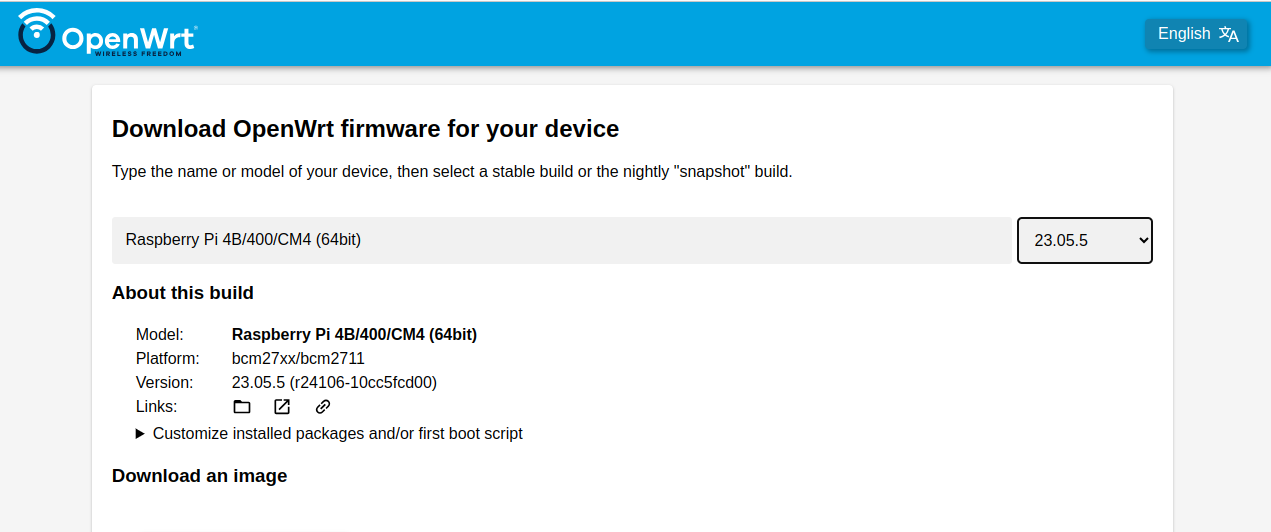
Note: Supported versions per Raspberry PI model can be found in https://openwrt.org/toh/raspberry_pi_foundation/raspberry_pi
Important: Download
factoryimage that allows to install OpenWRT for the first time: For example, this is the image name to install OpenWRT 23.05.5:openwrt-23.05.5-bcm27xx-bcm2711-rpi-4-ext4-factory.img.gz -
Step 2. Flash the image to a micro SD card using a disk imager, such as the open source one from the Raspberry Pi team
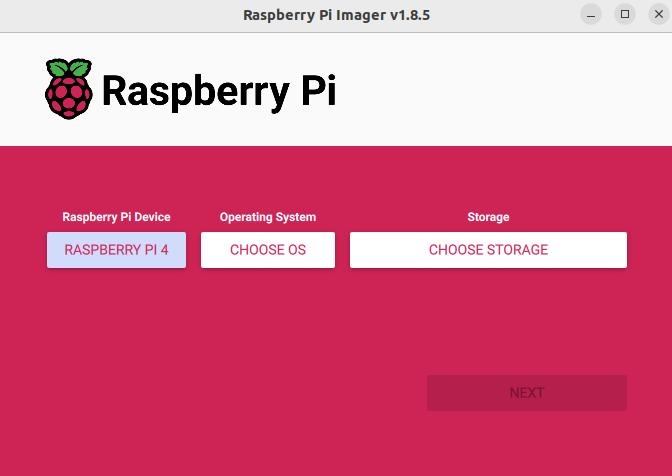
Use Raspberry PI Imager to flash the OpenWrt image to an SD card Unzip downloaded image
gunzip openwrt-23.05.5-bcm27xx-bcm2711-rpi-4-ext4-factory.img.gzOpen RpI Imager
-
Select Raspberry Pi Model
-
Select “Use Custom” when specifying “Operating System”, and the
.imgfile previously unzipped.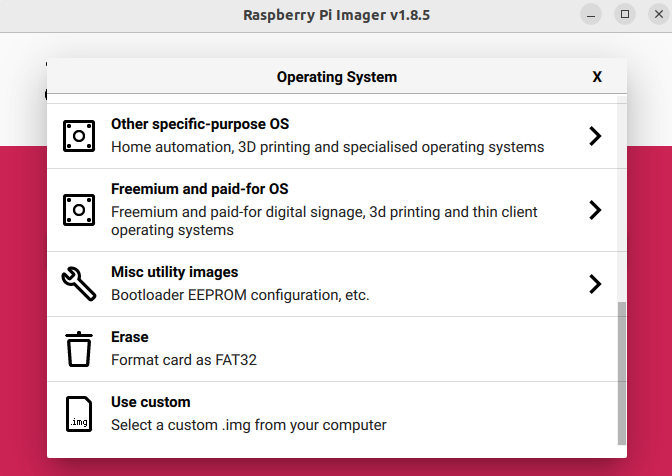
- Select SD Card when choosing “Storage”
- Click on “Write” to start the SD-card flashing
-
-
Step 3. Once SD Card flash is complete, insert the SD card into your Raspberry Pi and power up. OpenWrt will boot.
-
Step 4. Connect laptop directly to Raspberry PI ethernet port or via LAN switch OpenWRT will assign the laptop a IP via DHCP
-
Step 5: Open Luci interface at http://192.168.1.1
Login as
rootuser, no password is needed the first time.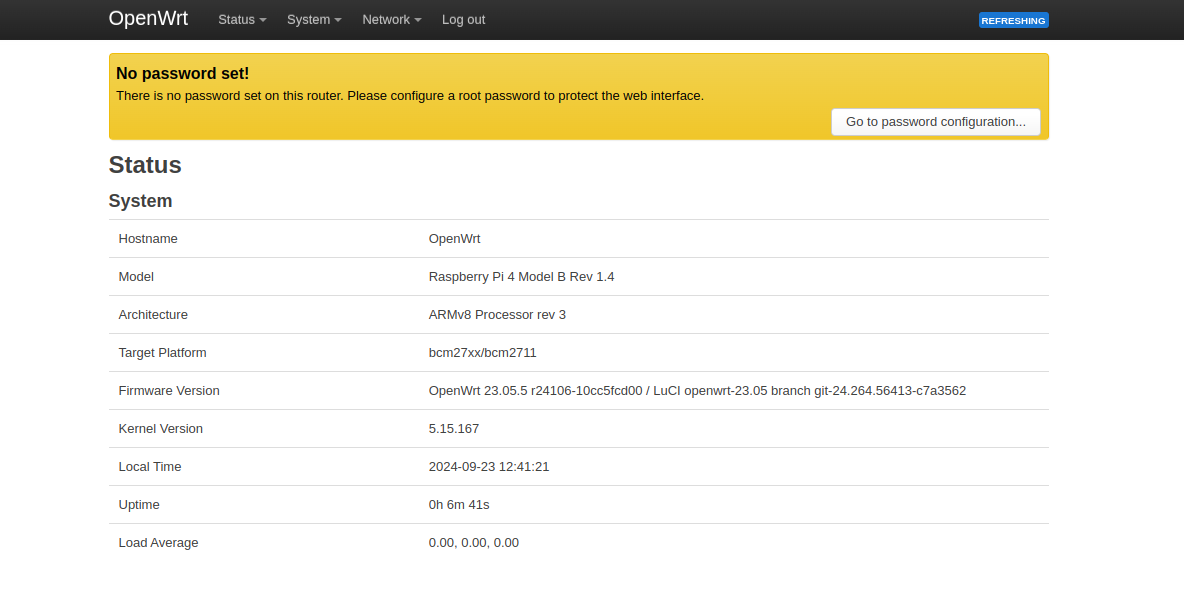
-
Step 6. Configure a password for
rootuser.
Note: SSH Acces
SSH access is also enabled by default using root user.
ssh root@192.168.1.1
Password is the same configured through LuCI UI.
OpenWRT installation in GL-iNet hardware
Gl Inet A-1300 support latest release of OpenWrt (23.05) but latest GL Inet firmware (4.17.5) comes with old version of OpenWrt (21.02) which is EOL release. Latest firmware version available can be downloaded from here: https://dl.gl-inet.com/router/a1300/
OpenWRT firmware cannot be upgraded without losing GL Inet customized version and functionalities provided on top of OpenWrt.
Reinstall Router with Updated version of OpenWRT
The procedure is the following
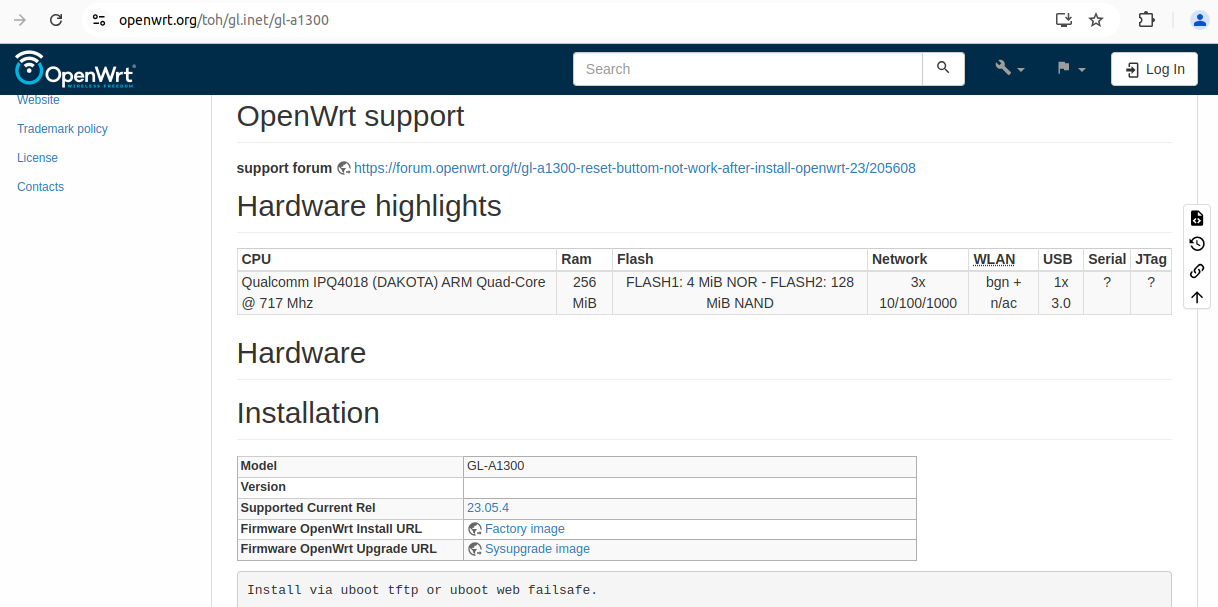
- Download firmware from https://openwrt.org/toh/gl.inet/gl-a1300
Note: Download Uboot firmware image In following image: Firmware OpenWrt Install URL
- Remove the power of router.
- Connect your computer to the Ethernet port (either LAN or WAN) of the router. All other ports MUST remain unconnected.
- Press and hold the Reset button firmly, and then power up the router. GL-A1300(Slate Plus) the LED flashes slowly 5 times, then stays on for a short while, then flashes quickly all the time. Release reset button after flashing sequence changes.
- Manually set the IP address of your computer to 192.168.1.2.
- Use browser to visit http://192.168.1.1, this is the Uboot Web UI
- Click Choose file button to find the firmware file. Then click Update firmware button and select firmware image downloaded in 1.
- Wait for around 3 minutes. Don’t power off your device when updating. The router is ready when both power and Wi-Fi LED are on or you can find its SSID on your device.
- Revert the IP setting you did in step 4 and connect your device to the LAN or Wi-Fi of the router. You will be able to access the router via 192.168.8.1 again.
- OpenWrt admin console is opened.
Tip: Reinstalling GL-Inet firmware
In case the router has been bricked because doing some DIY projects, like installing vanilla OpenWrt or flashing a wrong firmware and the access to the router is lost firmware can be re-can re-installed using Uboot failsafe.
See futher details in https://docs.gl-inet.com/router/en/4/faq/debrick/
OpenWRT configuration
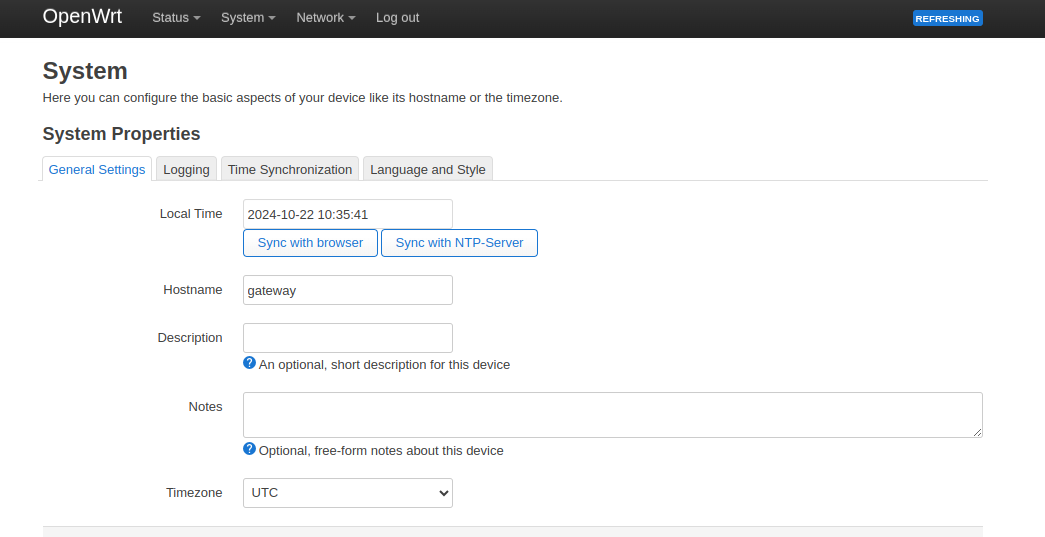
Configuring hostname
- Go to “System” -> “System”
- Select “General Settings” tab
- Update hostname and apply changes
Securing access
Securing SSH acess
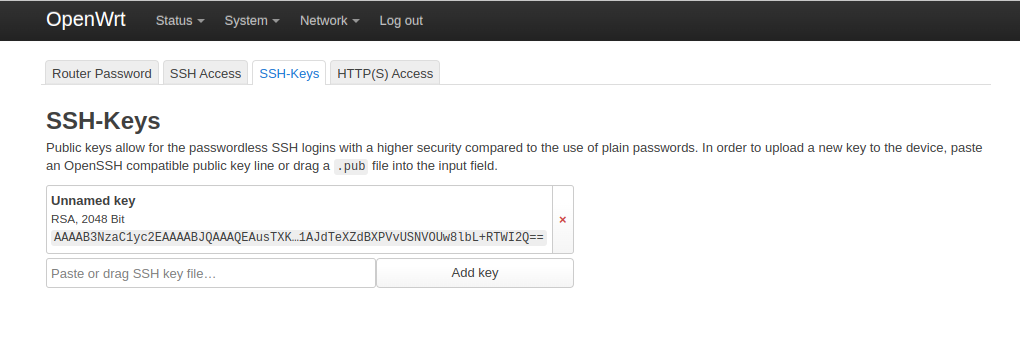
Configure SSH keys
- Go to System-> Administrator
- Select “SSH Keys” tab
- Copy and paste SSH public key
Try ssh connection using SSH private key
ssh root@10.0.0.1 -i <ssh_private_key_file>
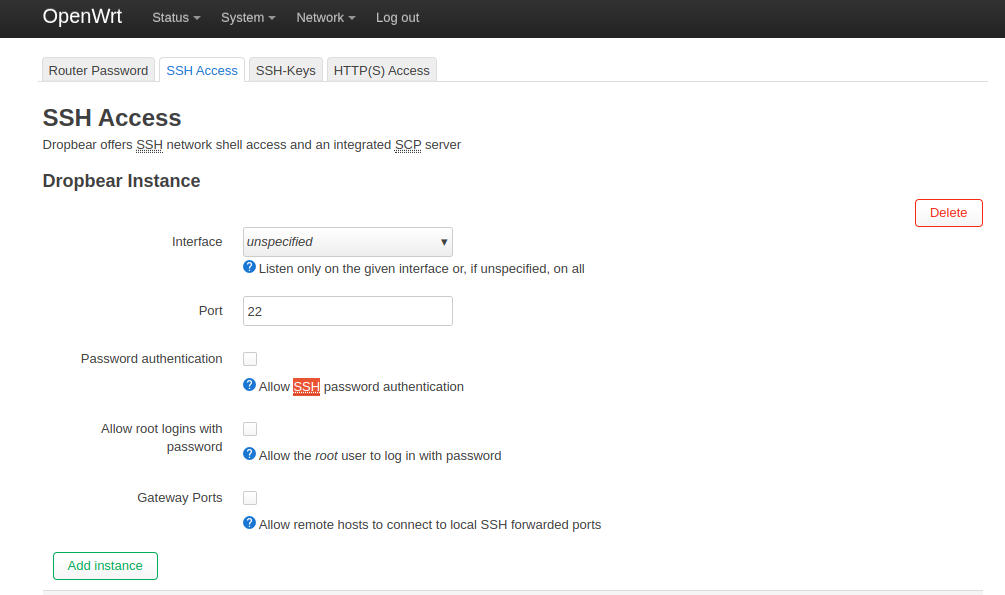
Disabling SSH using password
- Go to System -> Administrator
- Select “SSH Access” tab
- Uncheck “Password Authentication” and “Allows root login with password”
Securing LuCi console access
LuCi HTTP access can be secured applying the following configuration1.
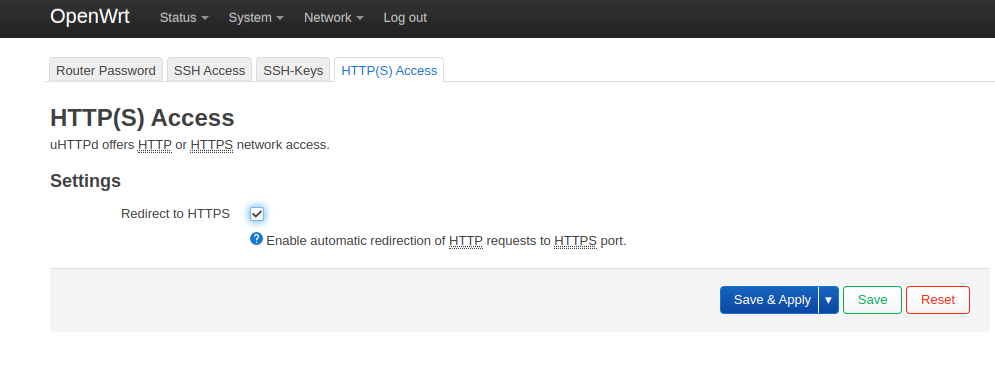
Enable HTTPs
- Go to “System” -> “Administration”
- Select “HTTP(S) Access” tab
- Click on “Redirect to HTTPS”
Install a valid TLS certificate
-
Generate a TLS certificate. Self-signed TLS or signed by LetsEncrypt.
Tip: Certbot tool can be used for this purpose
-
Copy private key and public key into
/etcrsync /tmp/gateway.homelab.ricsanfre.key gateway:/etc/uhttpd.key rsync /tmp/gateway.homelab.ricsanfre.crt gateway:/etc/uhttpd.crt -
Restart
uhttpprocess/etc/init.d/uhttpd restart
See further details in “OpenWrt documentation: How to get rid of LuCI HTTPS certificate warnings”
Configuring LAN
By default Router LAN IP is configured to use 192.168.1.0/24, network and 192.168.1.1 as router IP address in LAN.
Default LAN subnet and router IP addresseed must be changed to use homelab LAN subnetwork.
- Go to System -> Interfaces
- Edit lan (lan-br) interface
- In General settings, this interface is configured with a static address 192.168.1.1
- Assign an IP address in a different subnet (e.g. 10.0.0.1). Click Save.
- Click Save and Apply.
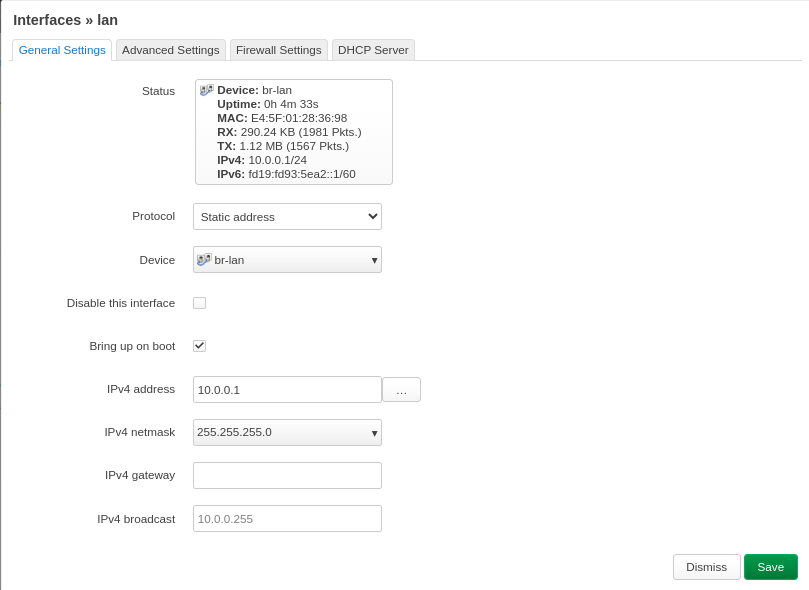
- Reconnect to Luci web UI using new IP 10.0.0.1
Configuring wireless WAN
Use one of the wifi interfaces to connect to home wifi2
-
Go to Network -> Wireless
The list of available wifi interfaces is displayed. The number and type of wifi-interfaces depends on the hardware used to run OpenWrt.
GL.iNet GL-A1300(SlatePlus) Wifi Interfaces
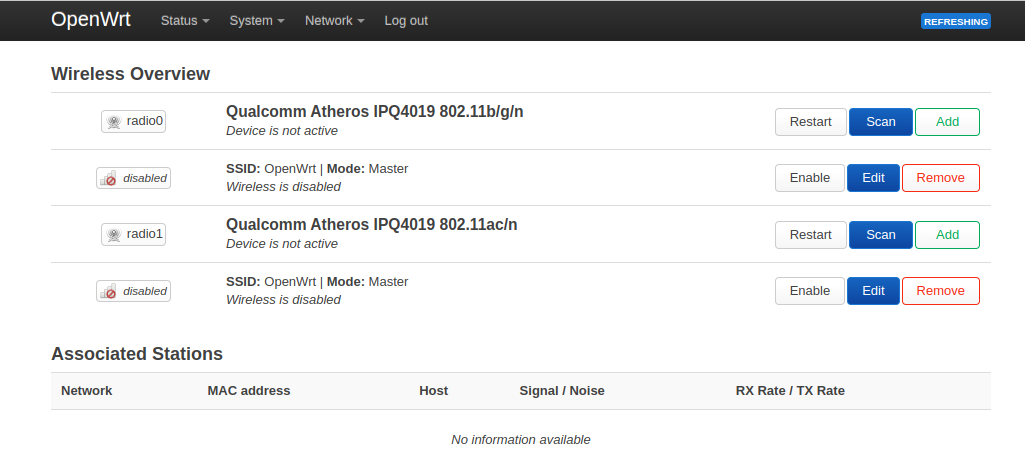
GL.iNet GL-A1300 (Slate Plus) has two wifi interfaces:
radio0: 802.11 a/b/g/n, 400Mbps (2.4GHz)radio1: 802.11 ac, 867Mbps (5GHz)
For the wan up-link we can select 5GHz interface to connect to my home network. Other wifi interface can be used to access vi WiFi to the homelab.
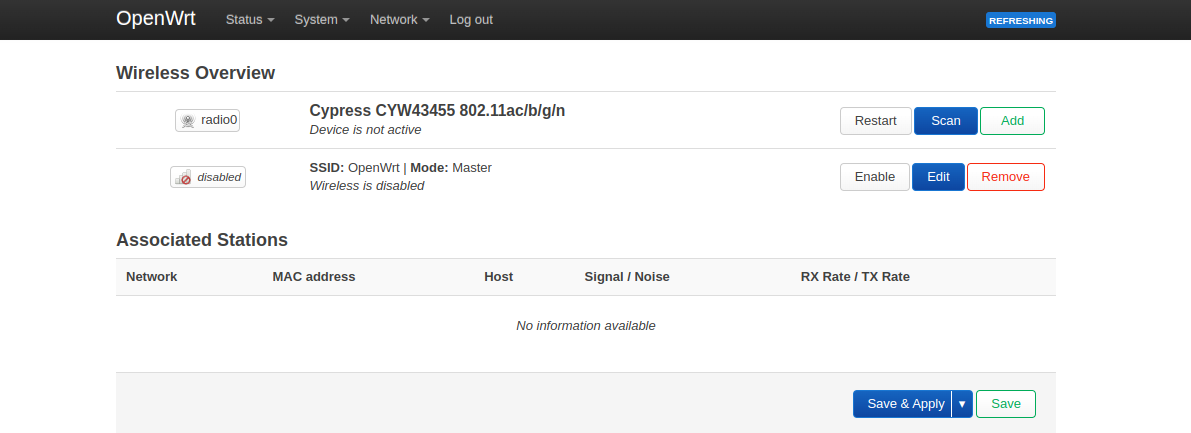
Raspberry Pi (4B) Wifi Interface
Raspberry Pi 4B model only has one wifi interface:
radio0: 802.11 a/b/g/n, 400Mbps (2.4GHz)
-
Select radio interface and click on “Scan” The available list of Wifi networks is displayed:

-
Choose the Wi-Fi network you want to connect to from the page and click “Join Network”.
-
Wifi connection configuration window is displayed
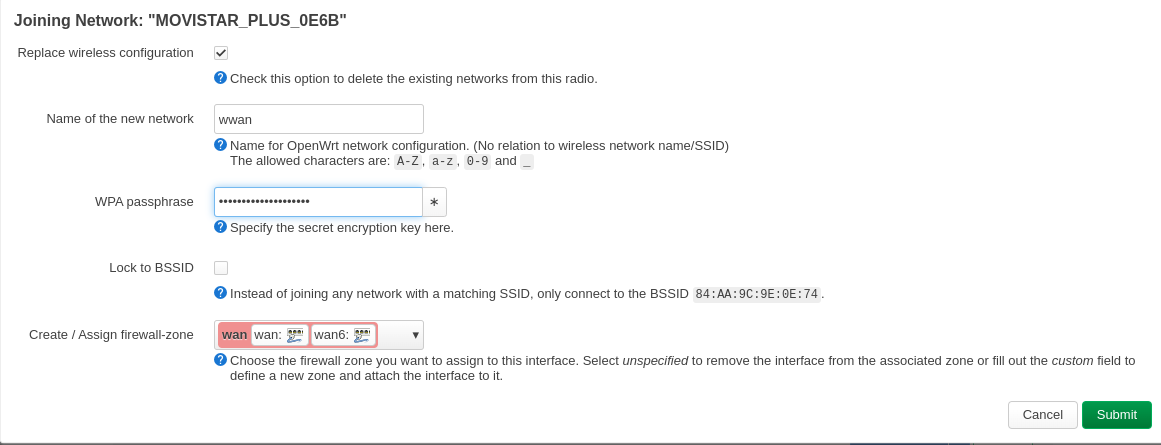
- Recommend to tick the ‘Replace wireless configuration’ to delete the wireless access point (Master) for the chosen radio.
- Enter the Wi-Fi password, leave the “name of new network” as “wwan” and select wan firewall zone.
- Click Save.
-
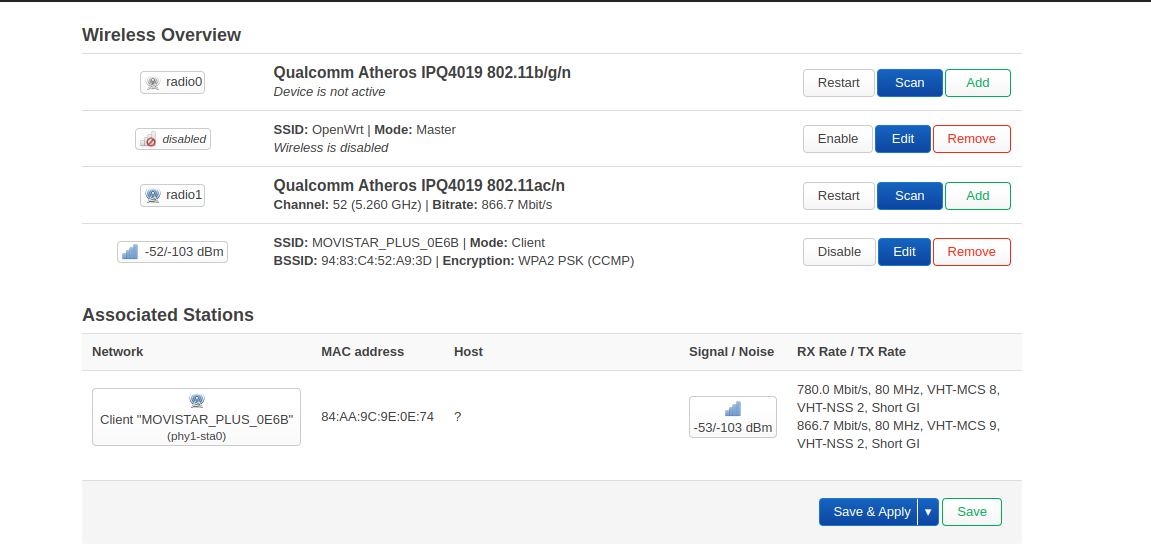
Client Wi-Fi settings page is opened.
- Leave default values
- Click in Save and apply
Configure static IP for wireless WAN
After connecting OpenWRT to a WIFI network as a client, a new wwan (phy1-sta0) interface is created in System->Interfaces
Note: By default the new interface is configured to use DHCP to obtain automatically a IP address
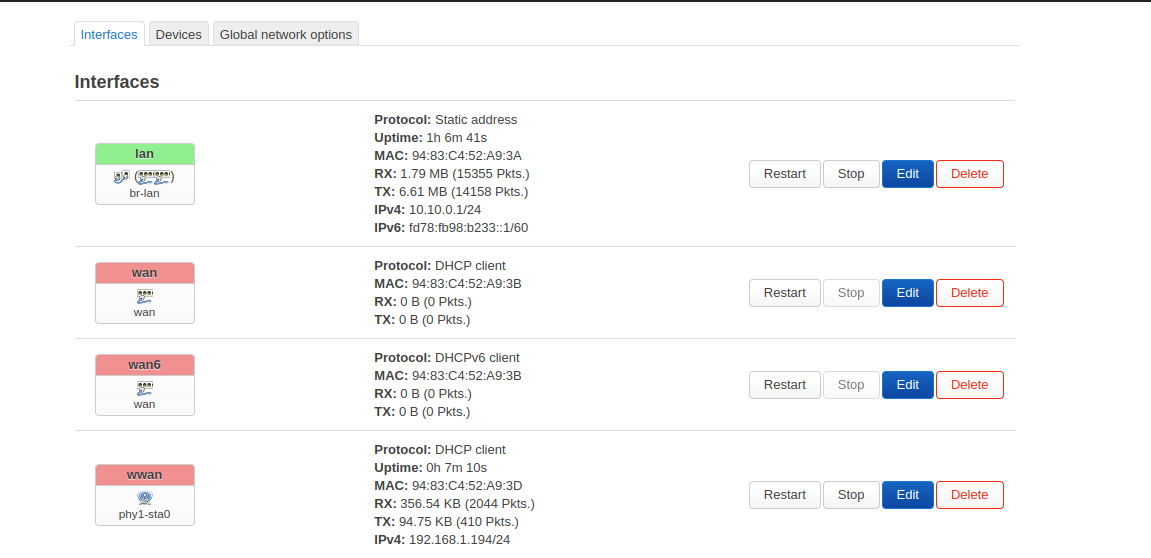
- Click on Edit to set a static IP address
- Select static IP address, and click on Switch Protocol confirmation button
- Select wwan (phy1-sta0) Device
- Set a static IP address that is available in your home network (i.e. 192.168.1.21)
- Click on Save and Save and apply
Configuring Default route
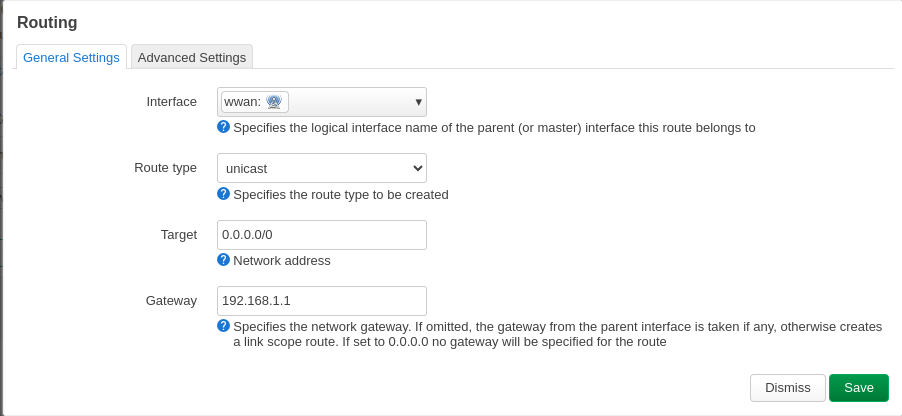
A default route need to be configured so Router can access to internet
- Go to Network->Routing
- Click on Add.
- Specify default route (0.0.0.0/0) through home router ip gateway (192.168.1.1 in my case) assigned to
wwaninterface
Firewall
OpenWrt uses the firewallX application netfilter/nftables rule builder application. It runs in user-space to parse a configuration file into a set of nftables rules, sending each to the kernel netfilter modules.
Note:
OpenWRT firewall application is based on nftables, same firewall solution used before when gateway node was running in Ubuntu OS (“PiCluster: Cluster Gateway (Ubuntu)”).
- OpenWrt release 22.01 uses firewall3 (
fw3command) - OpenWrt latest releases uses firewall4 (
fw4command)
Default configuration
Zones
A zone groups one or more interfaces and serves as source or destination for forwardings, rules and redirects
.
Two zones are configured by default:
lan: all LAN interfaces belong to this zone- All traffic from LAN to WAN is ACCEPTED by default
wan: all WAN interfaces belong to this zone- All traffic from WAN to LAN is REJECTED by default
Configure firewall rules
Go to “Network” -> “Traffic Rules”
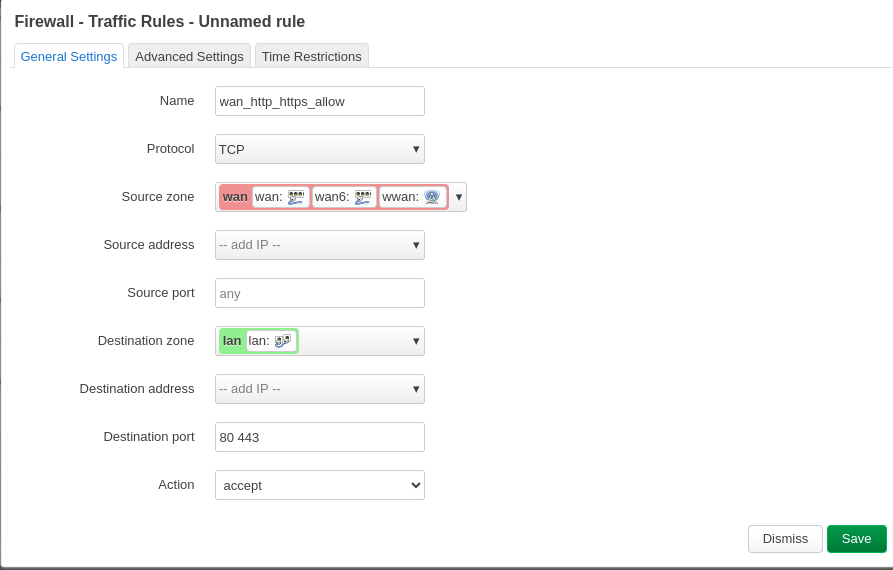
Enabling HTTP/HTTPS traffic WAN to LAN
Enabling HTTP/HTTPS traffic (TCP 80/443) to cluster nodes from WAN interface
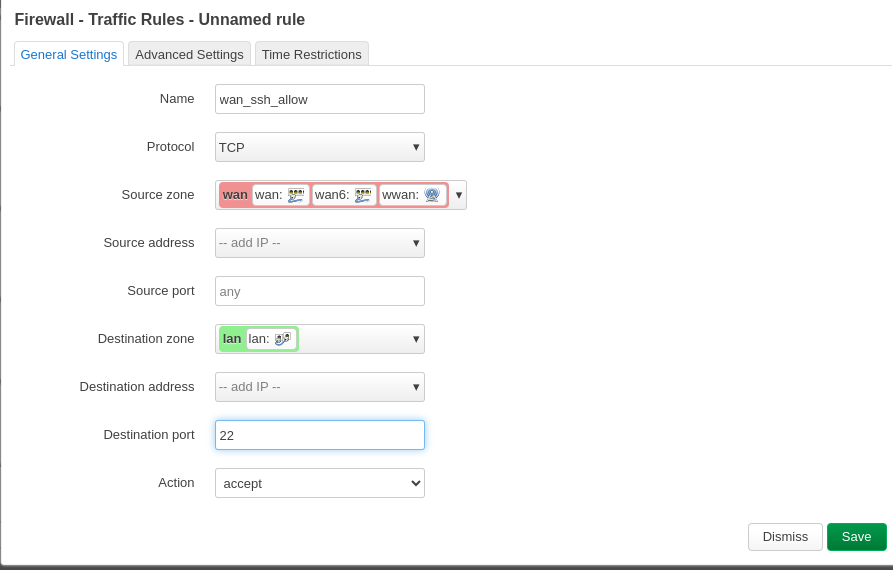
Enabling SSH traffic WAN to LAN
Enabling SSH traffic (tcp port:22) to cluster nodes from WAN interface
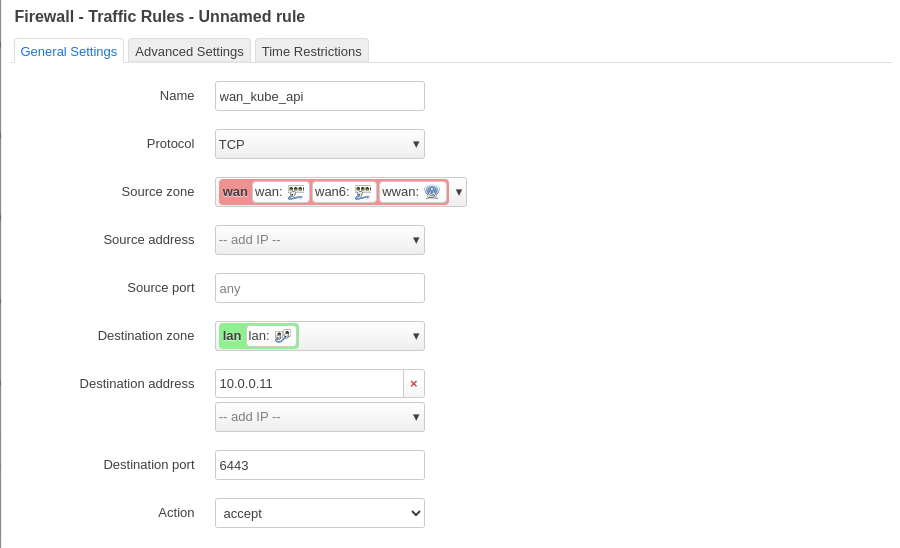
Enabling HTTPs traffic to Kube API
Enabling HTTPS traffic to Kube API (TCP 6443) running in 10.0.0.11 (HA Proxy load balancer)
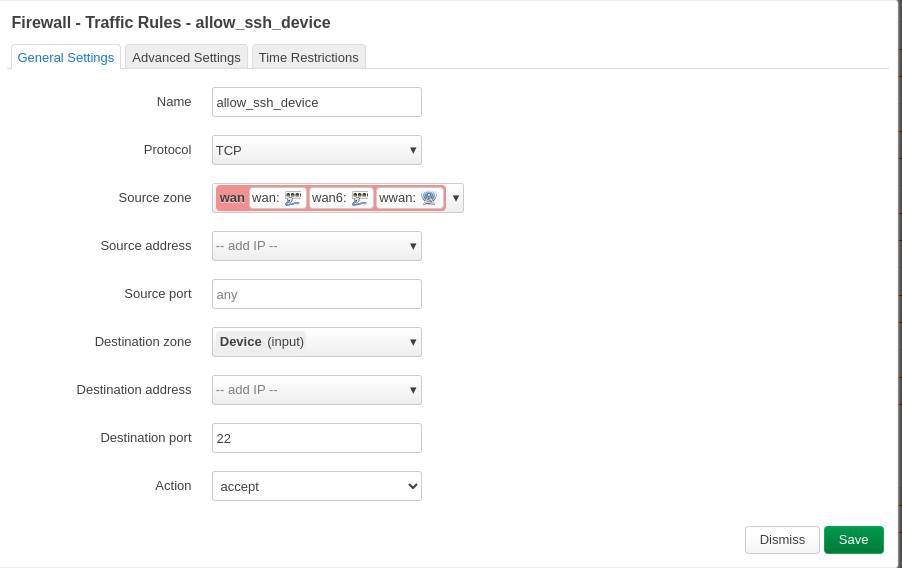
Enabling SSH connection to OpenWRT device from WAN
This is needed to enable SSH connections to OpenWRT router from WAN interfaces
Enabling HTTPS connection to OpenWRT device from WAN
This is needed to enable HTTPS connections to OpenWRT router from WAN interface
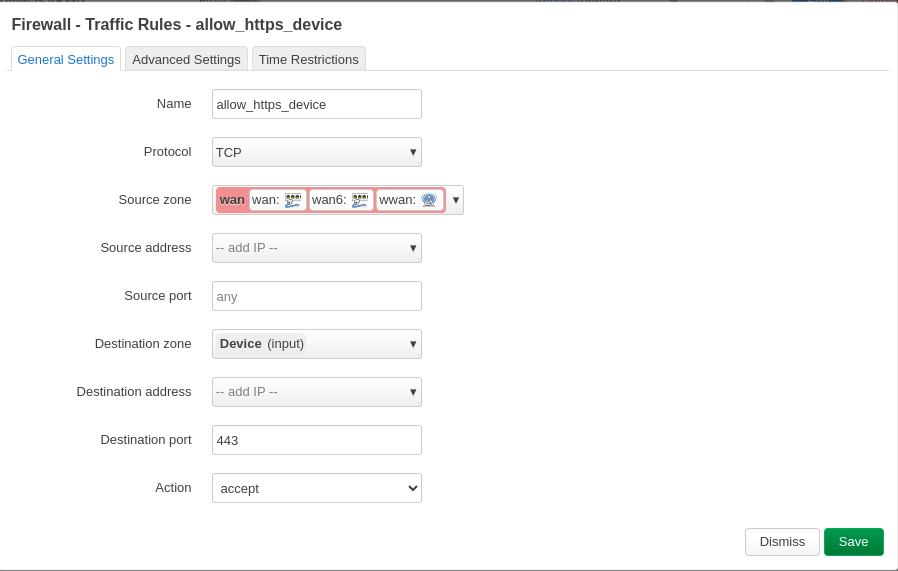
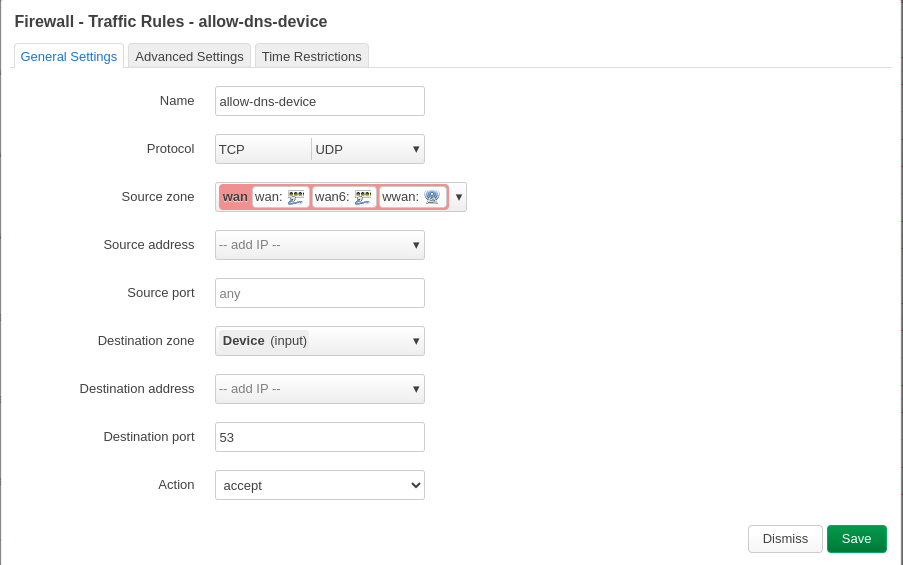
Enabling DNS connection to OpenWRT device from WAN
Enable DNS traffic to OpenWRT router from WAN interface. Use Homelab DNS from my home lab network
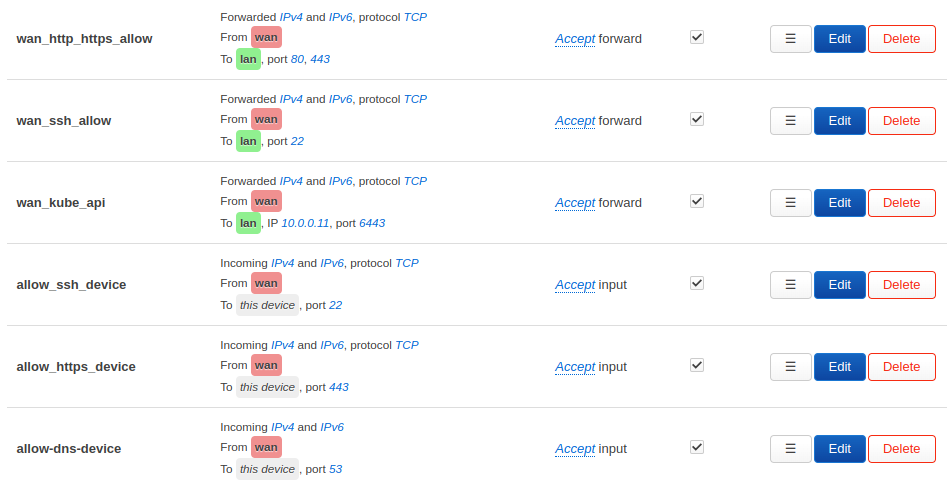
Summary of firewall rules added
DNS/DHCP service
Note:
OpenWRT DNS/DHCP service is based on [[Dnsmasq]], same DNS/DHCP solution used before when gateway node was running in Ubuntu OS (“PiCluster: Cluster Gateway (Ubuntu)”)
Configuration is stored in /etc/config/dhcp/
Further details in OpenWrt-DNS/DHCP configuration documentation
DNS server configuration
Configure Local domain
- Go to Network -> DHCP and DNS
- In Tab “General”
- Set “Local Domain” to internal DNS subdomain (
homelab.ricsanfre.com) - Set “Resolve this locally” to empty
Local DNS domain will be added to DHCP DNS search domain
- Set “Local Domain” to internal DNS subdomain (
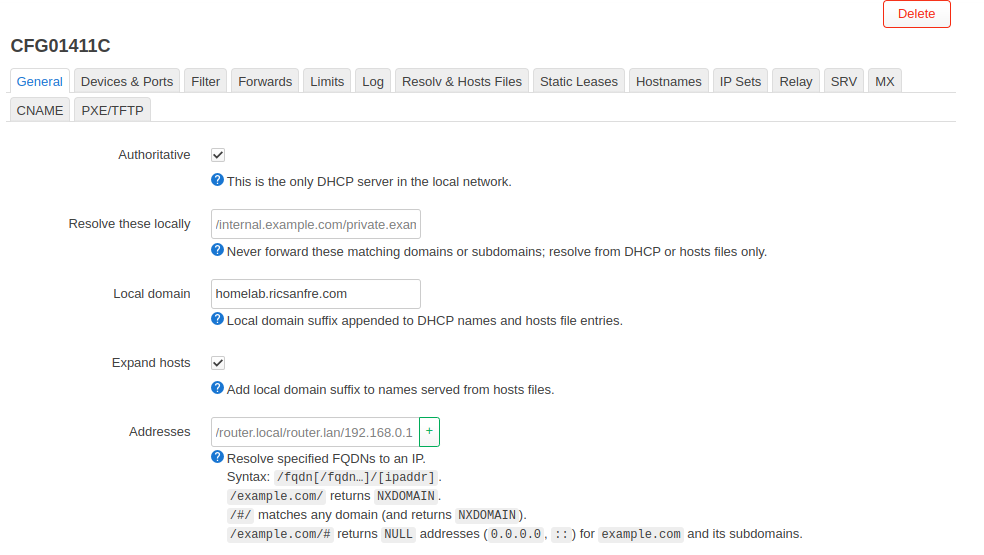
Configure DNS Forwarders
- Go to Network -> DHCP and DNS
- In Tab “Forwarders” add all upstream DNS servers
- Forward DNS queries for domain
homelab.ricsanfre.comto internal DNS server (Bind9) - Use CloudFlare (
1.1.1.1) and Google DNS (8.8.8.8) servers
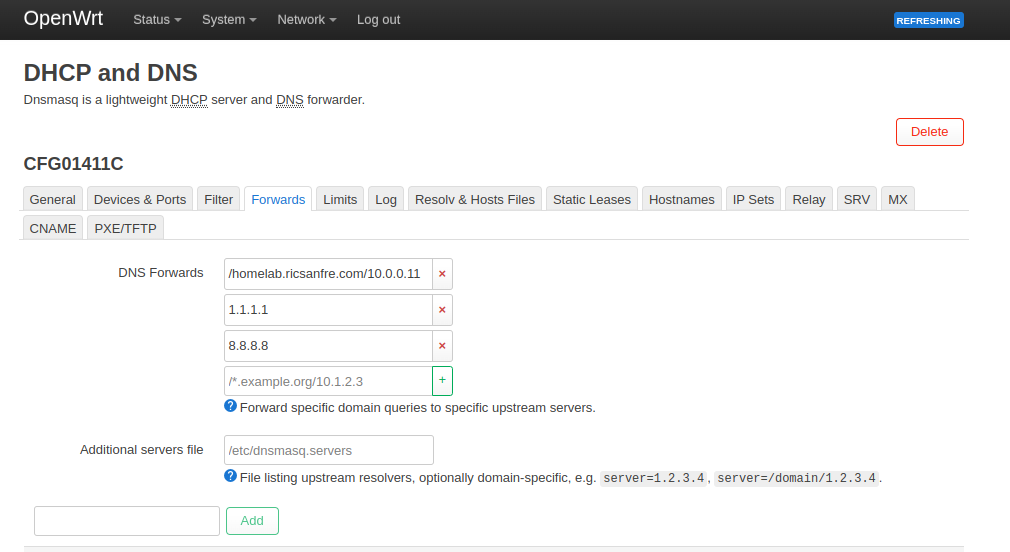
- Forward DNS queries for domain
-
In Tab “Filter” configure Rebind protection
Add
homelab.ricsanfre.comto “Domain Whitelist”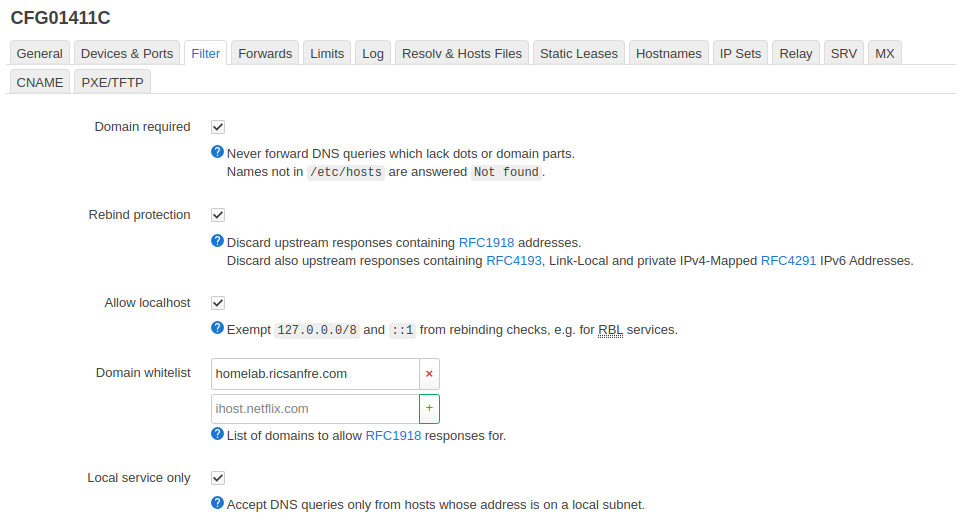
Important:
OpenWRT, by default, configures DNS Rebind protection. This is designed to protect against this type of attack by blocking DNS resolution for domains that point to private IP addresses. All request to
homelab.ricsanfre.com, since resolve private IP address, are rejected unless “rebind protection” is disabled orhomelab.ricsanfre.comdomain is added to the whitelist.
DHCP interfaces configuration
Enable DHCPv4 and disable DHCPv6 in lan interface
- Go to System -> Interfaces and edit
lan (lan-br)interface- Go to “DHCP Server” Tab and “General Settings” subtab
- “Ignore Interface” option has to be unchecked. This is default option
- Set “Start”, “Limit” and “Lease time” options Start option set to 100 and limit set to 150 => pool IP (10.0.0.100-10.0.0.249)
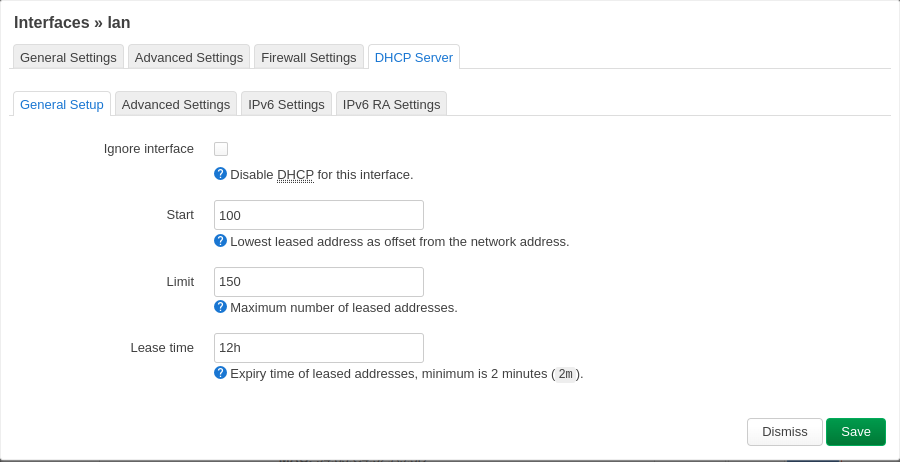
- Go to “DHCP Server” tab and “IPv6 Settings”
- Select “RA Service” and “DHCPv6 Service” as disabled
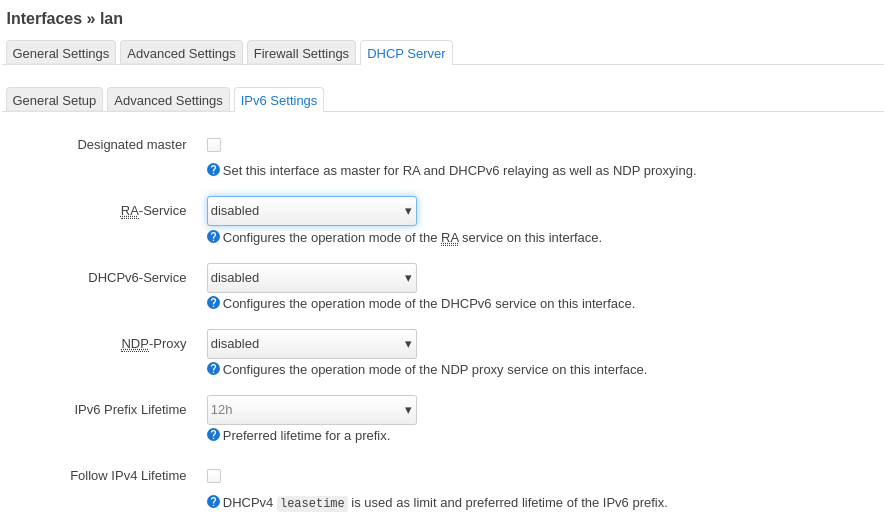
- Go to “DHCP Server” Tab and “General Settings” subtab
Configure DHCP Boot/PXE options
- Go to Network -> DHCP and DNS
- In Tab “PXE/TFPT” configure
- Configure
dnsmasqPXE boot options - Do not enable TFTP server
- Configure
Important:
Multiarchitecture boot options cannot be configured using LuCI
dnsmasq dhcp-match options cannot be configured
# UEFI boot
dhcp-match=set:efi-x86_64,option:client-arch,7
dhcp-boot=tag:efi-x86_64,bootx64.efi
UCI cli can be used instead3
-
Connect to OpenWrt through SSH
-
Execute the following UCI commands
uci set dhcp.@match[-1].networkid='bios'
uci set dhcp.@match[-1].match='60,PXEClient:Arch:00000'
uci add dhcp match
uci set dhcp.@match[-1].networkid='efi64'
uci set dhcp.@match[-1].match='60,PXEClient:Arch:00007'
uci add dhcp boot
uci set dhcp.@boot[-1].filename='tag:bios,pxelinux.0'
uci set dhcp.@boot[-1].serveraddress=10.0.0.11
uci set dhcp.@boot[-1].servername=node1
uci add dhcp boot
uci set dhcp.@boot[-1].filename='tag:efi64,bootx64.efi'
uci set dhcp.@boot[-1].serveraddress=10.0.0.11
uci set dhcp.@boot[-1].servername=node1
uci commit dhcp
service dnsmasq reload
Tip: dnsmasq configuration
After applying the changes the dnsmasq configuration that is really configured can be checked in directory /tmp/etc/dnsmasq.conf.x
NTP Configuration
NTP configuration can be updated in “System” -> “System” Menu -> “Time Synchronization” tab
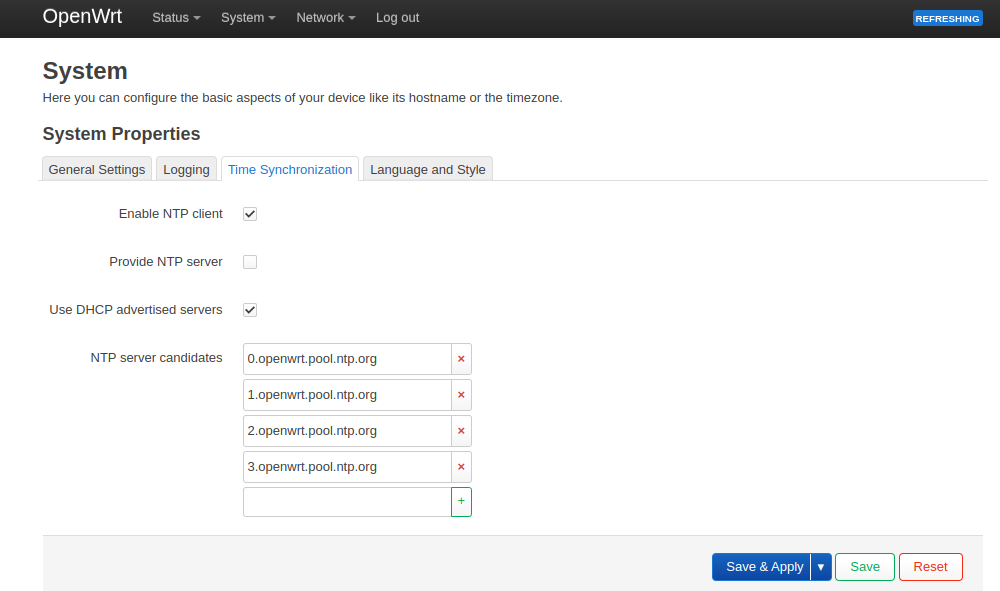
By default only NTP client is configured.
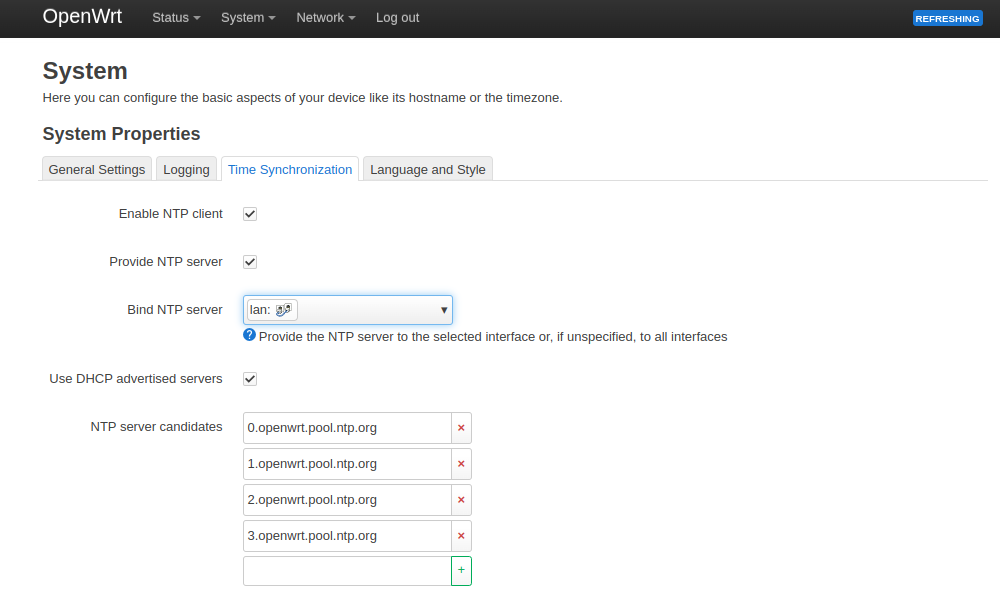
Enable NTP Server
To enable NTP server click on “Provide NTP server”. NTP server can be enabled only in a specific interface (i.e lan interface)
How OpenWrt keeps track of time
Most of OpenWrt hardware, including Raspberry PI or GL-A1300 does not have a RTC (Real Time clock), that means that it uses NTP to keep system time updated.
Even when NTP is used to synchronize the time and date, when NTP boots, it takes as current-time the time of the first-installation. As time goes after any reboot, NTP synchronization takes longer and longer because NTP adjust the time in small steps and the starting date to be synchronized is more distant in the past.
To remediate this, OpenWRT when booting updates system time to the most recently changed file in /etc directory.
Script implementing this behavior is (/etc/init.d/sysfixtime).
The problem is that if there is no configuration changes, the last update time won’t change between reboots.
To mitigate this problem, a script to update a dummy file in (/etc) can be scheduled.
Go to “System” -> “Scheduled Tasks”
Add the following crontab task and apply save:
# Keeping time track file so sysfixtime can find a recent timestamp when rebooting
*/5 * * * *  touch /etc/keepingtime
Scheduled tasks can be listed:
crontab -l
OpenWRT Operation
Software Management
Additional software packages can be installed in OpenWRT using OPKG packet manager4.
Note: Wireless/wired wan interface need to be configured with Internet Access (Default route and DNS need to be configured in the interface)
OpenWRT packages can be updated or new packages can be installed through LuCi:
- Go to System->Software
- Click on “Update List” to obtain list of packages
Packages can also be updated installed through command line:
All packages can be automatically uploaded with the following command
opkg list-upgradable | cut -f 1 -d ' ' | xargs opkg upgrade
Firmware Upgrade
Check latest version available for your hardware
Example:
- For Raspberry Pi: https://openwrt.org/toh/raspberry_pi_foundation/raspberry_pi
-
For GL-Inet A1300 model: https://openwrt.org/toh/gl.inet/gl-a1300
-
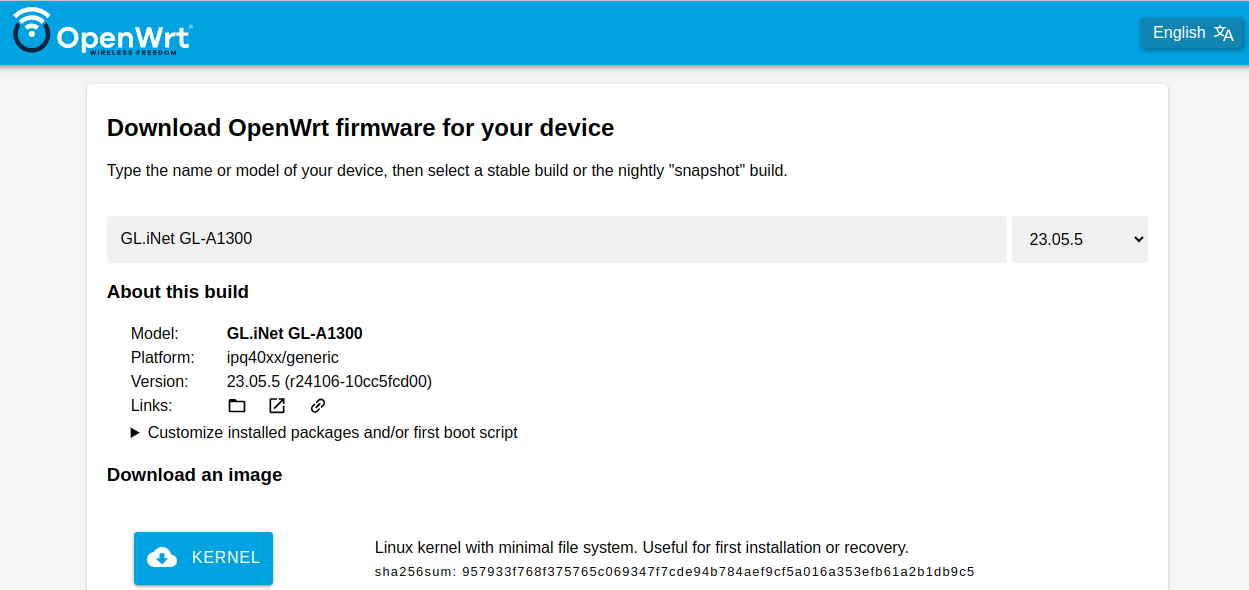
Step 1. Download the appropriate Image for your Model and desired OpenWrt release from Firmware Selector.
For example: For Rapsberry PI

For GL. iNet A-1300:
-
Step 2. Download “system Upgrade” image to update a router that already runs OpenWrt. The image can be used with the LuCI web interface or the terminal
-
Step 3: Connect to LuCI Interface
-
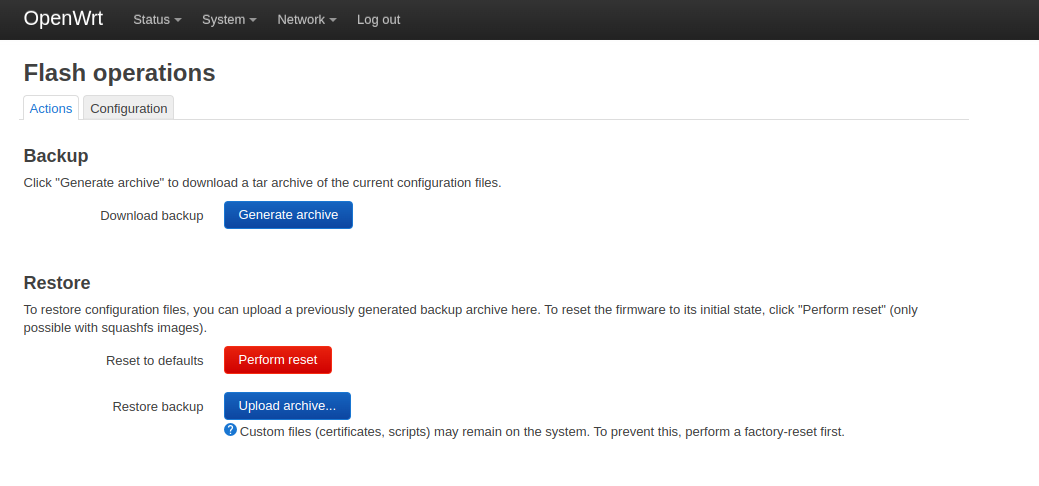
Step 4: Go to System->Backup/Flash Firmware
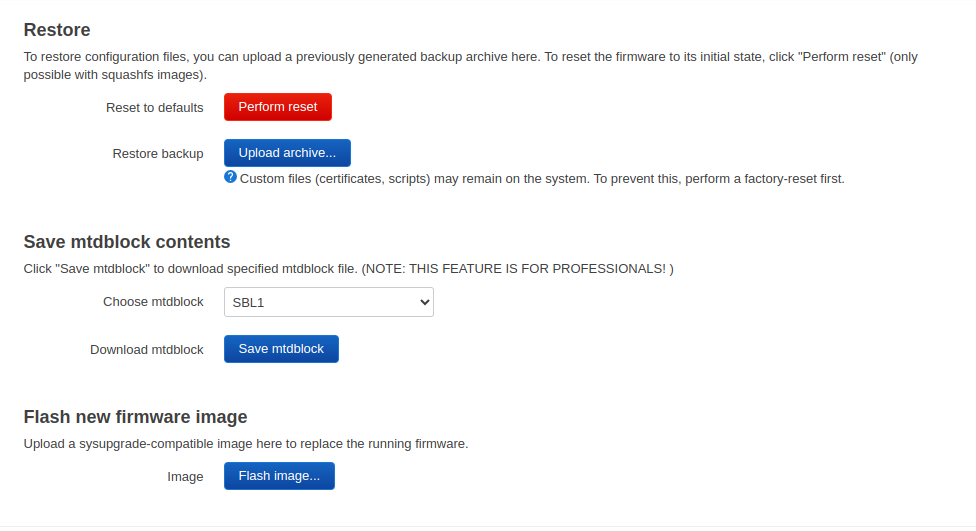
- Step 5: In Section “Flash new firmware image” Click on “Flash Image” and upload the new image.
Backup and Restore
-
Configuration files can be backup up through console
Go to “System” -> “Backup/Flash Firmware”
-
To download backup files in tar file, Go to “Backup” section “Download backup” and click on “Generate Archive”
-
To restore backup from archive file, Go to “Restore” section “Restore backup” and click “Upload archive…”
OpenWRT configuration files
OpenWrt’s central configuration is split into several files located in the /etc/config/ directory5. Each file relates roughly to the part of the system it configures.
Configuration files can be edited:
- Using a text editor
- Using CLI
uci - Using various programming APIs (shell, Lua and C)
- Using LuCi web interface.
Upon changing a UCI configuration file, whether through a text editor or the command line, the services or executables that are affected must be (re)started (or, in some cases, simply reloaded) by an init.d call
OpenWRT Observability
Metrics
Prometheus Integration
OpenWRT metrics can be exported deploying Prometheus node exporter packages
-
Step 1: Connect via SSH
ssh root@192.168.1.1 -
Step 2: Update packages
opkg update -
Step 3: Install prometheus node exporter packages
opkg install prometheus-node-exporter-lua \ prometheus-node-exporter-lua-nat_traffic \ prometheus-node-exporter-lua-netstat \ prometheus-node-exporter-lua-openwrt \ prometheus-node-exporter-lua-wifi \ prometheus-node-exporter-lua-wifi_stations -
Step 4: Check metrics are exposed
By default, the node exporter we installed will export data to localhost at port 9100 to /metrics. To test that metrics are exposed execute the following command
curl localhost:9100/metricsNote:
curl command might be not installed Install curl command with
opkg install curl -
Step 4: Make metrics endpoint available through LAN interface
Edit
/etc/config/prometheus-node-exporter-luafile.config prometheus-node-exporter-lua 'main' option listen_interface 'lan' option listen_port '9100' option listen_ipv6 '0' #option cert '/etc/uhttpd.crt' #option key '/etc/uhttpd.key' - Step 5: Restart prometheus-node-exporter-lua service
/etc/init.d/prometheus-node-exporter-lua restart -
Step 6: Configure Prometheus to scrape openWRT node-exporter endpoint
In Prometheus you need to add a new job scrape config (at the end of the file)
/etc/prometheus/prometheus.yml- job_name: "OpenWRT" static_configs: - targets: ["${ROUTER}:9100"]Replacing
${ROUTER}by IP address/FQDN of the openWRT router.
Integration with Kube-Prom-Stack
In case Prometheus server is deployed in Kuberentes cluster using kube-prometheus-stack (i.e Prometheus Operator), Prometheus Operator CRD ScrapeConfig resource can be used to automatically add configuration for scrapping metrics from node exporter.
-
Create Prometheus Operator ScrapeConfig resources
apiVersion: monitoring.coreos.com/v1alpha1
kind: ScrapeConfig
metadata:
  name: openwrt-node-exporter
spec:
  staticConfigs:
    - targets:
        - gateway.${CLUSTER_DOMAIN}:9100
  metricsPath: /metrics
  relabelings:
    - action: replace
      targetLabel: job
      replacement: openwrt-exporter
Where
${CLUSTER_DOMAIN}has to be replaced by the domain name used in the cluster. For example:homelab.ricsanfre.com. (i.e.: target =gateway.homelab.ricsanfre.com).
Grafana Dashboard
OpenWRTr dashboard can be donwloaded from grafana.com: dashboard id: 18153.
Dashboard can be automatically added using Grafana’s dashboard providers configuration. See further details in “PiCluster - Observability Visualization (Grafana): Automating installation of community dasbhoards
Add following configuration to Grafana’s helm chart values file:
# Configure default Dashboard Provider
# https://grafana.com/docs/grafana/latest/administration/provisioning/#dashboards
dashboardProviders:
  dashboardproviders.yaml:
    apiVersion: 1
    providers:
      - name: infrastructure
        orgId: 1
        folder: "Infrastructure"
        type: file
        disableDeletion: false
        editable: true
        options:
          path: /var/lib/grafana/dashboards/infrastructure-folder

# Add dashboard
# Dashboards
dashboards:
  infrastructure:
    openWRT:
      # https://grafana.com/grafana/dashboards/18153-asus-openwrt-router/
      # renovate: depName="OpenWRT Exporter Dashboard"
      gnetId: 18153
      revision: 4
      datasource:
        - { name: DS_PROMETHEUS, value: Prometheus }
Logs
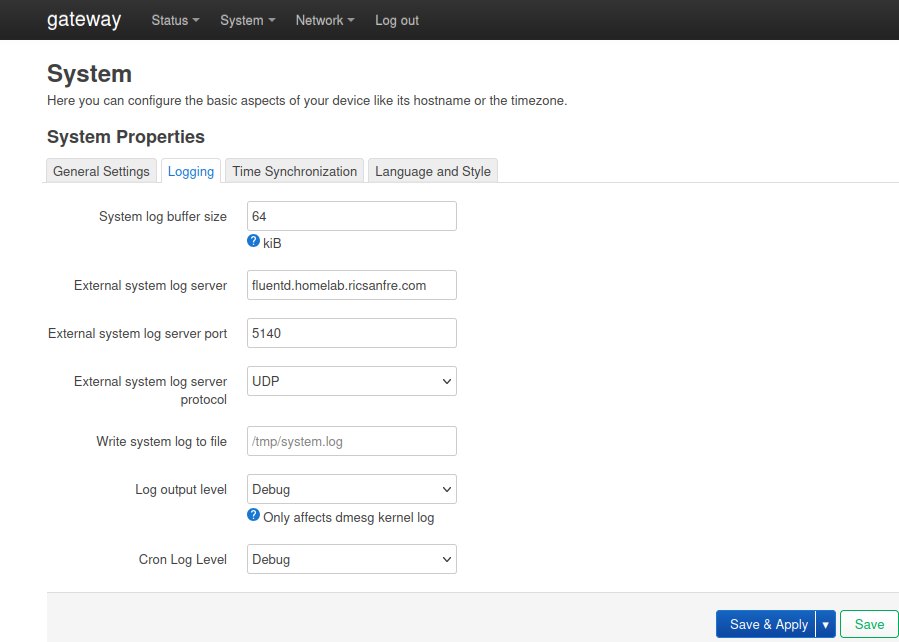
OpenWRT can be configure to forward syslogs to external Syslog server
- Go to “System” -> “System”
- Select “Logging” tab
- Update external syslog server and port and apply changes
Integration with syslog server can be tested generating a syslog message with the logger utility
logger "Testing syslog"
Fluentd service running in kubernetes cluster exposes a syslog endpoint to collect OpenWRT syslogs.