Service Mesh (Istio)
Why a Service Mesh
Introduce Service Mesh architecture to add observability, traffic management, and security capabilities to internal communications within the cluster.
Important:
I have been testing and using Linkerd as Service Mesh solution for my cluster since release 1.3 (April 2022). See “Service Mesh (Linkerd)” document.
Main reasons for selecting Linkerd over Istio were:
- ARM64 architecture support. Istio did not support ARM architectures at that time.
- Better performance and reduced memory/cpu footprint. Linkerd Proxy vs Istio’s Envoy Proxy
Since the initial evaluation was made:
-
In Aug 2022, Istio, introduced ARM64 support in release 1.15. See istio 1.15 announcement
-
In Feb 2024, Linkerd maintaner, Buyoyant, announced that it would no longer provide stable builds. See Linkerd 2.15 release announcement. That decision prompted CNCF to open a health check on the project.
-
Istio is developing a sidecarless architecture, Ambient mode, which is expected to use a reduced footprint. In March 2024, Istio announced the beta relase of Ambient mode for upcoming 1.22 istio release: See Istio ambient mode beta release announcement
For those reasons, Service Mesh solution in the cluster has been migrated to Istio since release 1.9.
Istio vs Linkerd
-
Open Source Community
Istio and Linkerd both are CNCF graduated projects.
After latest change in Linkerd licensing mode, continuity of Linkerd under CNCF is not clear.
-
ARM support
Istio added ARM64 architecture support in release 1.15. See istio 1.15 announcement.
Linkerd supports ARM64 architectures since release 2.9. See linkerd 2.9 announcement.
-
Performance and reduced footprint
Linkerd uses its own implementation of the communications proxy, a sidecar container that need to be deployed with any Pod as to inctercep all inbound/outbound traffic. Instead of using a generic purpose proxy (Envoy proxy) used by traditional Istio’s sidecar architecture, a specifc proxy tailored only to cover Kubernetes communications has been developed. Covering just Kubernetes scenario, allows Linkerd proxy to be a simpler, lighter, faster and more secure proxy than Envoy’s based proxy
Istio new sidecarless mode, ambient, uses a new L4 proxy, ztunnel, which is coded in Rust and which is not deployed side-by-side with every single pod, but only deployed one per node.
This sidecarless new architecture is expected to use a lower footprint than Linkerd.
Preliminary comparison, made by solo-io, main contributor to Istio’s new Ambient mode, shows reduced Istio footprint and better performance results than Likerd. See comparison analysis “Istio in Ambient Mode - Doing More for Less!”
Istio Architecture
An Istio service mesh is logically split into a data plane and a control plane.
- The data plane is the set of proxies that mediate and control all network communication between microservices. They also collect and report telemetry on all mesh traffic.
- The control plane manages and configures the proxies in the data plane.
Istio supports two main data plane modes:
-
sidecar mode, which deploys an Envoy proxy along with each pod that you start in your cluster, or running alongside services running on VMs. sidecar mode is similar to the one providers by other Service Mesh solutions like linkerd.
-
ambient mode, sidecaless mode, which uses a per-node Layer 4 proxy, and optionally a per-namespace Envoy proxy for Layer 7 features.
Note: Even whe Istio Ambien mode is in beta state, since it is expected to provide a reduced footprint than the sidecar architecture, I will use ambient mode for the PiCluster
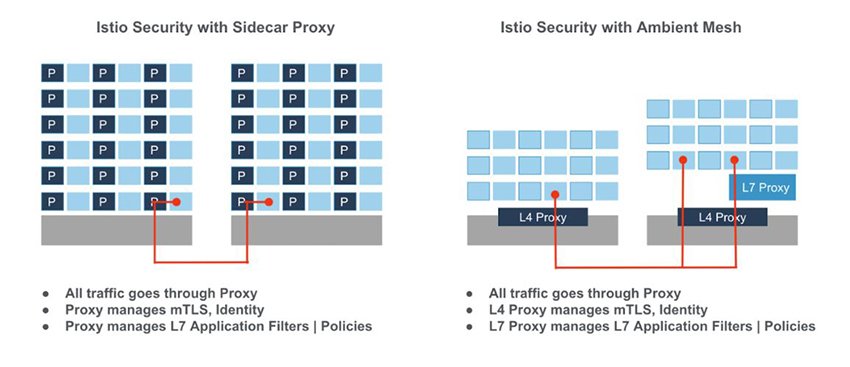
Istio Sidecar Mode
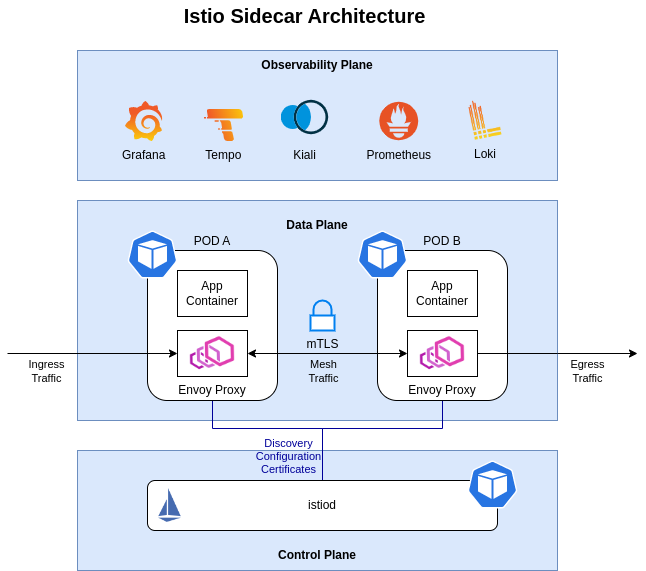
In sidecar mode, Istio implements its features using a per-pod L7 proxy,Envoy proxy. This is a transparent proxy running as sidecar container within the pods. Proxies automatically intercept Pod’s inbound/outbound TCP traffic and add transparantly encryption (mTLS), Later-7 load balancing, routing, retries, telemetry, etc.
Istio Ambient Mode

In ambient mode, Istio deploys a shared agent, running on each node in the Kubernetes cluster. This agent is a zero-trust tunnel (or ztunnel), and its primary responsibility is to securely connect and authenticate elements within the mesh. The networking stack on the node redirects all traffic of participating workloads through the local ztunnel agent.
Ztunnels enable the core functionality of a service mesh: zero trust. A secure overlay is created when ambient is enabled for a namespace. It provides workloads with mTLS, telemetry, authentication, and L4 authorization, without terminating or parsing HTTP.
After ambient mesh is enabled and a secure overlay is created, a namespace can be configured to utilize L7 features.
Namespaces operating in this mode use one or more Envoy-based waypoint proxies to handle L7 processing for workloads in that namespace. Istio’s control plane configures the ztunnels in the cluster to pass all traffic that requires L7 processing through the waypoint proxy. Importantly, from a Kubernetes perspective, waypoint proxies are just regular pods that can be auto-scaled like any other Kubernetes deployment.
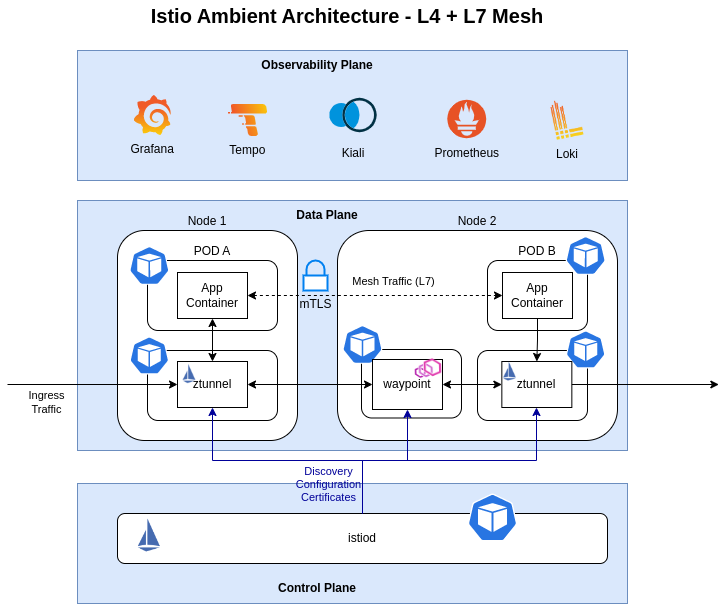
In ambient mode, Istio implements its features using two different proxies, a per-node Layer 4 (L4) proxy, ztunnel, and optionally a per-namespace Layer 7 (L7) proxy, waypoint proxy.
ztunnelproxy, providing basic L4 secured connectivity and authenticating workloads within the mesh (i.e.:mTLS).- L4 routing
- Encryption and authentication via mTLS
- L4 telemetry (metrics, logs)
waypointproxy, providing L7 functionality, is a deployment of the Envoy proxy; the same engine that Istio uses for its sidecar data plane mode.- L7 routing
- L7 telemetry (metrics, logs traces)
See further details in Istio Ambient Documentation
Istio Installation
Cilium CNI configuration
The main goal of Cilium configuration is to ensure that traffic redirected to Istio’s sidecar proxies (sidecar mode) or node proxy (ambient mode) is not disrupted. That disruptions can happen when enabling Cilium’s kubeProxyReplacement which uses socket based load balancing inside a Pod. SocketLB need to be disabled for non-root namespaces (helm chart option socketLB.hostNamespacesOnly=true).
Kube-proxy-replacement option is mandatory when using L2 announcing feature, which is used in Pi Cluster.
Also Istio uses a CNI plugin to implement functionality for both sidecar and ambient modes. To ensure that Cilium does not interfere with other CNI plugins on the node, it is important to set the cni-exclusive parameter to false.
The following options need to be added to Cilium helm values.yaml.
# Istio configuration
# https://docs.cilium.io/en/latest/network/servicemesh/istio/
# Disable socket lb for non-root ns. This is used to enable Istio routing rules
socketLB:
  hostNamespaceOnly: true
# Istio uses a CNI plugin to implement functionality for both sidecar and ambient modes.
# To ensure that Cilium does not interfere with other CNI plugins on the node,
cni:
  exclusive: false
Due to how Cilium manages node identity and internally allow-lists node-level health probes to pods, applying default-DENY NetworkPolicy in a Cilium CNI install underlying Istio in ambient mode, will cause kubelet health probes (which are by-default exempted from NetworkPolicy enforcement by Cilium) to be blocked.
This can be resolved by applying the following CiliumClusterWideNetworkPolicy:
apiVersion: "cilium.io/v2"
kind: CiliumClusterwideNetworkPolicy
metadata:
  name: "allow-ambient-hostprobes"
spec:
  description: "Allows SNAT-ed kubelet health check probes into ambient pods"
  endpointSelector: {}
  ingress:
  - fromCIDR:
    - "169.254.7.127/32"
See istio issue #49277 for more details.
Important:
This policy override is not required unless you already have other default-deny NetworkPolicies or CiliumNetworkPolicies applied in the cluster
See further details in Cilium Istio Configuration and Istio Cilium CNI Requirements
istioctl installation
Install the istioctl binary with curl:
Download the latest release with the command:
curl -sL https://istio.io/downloadIstioctl | sh -
Add the istioctl client to your path, on a macOS or Linux system:
export PATH=$HOME/.istioctl/bin:$PATH
Istio control plane installation
Installation using Helm (Release 3):
-
Step 1: Add the Istio Helm repository:
helm repo add istio https://istio-release.storage.googleapis.com/charts -
Step2: Fetch the latest charts from the repository:
helm repo update -
Step 3: Create namespace
kubectl create namespace istio-system -
Step 4: Install Istio base components (CRDs, Cluster Policies)
helm install istio-base istio/base -n istio-system -
Step 5: Install Istio CNI
helm install istio-cni istio/cni -n istio-system --set profile=ambient -
Step 6: Install istio discovery
helm install istiod istio/istiod -n istio-system --set profile=ambient -
Step 6: Install Ztunnel
helm install ztunnel istio/ztunnel -n istio-system -
Step 6: Confirm that the deployment succeeded, run:
kubectl get pods -n istio-system
https://istio.io/latest/docs/ambient/install/helm-installation/
Istio Gateway installation
-
Create Istio Gateway namespace
kubectl create namespace istio-ingress -
Install helm chart
helm install istio-gateway istio/gateway -n istio-ingress
Istio Observability configuration
Istio generates detailed telemetry (metrics, traces and logs) for all service communications within a mesh
See further details in Istio Observability
Logs
Istio support sending Envoy’s access logs using OpenTelemetry and a way to configure it using Istio’s Telemetry API. So that Telemetry API can be used to configure Ambient’s waypoint proxies (Envoy based proxies)
ztunnel proxies also generate by default operational and access logs.
See further details in Istio Observability Logs
Traces
Istio leverages Envoy’s proxy distributed tracing capabilities. Since Istio Ambient mode is only using Envoy proxy for waypoint proxy.
By default in Ambient mode, using Istio’s book-info testing application, traces are only generated from istio-gateway. No Spans are generated by different microservices since there is no any Envoy Proxy exporting traces.
To enable Open Telemetry traces to be generated by Istio ingress gateway and other proxies:
-
Step 1 - Enable Open Telemetry tracing provider in Istio’d control plane within Mesh global configuration options
Add following configuration to istiod helm chart
values.yamlmeshConfig: # Enabling distributed traces enableTracing: true extensionProviders: - name: opentelemetry opentelemetry: port: 4317 service: tempo-distributor.tempo.svc.cluster.local resource_detectors: environment: {}That configuration enables globallly OpenTelemetry provider using Grafana’s Tempo Open Telemetry collector.
-
Step 2 - Use Istio’s Telemetry API to apply the default distributed tracing configuration to the cluster
apiVersion: telemetry.istio.io/v1alpha1
kind: Telemetry
metadata:
  name: otel-global
  namespace: istio-system
spec:
  tracing:
  - providers:
    - name: opentelemetry
    randomSamplingPercentage: 100
    customTags:
      "my-attribute":
        literal:
          value: "default-value"
A specific configuration, per namespace or workload can be also configured.
See details in Istio’s Telemetry API doc
See furhter details in Istio Distributed Tracing
Metrics (Prometheus configuration)
Metrics from control plane (istiod) and proxies (ztunnel) can be extracted from Prometheus sever:
-
Create following manifest file to create Prometheus Operator monitoring resources
apiVersion: monitoring.coreos.com/v1 kind: ServiceMonitor metadata: name: istio-component-monitor namespace: istio-system labels: monitoring: istio-components release: istio spec: jobLabel: istio targetLabels: [app] selector: matchExpressions: - {key: istio, operator: In, values: [pilot]} namespaceSelector: matchNames: - istio-system endpoints: - port: http-monitoring interval: 60sapiVersion: monitoring.coreos.com/v1 kind: PodMonitor metadata: name: ztunnel-monitor namespace: istio-system labels: monitoring: ztunnel-proxies release: istio spec: selector: matchLabels: app: ztunnel namespaceSelector: matchNames: - istio-system jobLabel: ztunnel-proxy podMetricsEndpoints: - path: /stats/prometheus interval: 60s
Kiali installation
Kiali is an observability console for Istio with service mesh configuration and validation capabilities. It helps you understand the structure and health of your service mesh by monitoring traffic flow to infer the topology and report errors. Kiali provides detailed metrics and a basic Grafana integration, which can be used for advanced queries. Distributed tracing is provided in this cluster by integration with Tempo.
See details about installing Kiali using Helm in Kiali’s Quick Start Installation Guide
Kiali is installed using the Kiali Operator.
Installation using Helm (Release 3):
-
Step 1: Create Kiali namespace
kubectl create namespace kiali -
Step 2: Add the Kiali Helm repository:
helm repo add kiali https://istio-release.storage.googleapis.com/charts -
Step 3: Fetch the latest charts from the repository:
helm repo update -
Step 4: Create
kiali-operator-values.yamlcr: create: true namespace: kiali spec: istio_namespace: "istio-system" server: web_fqdn: "kiali.${CLUSTER_DOMAIN}" web_port: "443" web_schema: "https" web_root: "/" auth: strategy: "anonymous" external_services: prometheus: url: "http://kube-prometheus-stack-prometheus.kube-prom-stack:9090/prometheus/" grafana: enabled: true internal_url: "http://grafana.grafana.svc.cluster.local/grafana/" external_url: "https://grafana.${CLUSTER_DOMAIN}" auth: type: bearer use_kiali_token: true tracing: enabled: true internal_url: "http://tempo-query-frontend.tempo.svc.cluster.local:3100/" provider: "tempo" tempo_config: org_id: "1" datasource_uid: "a8d2ef1c-d31c-4de5-a90b-e7bc5252cd00" use_grpc: true grpc_port: 9095 deployment: logger: log_level: debug -
Step 5: Install Kiali Operator in kiali namespace
helm install kiali-operator kiali/kiali-operator --namespace kiali -f kiali-operator-values.yaml -
Step 6: Check Kiali is up and running
kubectl get pods -n kiali kubectl get service kiali -n kiali -
Step 7: Expose Kiali through Envoy Gateway with an
HTTPRouteapiVersion: gateway.networking.k8s.io/v1 kind: HTTPRoute metadata: name: kiali-console namespace: kiali spec: hostnames: - kiali.${CLUSTER_DOMAIN} parentRefs: - group: gateway.networking.k8s.io kind: Gateway name: public-gateway namespace: envoy-gateway-system rules: - backendRefs: - name: kiali port: 20001 matches: - path: type: PathPrefix value: /Note:
Substitute variables (
${var}) in the above yaml file before applying it.- Replace
${CLUSTER_DOMAIN}by the domain used in the cluster. For example:homelab.ricsanfre.com
To expose Kiali using the
HTTPRoute, Envoy Gateway and the sharedpublic-gatewayGatewaymust already be installed in the cluster. See installation details in Envoy Gateway documentation.With this configuration the Kiali Server custom resource is created with the following config:
-
Server public URL settings are configured through
cr.spec.server.web_fqdn,web_port,web_schema, andweb_roottell Kiali the external URL where it is published so redirects and generated links usehttps://kiali.${CLUSTER_DOMAIN}/. -
No authentincation strategy (
cr.spec.auth.strategy: "anonymous"). -
Kiali is exposed through Envoy Gateway using an external
HTTPRouteresource instead of the Kiali ingress settings.See further details in Kubernetes Gateway API HTTPRoute
-
External connection to Prometheus, Grafana and Tempo is configured (
cr.spec.external_services)See further details in Kiali Configuring Prometheus Tracing Grafana
- Replace
Kiali OpenID Authentication configuration
Kiali can be configured to use as authentication mechanism Open Id Connect server.
Kiali only supports the authorization code flow of the OpenId Connect spec.
See further details in Kiali OpenID Connect Strategy.
-
Step 1: Create a new OIDC client in ‘picluster’ Keycloak realm by navigating to: Clients -> Create client
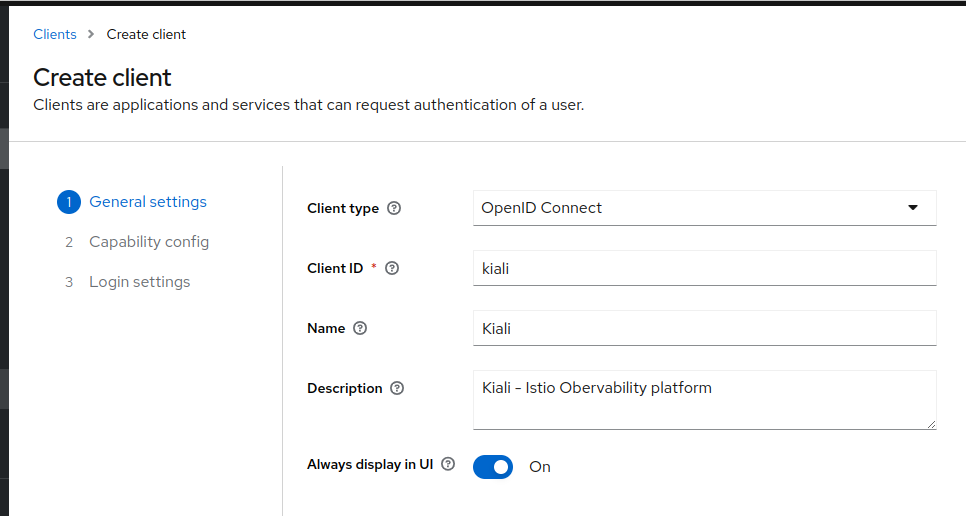
- Provide the following basic configuration:
- Client Type: ‘OpenID Connect’
- Client ID: ‘kiali’
- Click Next.
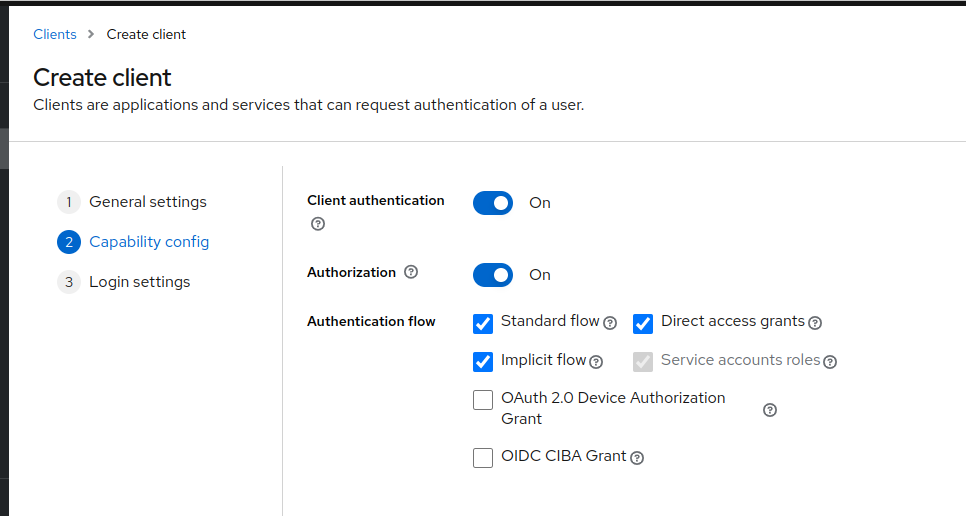
- Provide the following ‘Capability config’
- Client authentication: ‘On’
- Client authorization: ‘On’
- Authentication flow
- Standard flow ‘selected’
- Implicit flow ‘selected’
- Direct access grants ‘selected’
- Click Next
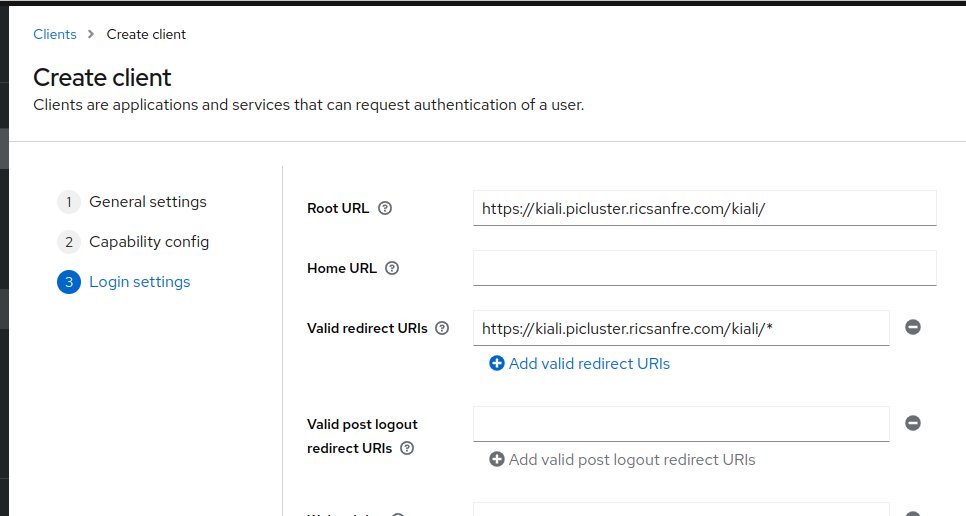
- Provide the following ‘Logging settings’
- Valid redirect URIs:
https://kiali.${CLUSTER_DOMAIN}/* - Root URL:
https://kiali.${CLUSTER_DOMAIN}/
- Valid redirect URIs:
- Save the configuration.
- Provide the following basic configuration:
-
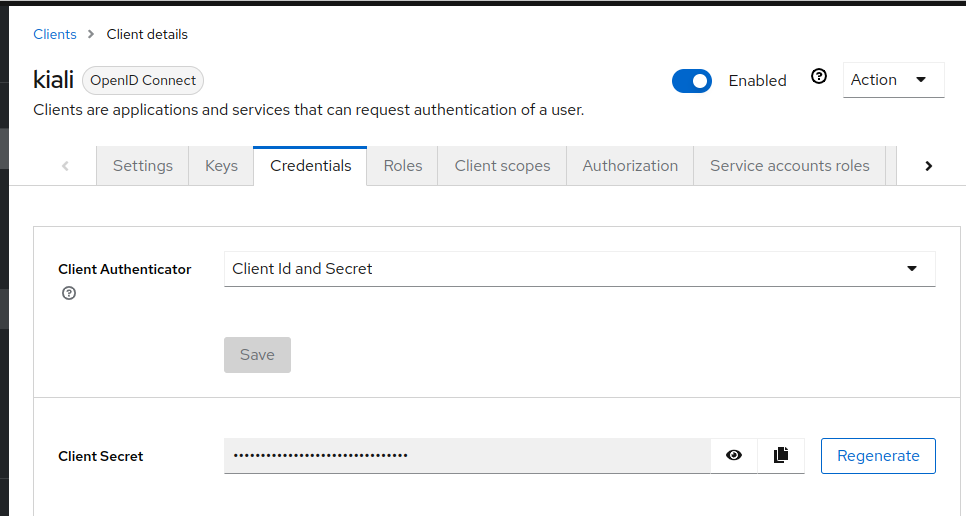
Step 2: Locate kiali client credentials
Under the Credentials tab you will now be able to locate Kiali client’s secret.
-
Step 3: Store Kiali client secret so it can be synchronized by External Secrets
In this repository the Kiali secret is not created manually. Instead, an
ExternalSecretnamedkiali-externalsecretreads the client secret from Vault keykiali/oauth2and materializes Kubernetes Secretkialiwith keyoidc-secret.The equivalent manifest used in this repository is:
apiVersion: external-secrets.io/v1 kind: ExternalSecret metadata: name: kiali-externalsecret namespace: kiali spec: secretStoreRef: name: vault-backend kind: ClusterSecretStore target: name: kiali data: - secretKey: oidc-secret remoteRef: key: kiali/oauth2 property: client-secret -
Step 4: Configure Kiali OpenID Connect authentication
Add following to Kiali’s helm chart operator values.yaml.
cr:
  spec:
    auth:
      # strategy: "anonymous"
      strategy: openid
      openid:
        client_id: "kiali"
        disable_rbac: true
        issuer_uri: "https://iam.${CLUSTER_DOMAIN}/realms/picluster"
Testing Istio installation
Book info sample application can be deployed to test installation
-
Create Kustomized bookInfo app
-
Create app directory
mkdir book-info-app -
Create book-info-app/kustomized.yaml file
apiVersion: kustomize.config.k8s.io/v1beta1
kind: Kustomization
namespace: book-info
resources:
- ns.yaml
  # https://istio.io/latest/docs/examples/bookinfo/
- https://raw.githubusercontent.com/istio/istio/release-1.29/samples/bookinfo/platform/kube/bookinfo.yaml
- https://raw.githubusercontent.com/istio/istio/release-1.29/samples/bookinfo/platform/kube/bookinfo-versions.yaml
- https://raw.githubusercontent.com/istio/istio/release-1.29/samples/bookinfo/gateway-api/bookinfo-gateway.yam
Note: Book-app release version has to be aligned with Istio release.
-
Create book-info-app/ns.yaml file
apiVersion: v1
kind: Namespace
metadata:
  name: book-info
-
-
Deploy book info app
kubectl kustomize book-info-app | kubectl apply -f - -
Label namespace to enable automatic sidecar injection
See Ambient Mode - Add workloads to the mesh”
kubectl label namespace book-info istio.io/dataplane-mode=ambientAmbient mode can be seamlessly enabled (or disabled) completely transparently as far as the application pods are concerned. Unlike the sidecar data plane mode, there is no need to restart applications to add them to the mesh, and they will not show as having an extra container deployed in their pod.
-
Validate configuration
istioctl validate
References
- Install istio using Helm chart: https://istio.io/latest/docs/setup/install/helm/
- Istio getting started: https://istio.io/latest/docs/setup/getting-started/
- Kiali: https://kiali.io/
- NGINX Ingress vs Istio gateway: https://imesh.ai/blog/kubernetes-nginx-ingress-vs-istio-ingress-gateway/