DNS Homelab Architecture
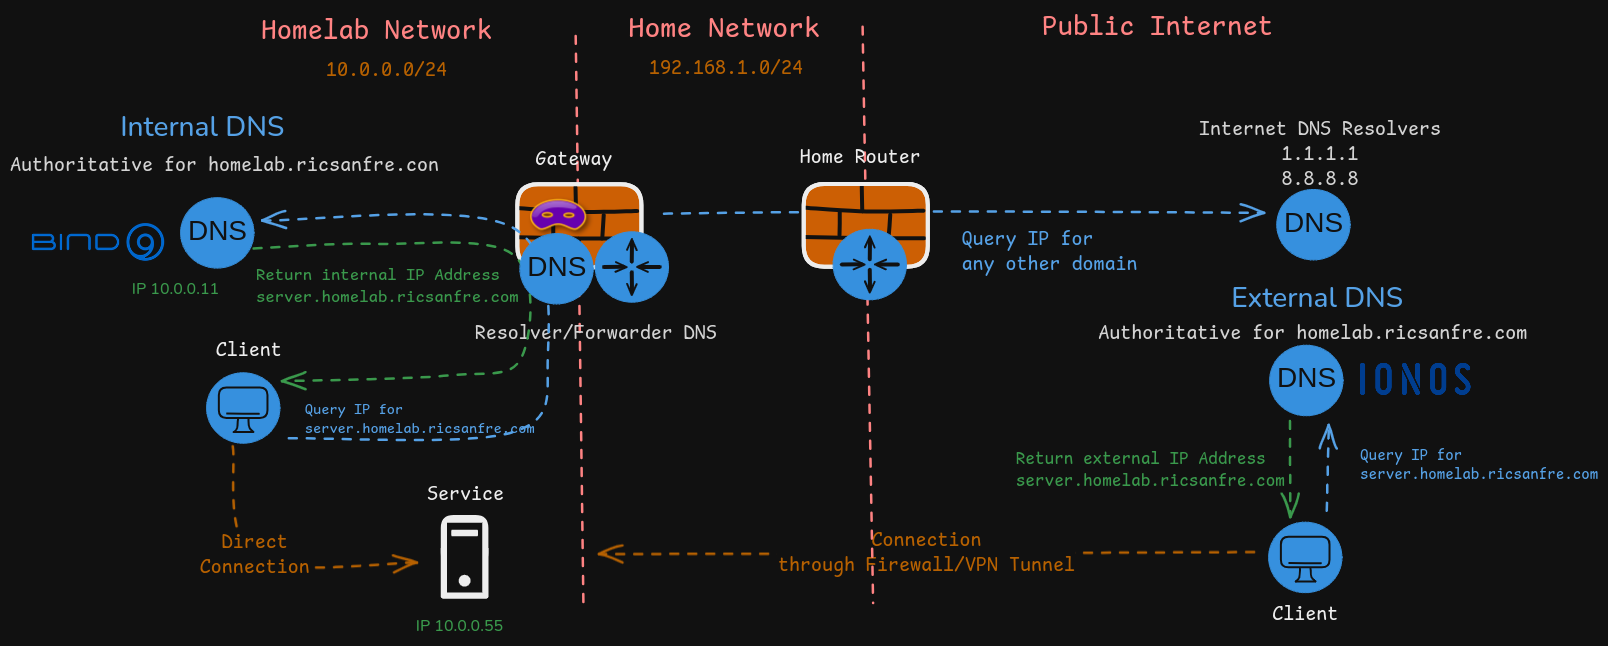
Split-horizon DNS architecture is used in my homelab so services can be accessed from my private network and also they can be accessed from external network.
Homelab DNS Architecture is composed of the following components:
-
Authoritative internal DNS server, based on Bind9, deployed in one of the homelab nodes (
node1).Authoritative DNS server for homelab subdomain
homelab.ricsanfre.com, resolving DNS names to homelab’s private IP address. -
Authoritative external DNS server, IONOS/CloudFlare, resolving DNS names from same homelab subdomain
homelab.ricsanfre.comto public IP addresses.Potentially this external DNS can be used to access internal services from Internet through my home network firewall, implementing a VPN/Port Forwarding solution.
Initially all homelab services are not accessible from Internet, but that External DNS is needed for when generating valid TLS certificates with Let’s Encrypt. DNS01 challenge used by Let’s Encrypt to check ownership of the DNS domain before issuing the TLS certificate will be implemented using this external DNS service.
-
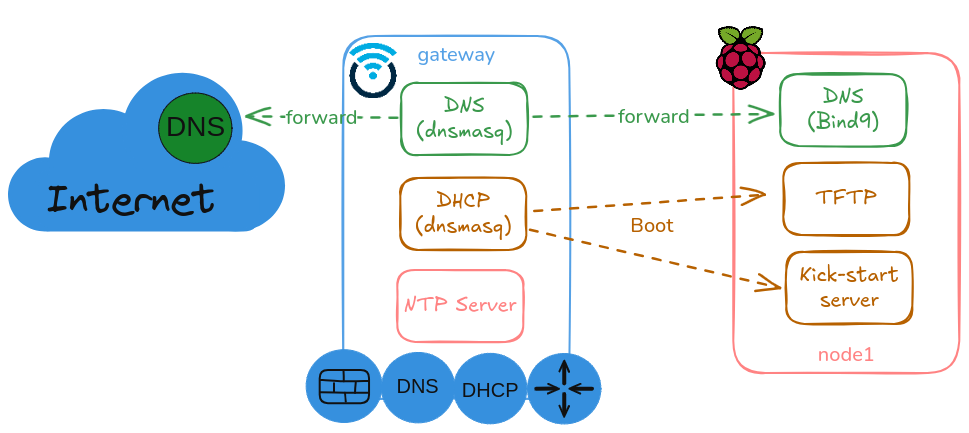
Forwarder/Resolver DNS server, based on
dnsmasq, running in my homelab router (gateway), able to resolve recursive queries by forwarding the requests to the corresponding authoritative servers.Configured as DNS server in all homelab nodes. It forwards request for
homelab.ricsanfre.comdomain to Authoritative Internal DNS server running innode1and the rest of request to default DNS servers 1.1.1.1 (cloudflare) and 8.8.8.8 (google)
This architecture is complemented with the following Kubernetes components:
-
Kubernetes DNS service, CoreDNS. DNS server that can perform service discovery and name resolution within the cluster.
Pods and kubernetes services are automatically discovered, using Kubernetes API, and assigned a DNS name within cluster-dns domain (default
cluster.local) so they can be accessed by PODs running in the cluster.CoreDNS also takes the role of Resolver/Forwarder DNS to resolve POD’s dns queries for any domain, using default DNS server configured at node level.
-
ExternalDNS, to synchronize exposed Kubernetes Services and Ingresses with cluster authoritative DNS, Bind9. So DNS records associated to exposed services can be automatically created and services can be accessed from out-side using their DNS names.
See details about Kubernetes DNS services in PiCluster - Kubernetes DNS
DNS Internal Authoritative Server (Bind9)
Authoritative DNS server for homelab zone (homlab.ricsanfre.com) is deployed in one of the nodes of the cluster: node1
Bind9 Installation
Use apt package manager to install Bind9 in an Ubuntu server.
sudo apt-get install bind9 bind9-doc dnsutils
Ubuntu packages install bind9 with a default configuration in /etc/bind/named.conf
About folders permissions in Ubuntu with AppArmor
Ubuntu bind9 packages install [[AppArmor]] profile /etc/apparmor.d/usr.sbin.named.
This profile set permissions for named application and control the access only to a set of directories.
Ubuntu packate configure Apparmor permissions so /var/lib/bind directory is configured with proper permissions to store and keep zones files and its journals. That is the folder that must be used to store the zone files in case DDNS is in going to be used. If that directory is not used, DDNS updates are not working because of permission issues.
The same happens with log directory: /var/logs/named directory should be used if AppArmor profile is active.
See https://ubuntu.com/server/docs/domain-name-service-dns
DNS Server Configuration
Disabling IPv6
- Edit
/etc/default/namedfile:# # run resolvconf? RESOLVCONF=no # startup options for the server OPTIONS="-u bind" -
Add following
OPTIONS="-u bind -4" -
Restart bind
sudo systemctl restart bind9
Configuring the Options File
/etc/bind/named.conf.options
options {
  directory "/var/cache/bind";

  dnssec-validation auto;

  // listening addreses
  listen-on { any; };

  // allow query from any network
  allow-query { any; };

  // Disable recursive queries
  recursion no;

  // Disable zone transfer by default
  allow-transfer { none; };
};
DNS server is authoritative server only. Recursive or Forwarder roles are disabled.
- Disable recursive queries:
recursion nooption. - It does not contain
forwarderssection. - Allow queries from any subnet:
allow-query { any; } - Disable zone transfer by default
allow-transfer { none; } - DNS configured to listen only on IPv4 IP addresses
listen-on { any; }.
Adding local zones
DNS zones designate a specific scope for managing and defining DNS records.
In this file it must be specified the DNS zones managed by DNS server
Zones files are define in dedicated files /etc/bind.db.x
Two types of zones need to be created:
- Direct Zone: Used for forward dns lookup (DNS name -> IP)
- Reverse zone: Used for reververse dns lookup (IP -> DNS name)
Edit config file: /etc/bind/named.conf.local
//
// Do any local configuration here
//

// Consider adding the 1918 zones here, if they are not used in your
// organization
//include "/etc/bind/zones.rfc1918";

// forward zone name
zone "homelab.ricsanfre.com" {
    type primary;
    file "/var/lib/bind/db.homelab.ricsanfre.com";

};

// reverse zone name
zone "0.10.in-addr.arpa" {
    type primary;
    file "/var/lib/bind/zones/db.10.0";  # 10.0.0.0/16 subnet
};
Creating the Forward Zone File
The forward zone file is where you define DNS records for forward DNS lookups.
- Initial file can be copied from
/etc/bind/db.local - Create the file:
/var/lib/bind/db.<domain>: (i.e:/var/lib/bind.db.homelab.ricsanfre.com)
;
; BIND data file for local loopback interface
;
$TTL	604800
@	IN	SOA	ns.homelab.ricsanfre.com. admin.homelab.ricsanfre.com. (
			      2		; Serial
			 604800		; Refresh
			  86400		; Retry
			2419200		; Expire
			 604800 )	; Negative Cache TTL
;
@	IN	NS	ns.
@	IN	A	127.0.0.1
@	IN	AAAA	::1

; name servers - A records
ns.homelab.ricsanfre.com.      IN      A       10.0.0.11


; 10.0.0.0/16 - A records
node1.homelab.ricsanfre.com.  IN      A      10.0.0.11
node2.homelab.ricsanfre.com.  IN      A      10.0.0.12
...
Create Reverse Zone File
Used for the reverse DNS lookup (From IP to name)
- Initial file can be copied from
/etc/bind/db.127 - Create the file (
/var/lib/bind/db.<IP>)
$TTL    604800
@       IN      SOA     ns.homelab.ricsanfre.com. admin.homelab.ricsanfre.com. (
                              1         ; Serial
                         604800         ; Refresh
                          86400         ; Retry
                        2419200         ; Expire
                         604800 )       ; Negative Cache TTL
;

; name servers - NS records
      IN      NS      ns.homelab.ricsanfre.com.

; PTR Records
11.0    IN      PTR     ns.homelab.example.com.  ; 10.0.0.11


11.0 IN      PTR     node1.homelab.ricsanfre.com.  ; 10.0.0.11
12.0 IN      PTR     node2.homelab.ricsanfre.com.  ; 10.0.0.12
...
About Zone File syntax
Resource Records (RR) follows the following syntax, defined in RFC1035:
{name} {ttl} {class} {type} {data}
where:
name: domain namettl: TTL of the recordclass: class. (INvalue)type: type of record (SOA, A, AAAA, MX, CNAME, etc.)data: data content. Structure depends on the record type.
Special symbols:
@: Used as RRname: it represents the current origin. At the start of the zone file, it is the <zone_name>, followed by a trailing dot (.).$ORIGINDirective:$ORIGIN <domain>.: $ORIGIN sets the domain name that is appended to any unqualified records. When a zone is first read, there is an implicit$ORIGIN <zone_name>.$TTLDirective:$TTL <default-ttl>: This sets the default Time-To-Live (TTL) for subsequent records
See further information about the Zone file structure in https://bind9.readthedocs.io/en/v9.18.30/chapter3.html#soa-rr
Observability
Metrics
The BIND 9 statistics can be retrieved from a running BIND 9 server via the HTTP protocol. BIND 9 has a tiny built-in web-server, which provides the statistics data in XML or JSON format.
It is disabled by default but can be enabled easily with a single line of configuration. e.g.
statistics-channels {
  inet 127.0.0.1 port 8053 allow { 127.0.0.1; };
};
This enables metric port (TCP 8053) that is only accessible from localhost. Metrics are exposed in XML format. Prometheus bind exporter deployed in same node can be used to scrape these metrics and export them in Prometheus format.
Bind Exporter installation
Bind Exporter is a Prometheus exporter for Export BIND (named/dns) v9+ service metrics to Prometheus.
Bind Exporter is deployed on same node as dns server, so it uses bind9 statistic channel to expose a Prometheus compliant metrics endpoint that can be used by Prometheus Server to collect metrics.
The Prometheus Bind Exporter is a single static binary that can be installed via tarball that can be downloaded from Prometheus download website
- Step 1: Add user for bind_exporter
sudo useradd --no-create-home --shell /sbin/nologin bind_exporter -
Step 2: Download tar file and untar it
cd tmp
wget https://github.com/prometheus/bind_exporter/releases/download/v<VERSION>/bind_exporter-<VERSION>.linux-<ARCH>.tar.gz
tar -xvf bind_exporter-<VERSION>.linux-<ARCH>.tar.gz
Where
<VERSION>is the version of bind exporter to be installed and<ARCH>is the architecture of the system (i.e.:amd64for x86_64 systems). ``` -
Step 3: Copy bind_exporter binary to
/usr/local/binsudo cp /tmp/bind_exporter-<VERSION>.linux-<ARCH>/bind_exporter /usr/local/bin -
Step 4: Create service file for systemd
/etc/systemd/system/bind_exporter.service[Unit] Description=Bind Exporter Wants=network-online.target After=network-online.target [Service] User=bind_exporter Group=bind_exporter Type=simple ExecStart=/usr/local/bin/bind_exporter \ --bind.stats-url="http://localhost:8053/" \ --bind.timeout="10s" \ --bind.pid-file="/run/named/named.pid" \ --bind.stats-version=auto \ --web.listen-address=0.0.0.0:9119 \ --web.telemetry-path=/metrics [Install] WantedBy=multi-user.target -
Step 4: Reload systemd daemon
sudo systemctl daemon-reload -
Step 5: Start and enable bind exporter service
sudo systemctl enable bind_exporter sudo systemctl start bind_exporter -
Step 6: Check that bind_exporter has started
sudo journalctl -f --unit bind_exporter
Bind Exporter installation and configuration can be automated with Ansible. Ansible role prometheus.bind-exporter, which is part of Ansible Collection for Prometheus maintained by Prometehus Community, can be used to automate its deployment and configuration.
Integration with Kube-Prom-Stack
In case Prometheus server is deployed in Kubernetes cluster using kube-prometheus-stack (i.e Prometheus Operator), Prometheus Operator CRD ScrapeConfig resource can be used to automatically add configuration for scrapping metrics from node exporter.
-
Create Prometheus Operator ScrapeConfig resources
apiVersion: monitoring.coreos.com/v1alpha1
kind: ScrapeConfig
metadata:
  name: bind-exporter
spec:
  staticConfigs:
    - targets:
        - ns.${CLUSTER_DOMAIN}:9119
  metricsPath: /metrics
Where
${CLUSTER_DOMAIN}has to be replaced by the domain name used in the cluster. For example:homelab.ricsanfre.com. (i.e.: target =ns.homelab.ricsanfre.com).
Grafana Dashboard
Bind Exporter dashboard can be donwloaded from grafana.com: dashboard id: 12309.
Dashboard can be automatically added using Grafana’s dashboard providers configuration. See further details in “PiCluster - Observability Visualization (Grafana): Automating installation of community dashboards
Add following configuration to Grafana’s helm chart values file:
# Configure default Dashboard Provider
# https://grafana.com/docs/grafana/latest/administration/provisioning/#dashboards
dashboardProviders:
  dashboardproviders.yaml:
    apiVersion: 1
    providers:
      - name: infrastructure
        orgId: 1
        folder: "Infrastructure"
        type: file
        disableDeletion: false
        editable: true
        options:
          path: /var/lib/grafana/dashboards/infrastructure-folder

# Add dashboard
# Dashboards
dashboards:
  infrastructure:
    bind-exporter:
      # https://grafana.com/grafana/dashboards/12309-bind9-exporter-dns/
      # renovate: depName="Bind9 Exporter Dashboard"
      gnetId: 12309
      revision: 5
      datasource:
        - { name: DS_PROMETHEUS, value: Prometheus }
DNS Resolver/Forwarder (Dnsmasq)
A DNS Resolver/Forwarder is configured as default DNS server for all nodes in the cluster. This DNS server is able to resolve DNS queries forwarding the request to upstream DNS servers.
dnsmasq installed in gateway is providing DHCP/DNS services and it should have the following options
-
Step 1. Configure DNS service in dnsmasq
Edit file
/etc/dnsmasq.d/dnsmasq.conf# DNS server is not authoritative # Disable local domain and do not read addresses from /etc/host # Also `addresses=` configuration in dnsmasq.conf file should be avoided # local should be unset # local= # Do not use /etc/host # expand-hosts= # Specify domain for DHCP server domain=homelab.ricsanfre.com # DNS upstream nameservers # Default upstream servers server=1.1.1.1 server=8.8.8.8 # Conditional forward for domain homelab.ricsanfre.com server=/homelab.ricsanfre.com/10.0.0.11 # Never forward plain names (without a dot or domain part) domain-needed -
Step 2. Restart dnsmasq service
sudo systemctl restart dnsmasq
Local DNS Server (Bind9)
DNS Resolver/Forwarding service, can be deployed in my linux laptop so DNS queries can be automatically forwarded to homelab DNS authoritative server (Bind9)
-
Install bind9
Use apt package manager to install Bind9 in an Ubuntu server.
sudo apt-get install bind9 bind9-doc dnsutils -
Edit
/etc/bind/named.conf.optionsacl trusted { localhost; }; options { directory "/var/cache/bind"; forwarders { 1.1.1.1; 8.8.8.8; }; dnssec-validation auto; // listening addreses listen-on-v6 { ::1; }; listen-on { 127.0.0.1; }; // Enable recursion only from trusted recursion yes; # enables recursive queries allow-recursion { trusted; }; # allows recursive queries from "trusted" clients };With this configuration, DNS service is not exposed, and only queries coming from localhost are accepted.
-
Edit
/etc/bind/named.conf.localAdd conditional forwarding for homelab domain
homelab.ricsanfre.com. DNS queries for homelab domain are forwarded togatewayusing its IP address in my home networkzone "homelab.ricsanfre.com" { type forward; forwarders { 192.168.1.21; }; }; -
Restart bind server
sudo systemctl restart named -
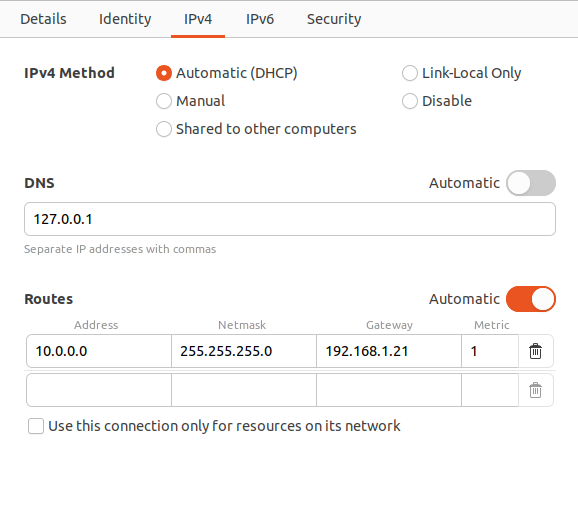
Statically assign DNS server to 127.0.0.1 instead of using the one offered by DHCP.
If using Ubuntu Desktop, Network-Manager need to be configured. Go to Interface settings and set static DNS nameserver.