Lab Architecture
The home lab I am building is shown in the following picture
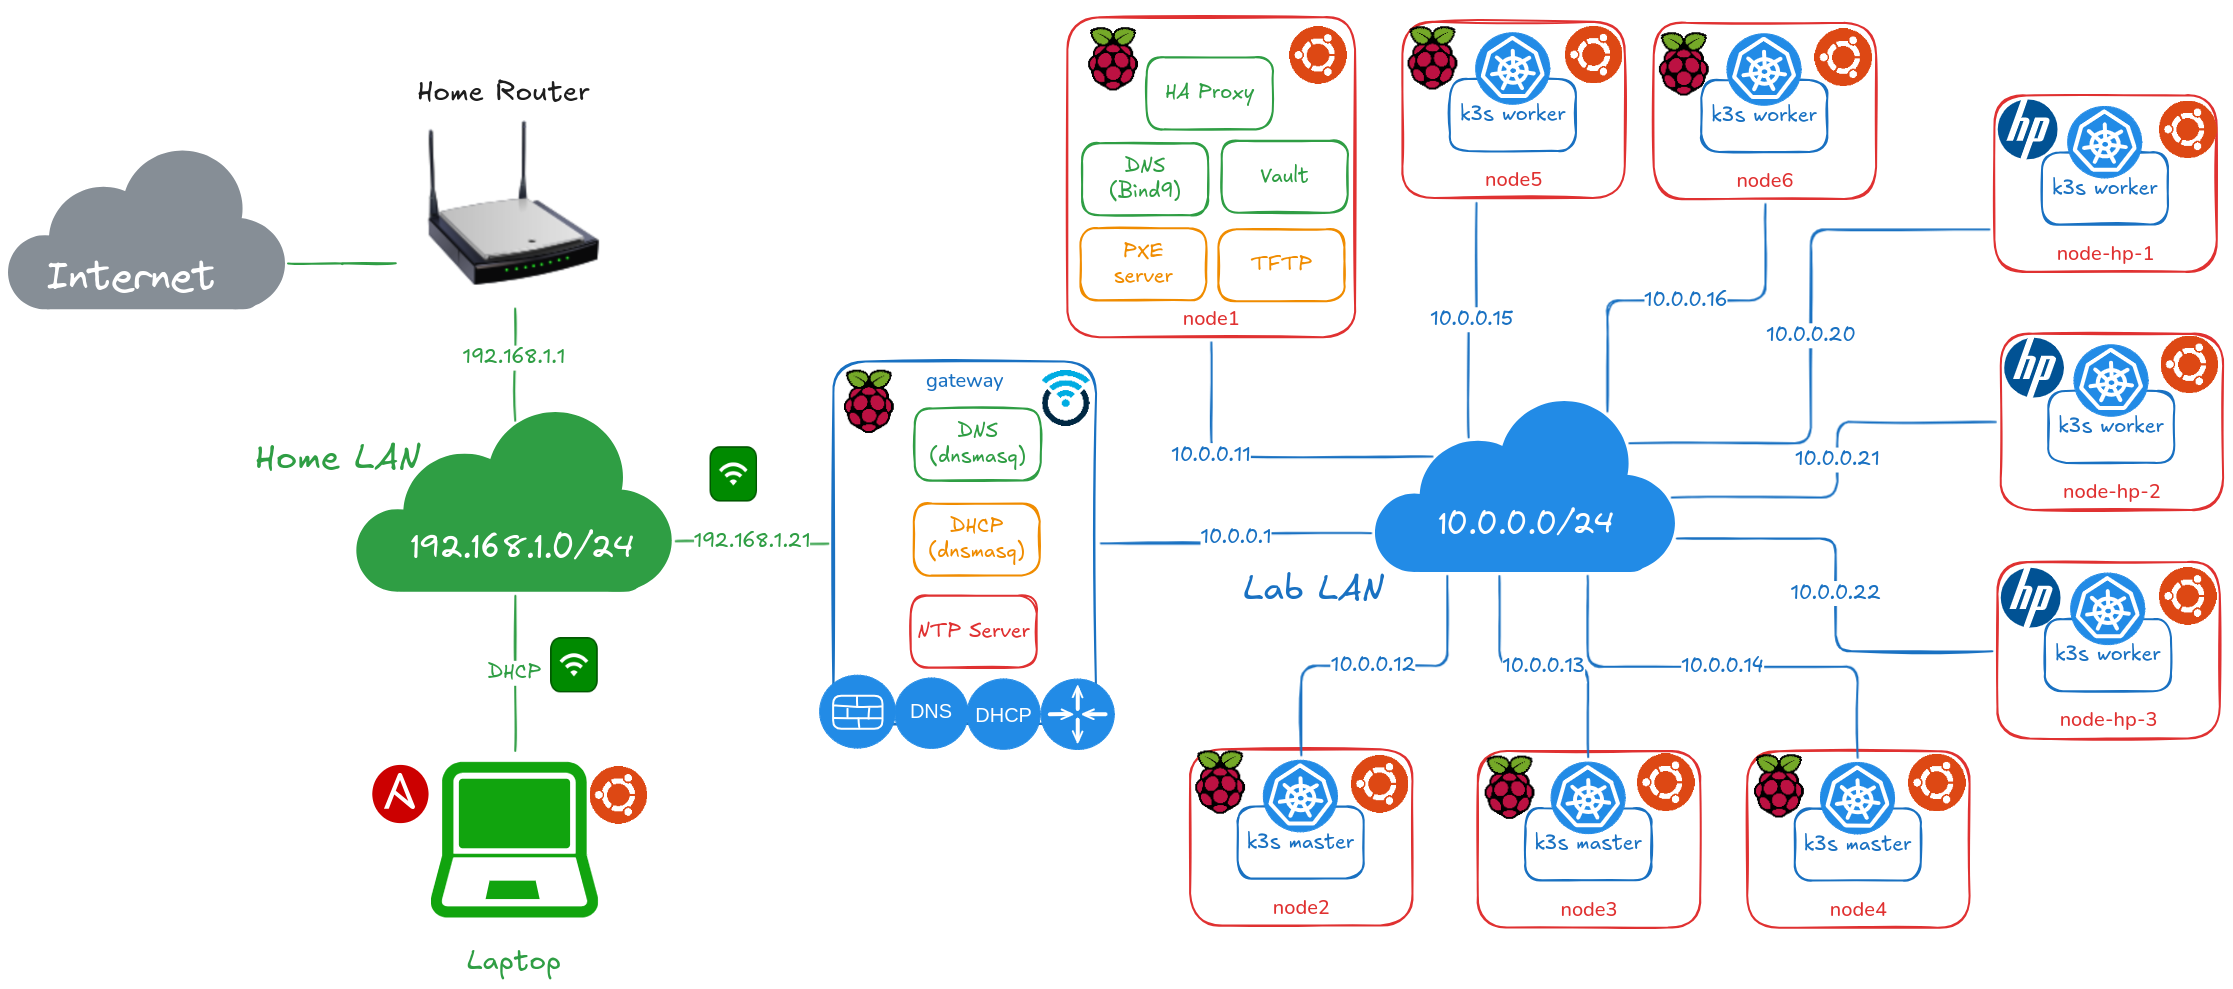
A K3S cluster is composed of the following cluster nodes:
- 3 master nodes (
node2,node3andnode4), running on Raspberry Pi 4B (4GB) - 5 worker nodes:
node5andnode6running on Raspberry Pi 4B (8GB)node-hp-1,node-hp-2andnode-hp-3running on HP Elitedesk 800 G3 (16GB)
A LAN switch (16 Gigabit ports) used to provide L2 connectivity to the cluster nodes. L3 connectivity and internet access is provided by a router/firewall (gateway) running OpenWRT on Raspberry Pi 4B (2GB) or GL-iNet Slate Plus (GL-A1300).
gateway, cluster firewall/router is connected to LAN Switch using its Gigabit Ethernet port. It is also connected to my home network using its WIFI interface, so it can route and filter traffic comming in/out the cluster. With this architecture my lab network can be isolated from my home network.
gateway also provides networking services to my lab network:
- Internet Access
- DNS
- NTP
- DHCP
node1, running on Raspberry Pi 4B (4GB), for providing kubernetes external services:
- Secret Management (Vault)
- DNS Authoritative (Bind9)
A load balancer is also needed for providing Hight availability to Kubernetes API. In this cases a network load balancer, HAProxy, will be deployed in node1 server.
For automating the OS installation of x86 nodes, a PXE server will be deployed in node1 node.
Ansible control node, pimaster is deployed in a Linux VM or Linux Laptop, so from this node the whole cluster configuration can be managed. pimaster is connected to my home network (ip in 192.168.1.0/24 network). In pimaster, a IP route to 10.0.0.0/24 network through gateway (192.168.1.21) need to be configured, so it can have connectivity to cluster nodes.
Hardware
Nodes
For building the cluster, using bare metal servers instead of virtual machines, low cost servers are used:
ARM-based SBC (Single Board Computer)
-
- CPU: Broadcom BCM2711, Quad core Cortex-A72 (ARM v8). 4 cores/4 threads at 1.5GHz
- RAM: 2GB/4GB/8GB
- Disk: SDCard or USB disk (Flash Disk or SSD disk through USB to SATA adapter)
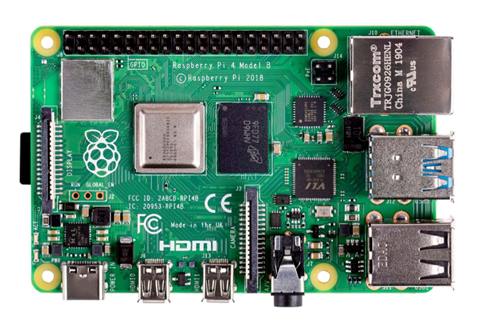
I have used the following hardware components to assemble Raspberry PI components of the cluster.
- 4 x Raspberry Pi 4 - Model B (4 GB) and 2 x Raspberry Pi 4 - Model B (8 GB) as ARM-based cluster nodes (1 master node and 5 worker nodes).
- 1 x Raspberry Pi 4 - Model B (2 GB) as router/firewall for the lab environment connected via wifi to my home network and securing the access to my lab network.
- 4 x SanDisk Ultra 32 GB microSDHC Memory Cards (Class 10) for installing Raspberry Pi OS for enabling booting from USB (update Raspberry PI firmware and modify USB partition)
- 4 x Samsung USB 3.1 32 GB Fit Plus Flash Disk
- 1 x Kingston A400 SSD Disk 480GB
- 5 x Kingston A400 SSD Disk 240GB
- 6 x Startech USB 3.0 to SATA III Adapter for connecting SSD disk to USB 3.0 ports.
- 1 x GeeekPi Pi Rack Case. It comes with a stack for 4 x Raspberry Pi’s, plus heatsinks and fans)
- 1 x SSD Rack Case
- 1 x ANIDEES AI CHARGER 6+. 6 port USB power supply (60 W and max 12 A)
- 1 x ANKER USB Charging Hub. 6 port USB power supply (60 w and max 12 A)
- 7 x USB-C charging cable with ON/OFF switch.
x86-based old refurbished mini PC
- HP Elitedesk 800 G3 Desktop mini PC
- CPU: Intel i5 6500T. 4 cores(4 threads) at 2.5 GHz
- RAM: 16 GB
- Disk: Integrated SSD disk (SATA or NVMe)

I have used the following hardware components
- 3 x HP EliteDesk 800 G3 i5 6500T 2,5 GHz, 8 GB de RAM, SSD de 256 GB as x86 cluster nodes.
One of the nodes
node-hp-2has a SSD M.2 NVMe 256 GB. The other,node-hp-1has a SATA SSD Kingston 240 GB - 3 x Crucial RAM 8GB DDR4 2400MHz CL17 Memoria as RAM expansion for mini PCs. Total memmory 16 GB
Note:
Initially the intent of this project was to build a kuberentes cluster using only Raspberry PI nodes. Due to Raspberry shortage happened during 2021-2023 period, which made impossible to buy them at reasonable prices, I decided to look for alternatives to be able to scale up my cluster.
Use old x86 refurbished mini PCs, with Intel i5 processors, was the solution. These mini PCs provide similar performance to RaspberryPi 4B’s Quadcore ARM Cortex-A72, but its memory can be expanded up to 32GB of RAM (Raspberry PI 4B higher model only supports 8GB RAM). As a drawback power consumption of those mini PCs are higher that Raspberry PIs.
The overall price of a mini PC, intel i5 + 8 GB RAM + 256 GB SSD disk + power supply, (aprox 130 €) was cheaper than the overal cost of building a cluster node using a Rasbperry PI: cost of Raspberry PI 4B 8GB (100€) + Power Adapter (aprox 10 €) + SSD Disk (aprox 20 €) + USB3.0 to SATA converter (aprox 20€)
Similar comparative exercice can be made using newer Raspberry Pi model. Raspberry Pi 5 based mode has a higher processor than Pi 4 model, Quadcore ARM Cortex-A76, and its higher model support 16 GB RAM. It also features a PCIe connector, higher SSD disk perfomace than USB sata converter
The overall cost to build a Raspberry Pi-5-based node for the kubernetes homelab cluster could be aprox 220€: Raspberry PI-5 16GB (144€), Power Adapter (aprox 15€), Active cooler(aprox 6€) , RTC Batery(aprox 7€) , NVMe base + NVMe 256GB disk (50€), i.e Piromori NVMe base + NVMe disk
As alternative a overall price of refurbished mini PC, intel i5, 16GB RAM + 256 GB NVME disk + power supply, [aprox 150], base model(aprox 130 €) + 8GB RAM expansion(aprox. 20 €).
Networking
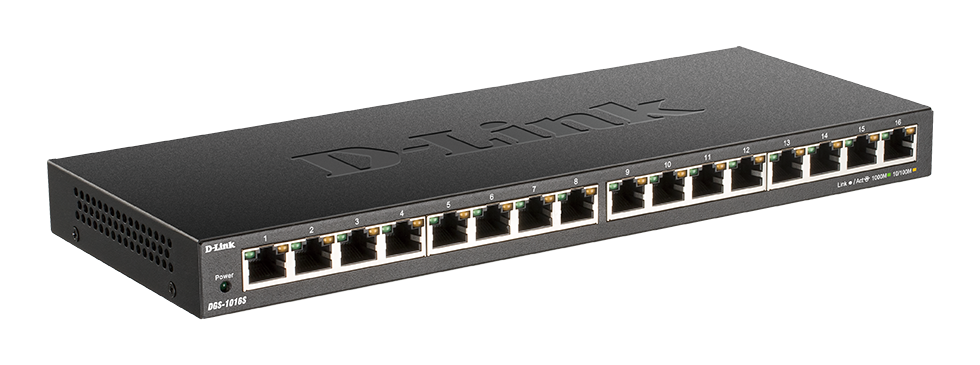
A 16 GE ports LAN switch, D-Link DGS-1016S is used to provide connectivity to all cluster nodes (Raspberry Pis and x86 mini PCs).
All nodes are connected to the switch with Cat6 eth cables, using their Gigabit Ethernet port.
As homelab router/firewall, a wifi pocket-sized travel router, GL-Inet Slate Plus (GL-A1300). Firmware of the router is replaced by latest version of OpenWRT operating system.
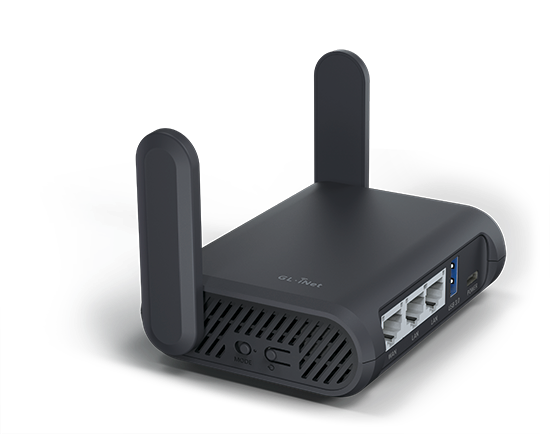
One of the LAN ports of GL-A1300 is connected to DL-Link switch. One of the WiFi ports is used as WAN port connected to my Home network.
Note:
As alternative to Gl-iNet router, a Raspberry Pi 4B can be used.
For networking, I have used the following hardware components:
-
1 x D-Link DGS-1016S. 16 ports GE ethernet unmanaged switch
-
1 x GL-Inet Slate Plus (GL-A1300), wifi router/firewall.
-
10 x Ethernet Cable. Flat Cat 6, 15 cm length
Raspberry PI Storage
x86 mini PCs has their own integrated disk (SSD disk or NVME). For Raspberry PIs different storage alternatives can be applied:
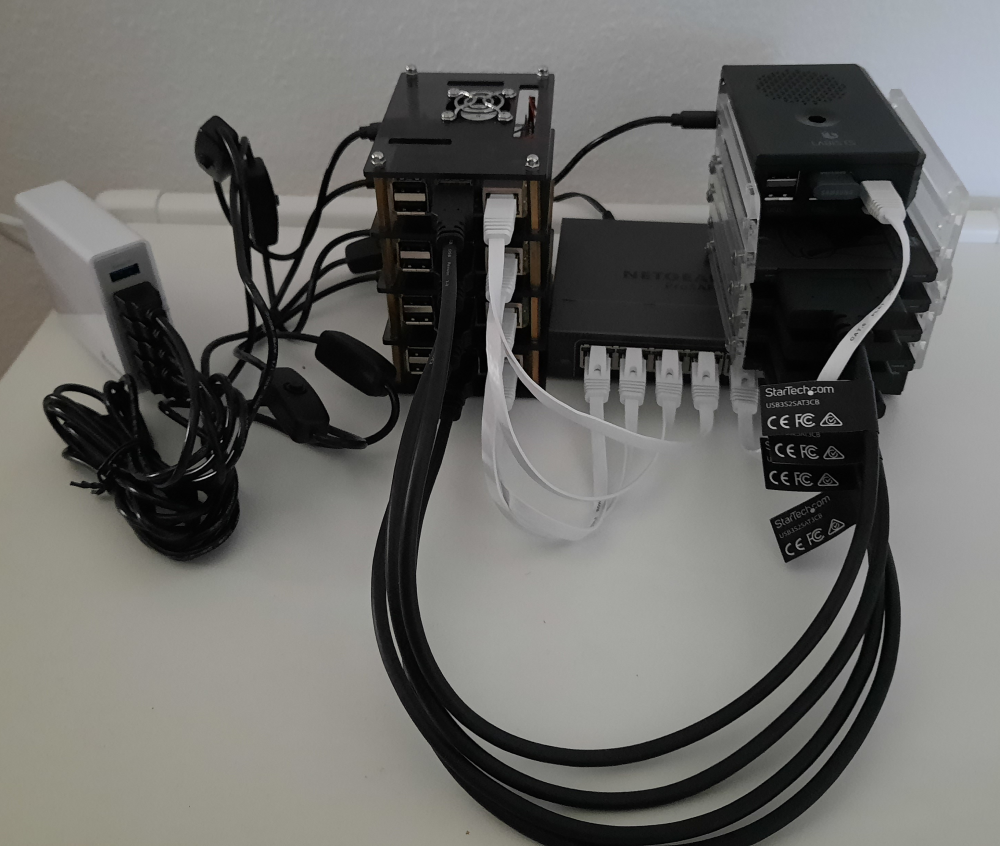
- Dedicated Disks: Each node has its SSD disks attached to one of its USB 3.0 ports. SSD disk + SATA to USB 3.0 adapter is needed for each node.
- Centralized SAN: Each node has Flash Disk (USB3.0) for running OS and additional storage capacity is provide via iSCSI from a SAN (Storage Area Network). One of the cluster nodes,
san, is configured as SAN server, and it needs to have SSD disk attached to its USB3.0 port.

Dedicated Disks
gateway uses local storage attached directly to USB 3.0 port (Flash Disk) for hosting the OS, avoiding the use of less reliable SDCards.
For having better cluster performance all Raspberry PI nodes will use SSDs attached to USB 3.0 port. SSD disk will be used to host OS (boot from USB) and to provide the additional storage required per node for deploying the Kubernetes distributed storage solution (Ceph or Longhorn).
Centralized SAN
A cheaper alternative architecture, instead of using dedicated SSD disks for each cluster node, one single SSD disk can be used for configuring a SAN service.
Each raspberry pi in the cluster node can use local storage attached directly to USB 3.0 port (USB Flash Disk) for hosting the OS, avoiding the use of less reliable SDCards.
As additional storage (required by distributed storage solution), iSCSI SAN can be deployed instead of attaching an additional USB Flash Disks to each of the nodes.
A SAN (Storage Access Network) can be configured using one of the nodes, san node, as iSCSI Storage Server, providing additional storage (LUNs) to the rest of the Raspberry PI nodes.
As storage device, a SSD disk was attached to san node. This SSD disk was used as well to host the OS.
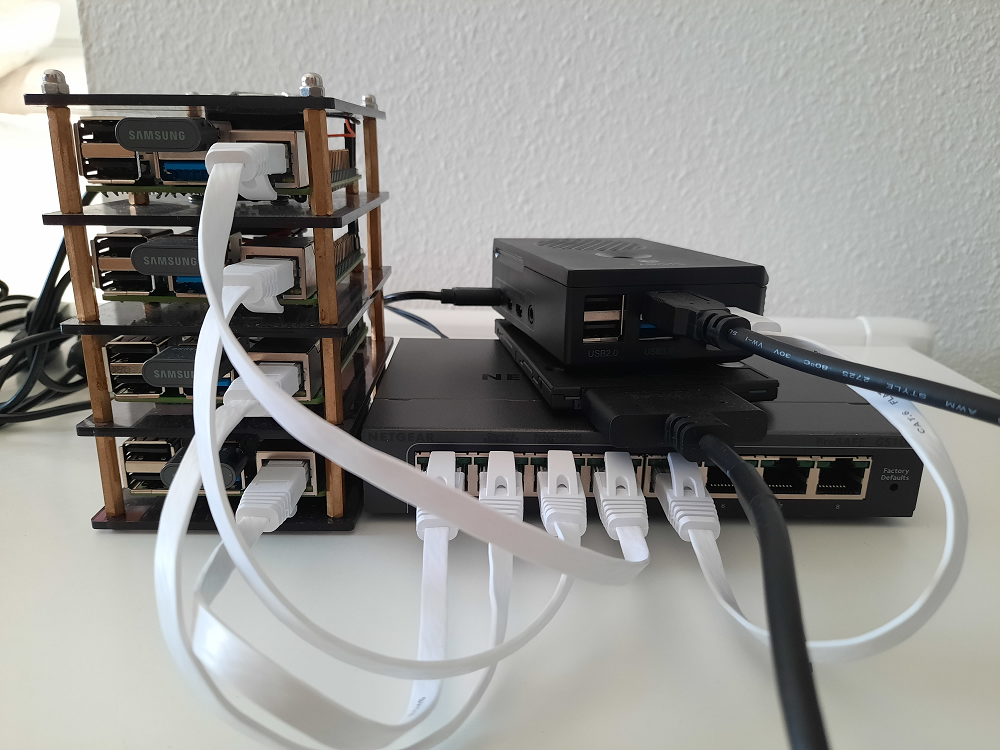
This alternative setup is worth it from educational point of view, to test the different storage options for RaspberryPI and to learn about iSCSI configuration and deployment on bare-metal environments. As well it can be used as a cheaper solution for deploying centralized storage solution.
See SAN configuration document further details about the configuration of SAN using a Raspeberry PIs, san, as iSCSI Target exposing LUNs to cluster nodes.
Raspberry PI Storage benchmarking
Different Raspberry PI storage configurations have been tested:
-
Internal SDCard: SanDisk Ultra 32 GB microSDHC Memory Cards (Class 10)
-
Flash Disk USB 3.0: Samsung USB 3.1 32 GB Fit Plus Flash Disk
-
SSD Disk Kingston A400 480GB + USB3 to SATA Adapter Startech USB 3.0 to SATA III
-
iSCSI Volumes. Using another Raspberry PI as storage server, configured as iSCSI Target, using a SSD disk attached.
Testing procedure
Sequential and random I/O tests have been executed with the different storage configurations.
For the testing a tweaked version of the script provided by James A. Chambers (https://jamesachambers.com/) has been used
Tests execution has been automated with Ansible. See pi-storage-benchmark repository for the details of the testing procedure and the results.
Sequential I/O performance
Test sequential I/O with dd and hdparam tools. hdparm can be installed through sudo apt install -y hdparm
-
Read speed (Use
hdparmcommand)sudo hdparm -t /dev/sda1 Timing buffered disk reads: 72 MB in 3.05 seconds = 23.59 MB/sec sudo hdparm -T /dev/sda1 Timing cached reads: 464 MB in 2.01 seconds = 231.31 MB/secIt can be combined in just one command:
sudo hdparm -tT --direct /dev/sda1 Timing O_DIRECT cached reads: 724 MB in 2.00 seconds = 361.84 MB/sec Timing O_DIRECT disk reads: 406 MB in 3.01 seconds = 134.99 MB/sec -
Write Speed (use
ddcommand)sudo dd if=/dev/zero of=test bs=4k count=80k conv=fsync 81920+0 records in 81920+0 records out 335544320 bytes (336 MB, 320 MiB) copied, 1,86384 s, 180 MB/s
Random I/O Performance
Tools used fio and iozone.
-
Install required packages with:
sudo apt install iozone3 fio -
Check random I/O with
fioRandom Write
sudo fio --minimal --randrepeat=1 --ioengine=libaio --direct=1 --gtod_reduce=1 --name=test --filename=test --bs=4k --iodepth=64 --size=80M --readwrite=randwriteRandom Read
sudo fio --minimal --randrepeat=1 --ioengine=libaio --direct=1 --gtod_reduce=1 --name=test --filename=test --bs=4k --iodepth=64 --size=80M --readwrite=randread -
Check random I/O with
iozonesudo iozone -a -e -I -i 0 -i 1 -i 2 -s 80M -r 4k
Performance Results
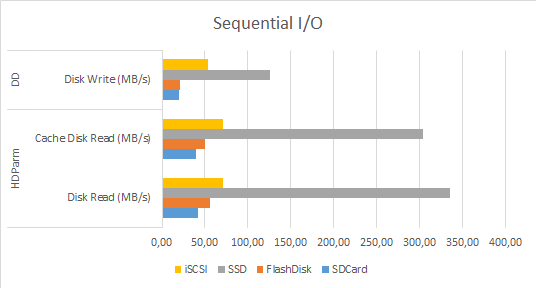
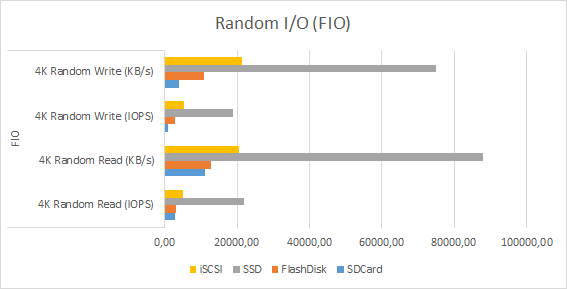
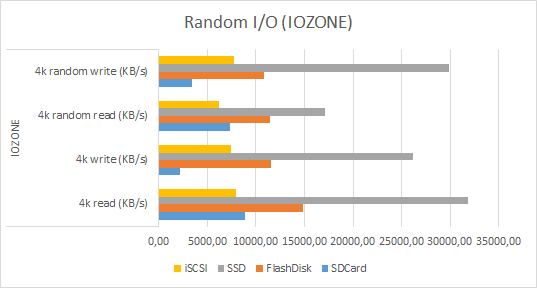
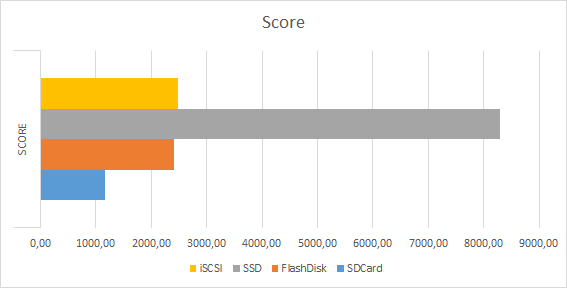
Average-metrics obtained during the tests removing the worst and the best result can be found in the next table and the following graphs:
| Disk Read (MB/s) | Cache Disk Read (MB/s) | Disk Write (MB/s) | 4K Random Read (IOPS) | 4K Random Read (KB/s) | 4K Random Write (IOPS) | 4K Random Write (KB/s) | 4k read (KB/s) | 4k write (KB/s) | 4k random read (KB/s) | 4k random write (KB/s) | Global Score | |
|---|---|---|---|---|---|---|---|---|---|---|---|---|
| SDCard | 41.89 | 39.02 | 19.23 | 2767.33 | 11071.00 | 974.33 | 3899.33 | 8846.33 | 2230.33 | 7368.67 | 3442.33 | 1169.67 |
| FlashDisk | 55.39 | 50.51 | 21.30 | 3168.40 | 12675.00 | 2700.20 | 10802.40 | 14842.20 | 11561.80 | 11429.60 | 10780.60 | 2413.60 |
| SSD | 335.10 | 304.67 | 125.67 | 22025.67 | 88103.33 | 18731.33 | 74927.00 | 31834.33 | 26213.33 | 17064.33 | 29884.00 | 8295.67 |
| iSCSI | 70.99 | 71.46 | 54.07 | 5104.00 | 20417.00 | 5349.67 | 21400.00 | 7954.33 | 7421.33 | 6177.00 | 7788.33 | 2473.00 |
-
Sequential I/O
-
Random I/O (FIO)
-
Random I/O (IOZONE)
-
Global Score
Conclusions:
- Clearly
SSDwith USB3.0 to SATA adapter beats the rest in all performance tests. SDCardobtains worst metrics thanFlashDiskandiSCSIFlashDiskandiSCSIget similar performance metrics
The performace obtained using local attached USB3.0 Flash Disk is quite similar to the one obtained using iSCSI with RaspberryPI+SSD Disk as central storage.